You can use Kaltura to record video (or audio) feedback when evaluating Assignment folder submissions. There are two methods for recording video feedback using Kaltura.
Record your webcam only, using Web Recorder (can also be used to record audio only)
Step by Step
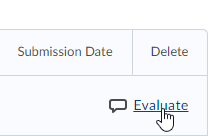
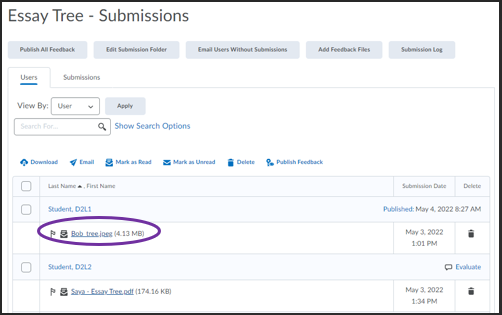
- In Assignments submissions, click Evaluate next to a submission
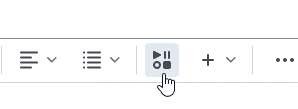
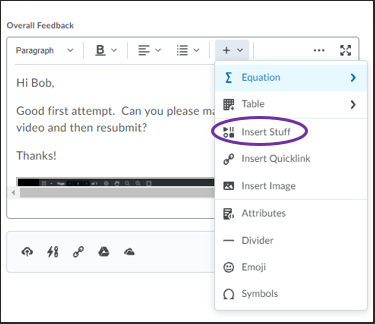
- In the Overall Feedback box, click Insert Stuff (you may need to click the plus sign to show this button)
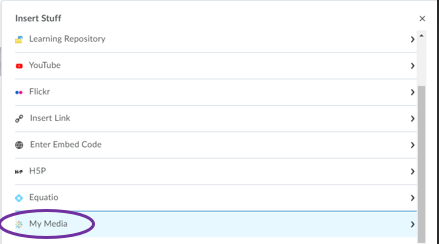
- Choose My Media
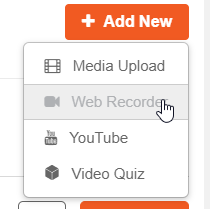
- In the My Media window, click Add New > Web Recorder
- Use the Web Recorder to record your video.
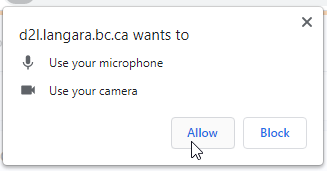
- Grant permission to use your webcam and microphone if your browser requests it
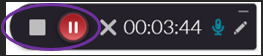
- Click the red circle to start the recording
- Click the square to stop the recording
- Once you’re done recording, you can preview the video, then choose either Record Again, or click the Use This button to proceed
- If you click Use This, you will be asked to give the video a Name, a Description, and Tags and Usage rights (if desired); you can also simply accept the automatically generated title and move on
- Click Save and Embed, then in the next window, click Insert to embed the video in the feedback box, assign a score for the Assignment, and save your evaluation as a Draft or Publish
- Grant permission to use your webcam and microphone if your browser requests it
Turnitin recently introduced an AI tool designed to assist instructors in detecting AI-generated content in student submissions. This tool potentially analyzes writing styles and may detect anomalies that could possibly indicate the use of generative AI. However, while this technology represents a significant step forward, caution is advised in its application. It’s important to recognize that the tool is not infallible and may not catch every instance of AI-generated content. Instructors should not rely on the AI tool to detect AI generated content, but rather, use it as one of several strategies in a comprehensive approach to uphold academic standards and encourage genuine student learning and creativity.
Video Demos
How to Record Video Feedback in Brightspace Assignments (Web Recorder)
See below for a video demo of the video feedback recording process.
Turnitin recently introduced an AI tool designed to assist instructors in detecting AI-generated content in student submissions. This tool potentially analyzes writing styles and may detect anomalies that could possibly indicate the use of generative AI. However, while this technology represents a significant step forward, caution is advised in its application. It’s important to recognize that the tool is not infallible and may not catch every instance of AI-generated content. Instructors should not rely on the AI tool to detect AI generated content, but rather, use it as one of several strategies in a comprehensive approach to uphold academic standards and encourage genuine student learning and creativity.
How to Use the Kaltura Web Recorder
See below for a detailed video demonstration of the Web Recorder (click here to learn more about the Kaltura Web Recorder).
Record Video Feedback with Screen Capture (Kaltura Capture)
Record your screen, your webcam, or a combination of the two, using Kaltura Capture.
Step by Step
- From the list of Assignment Submission Folders, click on the relevant assignment
- Click on a student’s submission
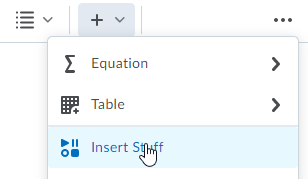
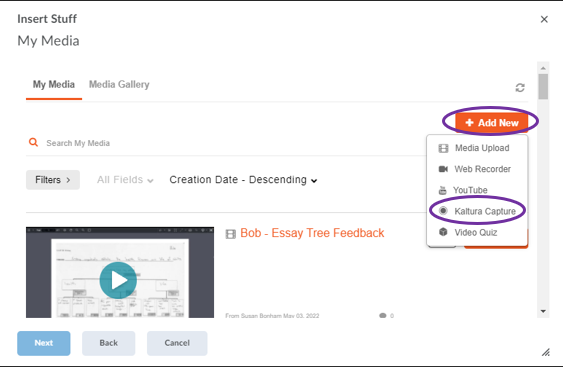
- In the feedback box, click on the + to expand the options, then select Insert Stuff
- Select My Media (it’s at the bottom of the list)
- Click the Add New button and select Kaltura Capture
- If you haven’t previously used Kaltura Capture, you will need to download it and make sure you select the correct version for your device: Windows or Mac
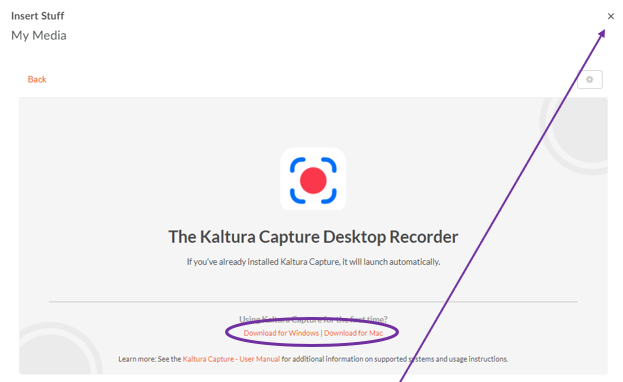
- Once it’s installed and launched, close the above window
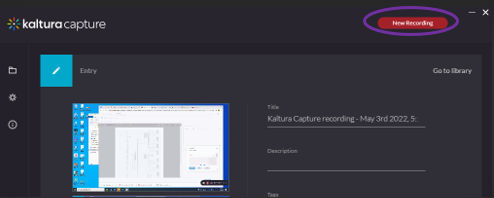
- Before you start recording, take a look at the student’s work and note what you want to include in your recording; how much you pre-mark (if anything) is at your discretion – this can be nothing, a few highlights/underlines, or longer typed-out comments
- When you are ready to start recording, hit the “New Recording” button in the Kaltura Capture window
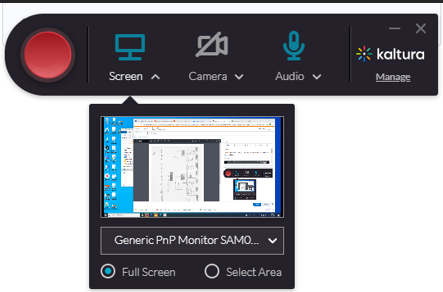
- You will see the recording controls pop-up
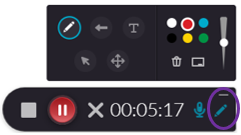
- Select what you want to record (your screen, you, and/or audio); if you want just the computer screen and your voice recorded, you can turn off the camera; if you’d like the students to be able to see you speaking, keep the camera turned on as well
- Select “Full Screen” or “Select Area” (we recommend full screen)
- You will see a 3 second countdown; while the countdown is happening, click on the student’s assignment and expand the feedback window to full screen

- Record your feedback
- To pause the recording, hit the pause button
- To end the recording, hit the square stop button
- Note: if you’re not recording somewhere like a Brightspace Assignment folder where there are annotation tools, you can click the pencil icon and open Notation tools within Kaltura Capture (drawing, arrows, text comments, etc.)
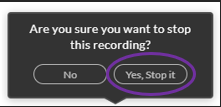
- Once you hit the stop button, you will be asked to confirm
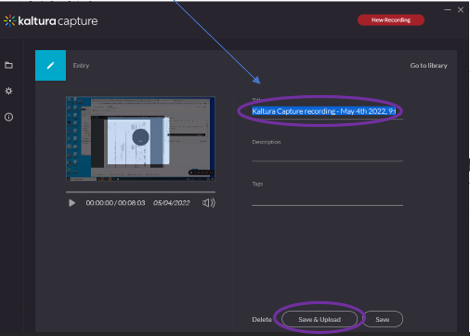
- Give the video a new title so that you’ll be able to identify each student’s feedback in your media list later and then click Save and Upload
- It can take a few minutes for videos to finish uploading and be available in your list of media through My Media
- Continue on to the next student and record their video feedback
- Once you’re finished with the next student, come back to the previous student and access Insert Stuff > My Media again
- Find the student’s feedback video (it should be the top one in your list) and click the Embed button
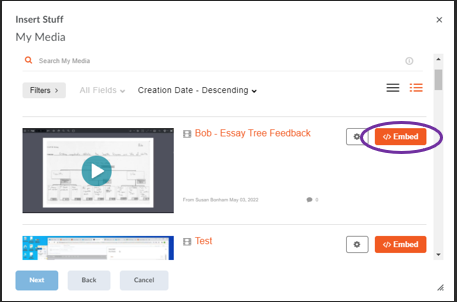
- Then click Insert
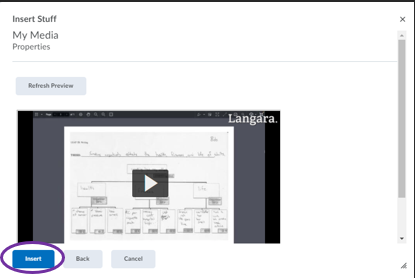
- On the bottom right you will have the option to Publish (which will release the feedback to the student immediately) or Save Draft (to save and release to the whole class at a later time)

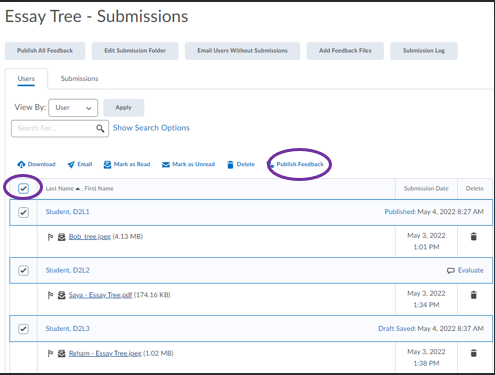
- If you want to do a batch release of your feedback after saving the drafts, you can do so from the Submissions page
- Check the top left box to select all
- Click Publish Feedback
Turnitin recently introduced an AI tool designed to assist instructors in detecting AI-generated content in student submissions. This tool potentially analyzes writing styles and may detect anomalies that could possibly indicate the use of generative AI. However, while this technology represents a significant step forward, caution is advised in its application. It’s important to recognize that the tool is not infallible and may not catch every instance of AI-generated content. Instructors should not rely on the AI tool to detect AI generated content, but rather, use it as one of several strategies in a comprehensive approach to uphold academic standards and encourage genuine student learning and creativity.
Video Demo
See below for a video demo of the video feedback recording process. Follow the same steps for Kaltura Capture, except at the step where you choose from the Add New menu, choose Kaltura Capture.
Turnitin recently introduced an AI tool designed to assist instructors in detecting AI-generated content in student submissions. This tool potentially analyzes writing styles and may detect anomalies that could possibly indicate the use of generative AI. However, while this technology represents a significant step forward, caution is advised in its application. It’s important to recognize that the tool is not infallible and may not catch every instance of AI-generated content. Instructors should not rely on the AI tool to detect AI generated content, but rather, use it as one of several strategies in a comprehensive approach to uphold academic standards and encourage genuine student learning and creativity.
