The Content tool is your central Table of Contents tool for the course. Learn how to add and manage modules and topics, and how to upload files.
Add a Module
You must create a module before you can add topics. You can create submodules (modules within existing modules) to establish a deeper hierarchy.
- On the navbar, click Content.
- In the Table of Contents panel, in the Add a module field, enter the name of your new module and then press Enter.
- To add a submodule, click into the module. In the Add a sub-module field, enter the name of your new sub-module and then press Enter.
Add a Topic
- On the navbar, click Content.
- In the Table of Contents panel, click on the module in which you want to create a new topic.
- Create a new item or add an Existing Activity
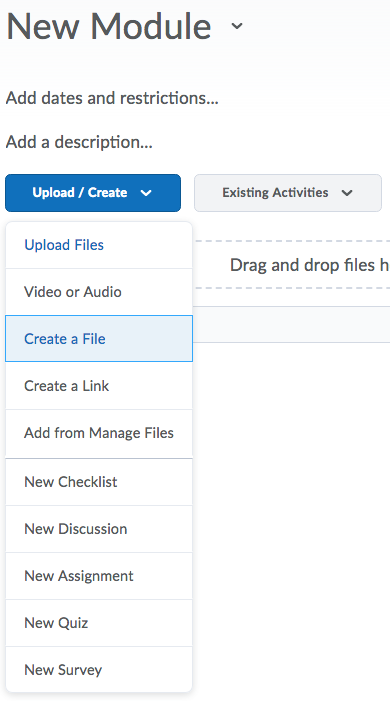
- To add a new item, click the Add New dropdown menu and do one of the following:
- To add files from your computer, click Upload Files.
- To add a video or audio topic, Video or Audio is not recommended; use Kaltura MediaSpace instead
- To add a new file, click Create a File.
- To add a link, click Create a Link (set to “open as an external resource” to prevent any unexpected security conflicts)
- To add files already uploaded to your Manage Files, click Add from Manage Files
- To add files from Brightspace Learning Repository, click Add Object from LOR.
- To add a new assignment, click New Assignment.
- To add a new checklist, click New Checklist.
- To add a new discussion topic, click New Discussion.
- To add a new quiz, click New Quiz.
- To add a new survey, click New Survey.
- To add an activity already in the course, click the Existing Activities dropdown menu
- Choose the type of existing activity you would like to add to Content (Assignments, Quizzes, etc.)
- To add a new item, click the Add New dropdown menu and do one of the following:
- Follow the prompts on the screen to modify your new topic.
Back to top of pageNote: To enhance the security of content files that execute scripts to create extra-rich HTML experiences (such as objects that can execute JavaScript), there is a sandboxing feature that creates a secure iFrame around the HTML file. This allows an HTML file to execute scripts (such as JavaScript) within the iFrame only but will prevent them from executing outside the iframe (against the domain). This enables some flexibility in creating rich content, but reassurance for the security-conscious that end user information remains secure in all situations, such as when learners in specific courses have a special role with permission to create content topics.
Delete a Module, Sub-Module, or Topic
Note: Deleting a module or sub-module deletes all topics within that module or sub-module.
- Go to Course Materials > Content.
- In the Table of Contents panel, click the module, sub-module, or topic you want to delete.

- If you are deleting a module, click Delete Module from the module’s context menu. If you are deleting a topic, click Delete Topic from the topic’s context menu.
- Decide whether you want to remove the module or topic from the Content view only or permanently delete the module or topic from the course (this will also delete all associated objects including discussions, quizzes, etc).

- Click Delete
Create a New File
To create a new course Content file within Brightspace:
- Click on the module’s Upload/Create drop-down menu and select Create a File.

- Type a title for your content topic in the Title field.
- Type your new content in the Brightspace Editor content window.
- When you are done, click Save as Draft to save changes for later or Publish to continue to the next step.
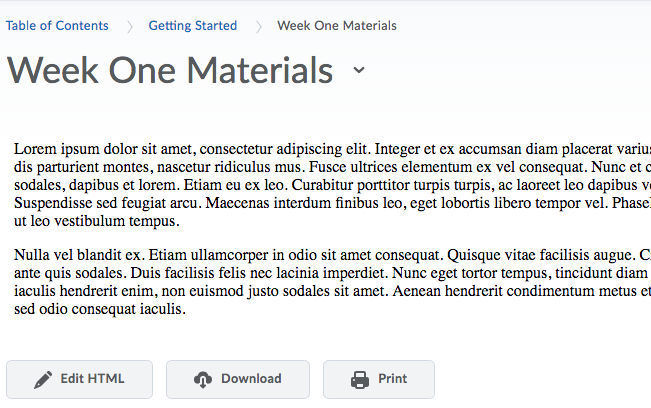
- You will be taken to a preview of your new content. Here you may make further changes by clicking Edit HTML or make changes to the item’s properties such as description, dates and restrictions, or set it as required/not required. Use the breadcrumbs above the topic title or open the Table of Contents tab to navigate back to the contents list

- Use the Brightspace Editor to create your content
Replace a File in Content
If you have an updated version of a file you’re already using in your Brightspace course, you can use the Change File option to replace the old file, instead of separately uploading and re-linking the new file.
Open the dropdown menu next to the content item in Content, and choose Change File.
Back to top of page
