Use the Calendar tool to arrange and visualize your course events in multiple views and enable integration of course content and your Calendar.
You can use iCal to synchronize the Calendar tool to your personal calendars (such as Outlook and Google Calendar, as well as iPhone, and Android).
There are two different types of events in the Calendar tool:
- Availability events
- Availability events indicate the availability and due dates of course objects in the Calendar tool, but do not have to be created using the Calendar tool. Once you are enrolled in a course, all objects for that course that you enable to display in the calendar will be visible. You can set due dates for course objects, edit, and delete availability events directly from the Calendar tool.
- General (Content) events
- These are events you create within the Calendar tool. You can create multiple events for the same course object, and include details of presenters, location, and a seating chart for the event.
Interface overview
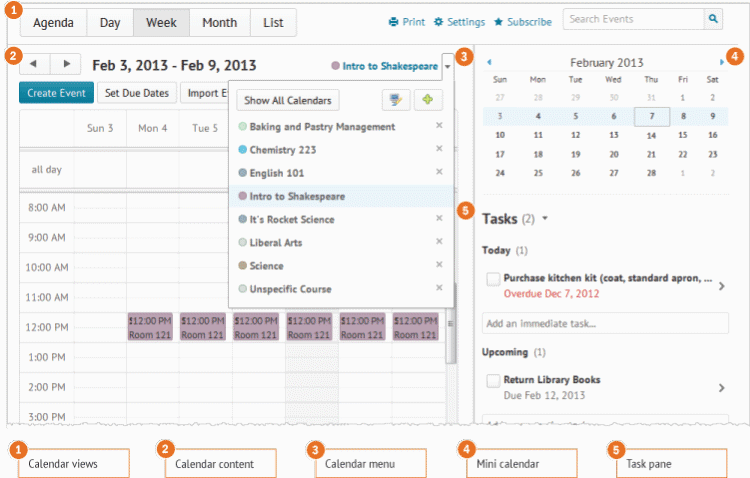
- Use the calendar views area to toggle between different event display layouts. Use the Agenda view to group your course events by Date, Course, or Category – events display in chronological order, and all-day events display at the top of each grouped listing. Use the Day, Week, and Month views to group your events in daily, weekly, or monthly increments. Use the List view to filter your events by Assignments, Checklists, Discussions, Grades, Materials, Modules, Quizzes, and Surveys.
- Use the calendar content area to navigate through your content. Navigation will vary depending on the view you select.
- Use the calendar menu to select multiple calendars to display, change the color scheme associated with individual calendars, and add new calendars.
- Use the mini calendar to navigate quickly to a specific day, week, or month.
- Use the task pane to create, track, and maintain personal tasks.
Calendar user interface
Use the calendar views area to toggle between different display layouts for events in the calendar content area. Use the Agenda view to group your course events by Date, Course, or Category – events display in chronological order, and all-day events display at the top of each grouped listing. Use the Day, Week, and Month views to group your events in daily, weekly, or monthly increments. Use the List view to filter your events by Dropbox, Checklists, Discussions, Grades, Materials, Modules, Quizzes, and Surveys. You can also make bulk changes to dates and visibilty in the List view. Finally, you can Print, adjust your calendar Settings, or browse through your calendars.
Inside the calendar content area, you can create events, set dates, import events, and browse through your calendar.
Use the calendar menu to select multiple calendars to display, change the colour scheme associated with individual calendars, and add new calendars.
Use the mini calendar to navigate quickly to a specific day, week, or month. To view a specific day in detail, click the Day calendar view, then click on the day you wish to view in detail in the mini calendar. Your calendar content will load to the day selected in the mini calendar. To view a specific week in detail, click the Week calendar view, then click on any day in the week you wish to view in detail in the mini calendar. To view a specific month in detail, click the Month calendar view, then click on any day in that month you wish to view in detail in the mini calendar. To browse through the mini calendar’s months, click the arrows at the top to see previous (left) or next (right) months.
Use the task pane to create, track, and maintain personal tasks.
Access the Calendar tool
Go to My Tools > Calendar. If you access the Calendar from within a course, it will filter to show only that course’s dates.
