Generative Artificial Intelligence (Gen AI) Resources

AI generated image of a humanoid robot teacher with a pointer in a classroom, standing in front of a blackboard with equations
Image generated by DALL-E.

Whether you are a superuser or a novice, the number of resources on generative artificial intelligence can be overwhelming. EdTech and TCDC have curated some that we’d like to recommend.

  • How to access Copilot (Microsoft)
    • Interested in trying a generative AI tool or using it in your course? ChatGPT and Copilot (formerly Bing Chat) are currently available in Canada. Langara College students and employees have access to a premium version of Copilot through Microsoft Enterprise and the Edge browser. Microsoft’s FAQs provide information on how to access Copilot through Microsoft Edge. 
  • Practical AI for Instructors and Students (Ethan Mollick/Wharton School, August 2023)
    • If you’re looking for a great primer on AI, this series of five videos is worth the watch. Each video is approximately 10 minutes so the whole series can be viewed in under an hour. Topics include: 1) an introduction to AI; 2) what large language model (LLM) platforms like ChatGPT are and how to start using them; 3) how to prompt AI; 4) how instructors can leverage AI; and 5) how students can use AI.
    • Note: this series references four LLMs: ChatGPT, BingCopilot, Bard, and Claude. Bard and Claude are not yet available in Canada. 
  • AI Primer by Educause
    • This article is a reading (and viewing) list that links to resources that do a deeper dive into generative AI. A good resource for those who know the basics and would like to learn more.  

EdTech and TCDC also regularly offer professional learning opportunities on AI topics. Check the PD Events Calendar for current offerings.

As always, if you’re planning to integrate AI into your course, please be aware that: 

  • There are privacy concerns with AI platforms. We recommend using caution when inputting – or having your students input – private, personal, or sensitive information (e.g. resumes or other identifying data).  
  • For those using assistive technology such as screen readers, some AI platforms are more accessible than others. For more information, please see Accessibility of AI Interfaces by Langara Assistive Technologist, Luke McKnight. 

If you would like more recommendations for AI resources, or any other AI-related support, please contact EdTech or TCDC

Brightspace – Introducing “New Experience” Discussions

As of August 28, 2023, Brightspace Discussions has a new look and feel, as well as some changes to functionality. Below we summarize the most important changes to the new version of Discussions.

Look & Feel

New Experience Discussions has been changed to bring it into alignment with how Assignments and Quizzes in Brightspace look and function. This consistency across tools is meant to make it easier for new users to Brightspace.

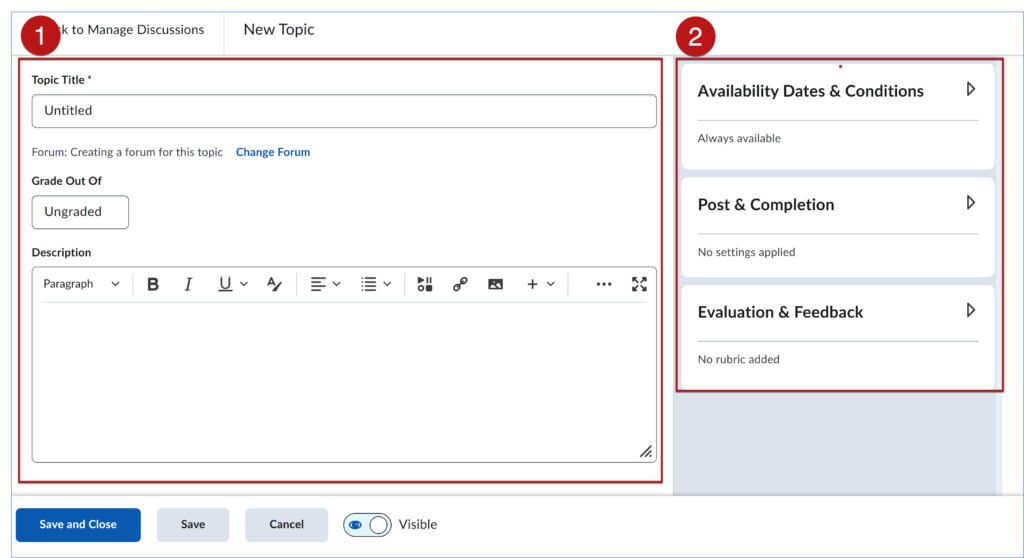
On the create/edit topic page, the main settings (title, grade out of, description, etc.) are on the left side of the page (1), and the more advanced settings (availability dates, restrictions, evaluation settings, etc.) are in the expandable tabs along the right (2).

Functionality

The are several changes to functionality and locations of settings that are significant in New Experience Discussions.

Automatically Create New Forum When Creating New Topic

All discussion topics need to sit within a forum (a container for topics). In New Experience Discussions, creating a new topic will automatically create a new forum of the same name. This eliminates the necessity of creating a forum prior to creating a topic. After the topic is created, instructors will be able to edit the name of the newly created forum or associate the current topic with another existing forum, if wanted.

Post and Completion

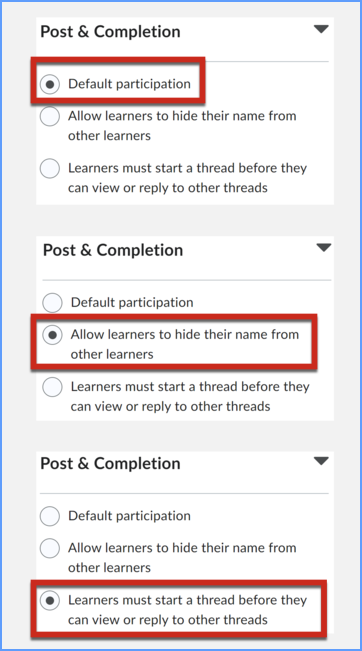
The Post and Completion settings are where you can allow anonymous posts and specify posting requirements. In New Experience discussions, only one of the following three options is possible:

1.     Default participation, which is a new option and has been added so that the default settings are clearly stated. The default settings do NOT allow for anonymous posts or require that users must start a thread.

2.     The option of Allow learners to hide their name from other learners is the setting that allows anonymous posts.

3.     The last option is Learners must start a thread before they can view or reply to other threads.

Manage Restrictions (replaces “Topic Type”)

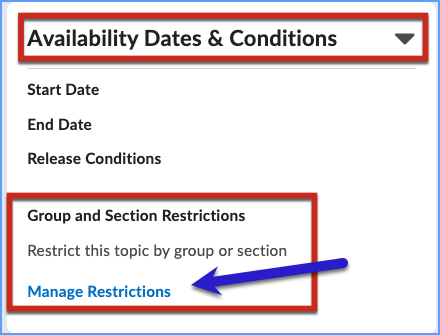
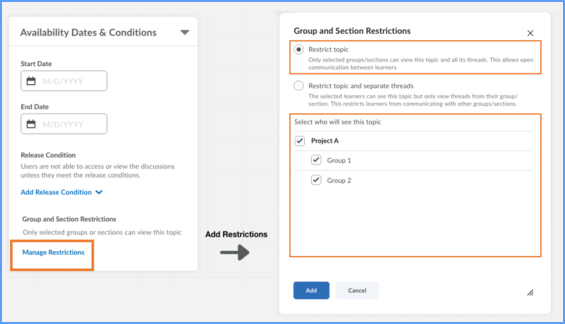
The default for discussions is an “open topic” that all learners in the course can participate in; however, accessing the Manage Restrictions settings allows instructors to restrict discussions, if needed, so that learners can only see and reply to their own group or section’s posts. To set topic restrictions in New Experience, go to the Availability & Conditions settings on the right side of the edit page and look for Manage Restrictions.

Note: In Classic Experience, topic types could not be revised once set; however, in New Experience topic restrictions can now be revised up until a topic has an associated post, providing greater flexibility.

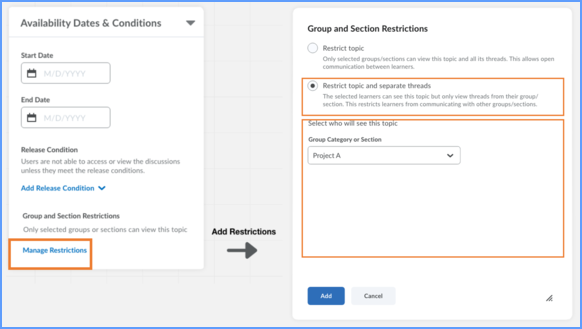
Restricting Topic and Separate Threads

To restrict a topic so that learners can only view threads from their group or section, go to Manage Restrictions and choose the option Restrict topic and separate threads. Then select which group category or section will have their threads separated.

Restrict Topic

To restrict a topic so that only selected groups or sections can view a topic and all threads, choose the radio option Restrict topic in the new Manage Restrictions workflow. Then select which sections/groups can see and participate in this discussion.

Availability Dates

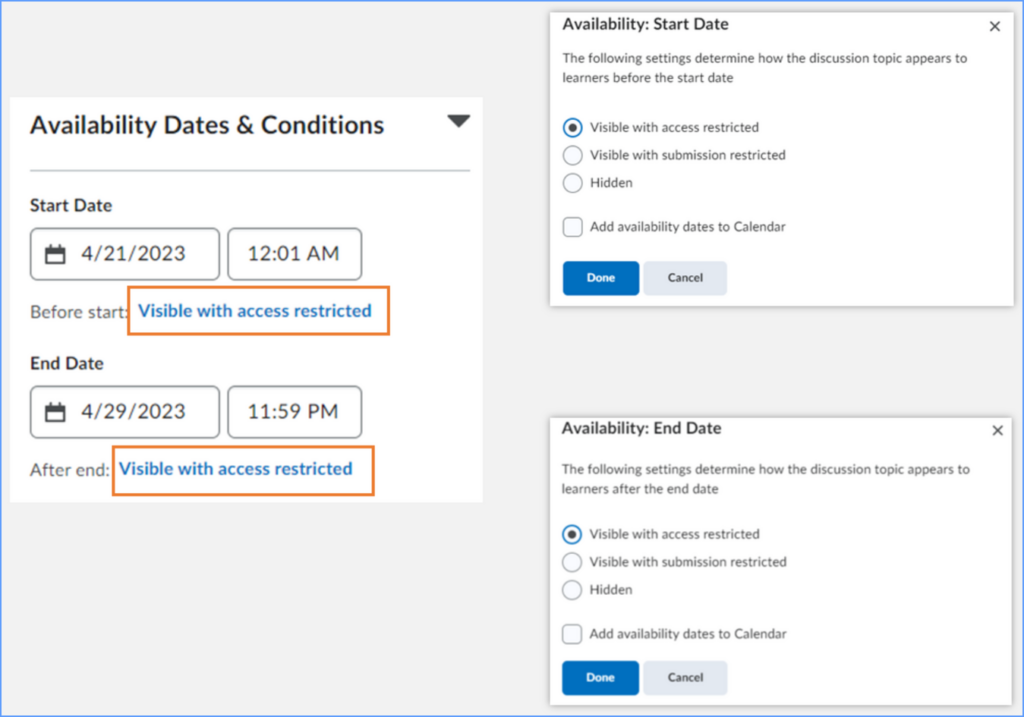
Managing availability dates in Discussions is now similar to Assignments. Once a start or end date is added, additional settings can be adjusted to specify how learners see and access the topic outside of the availability dates.

Questions?

If you need assistance with Brightspace Discussions, please contact EdTech.

Improve Students’ Experience in Brightspace by Adding Dates

Adding dates in Brightspace is a great way to support students’ time management. Dates populate the Work To Do and Calendar widgets so that student can keep track of what’s due and when. Due dates can be added to almost all items, activities, and modules in Brightspace.

Students have two options for seeing upcoming items with a due date — The Work To Do widget and the Calendar widget.

Work To Do is an organizational widget, meaning that it appears on Langara’s Brightspace homepage and provides learners with a summary of assigned learning activities from all their courses that are overdue or have an upcoming due date or end date. Work To Do can also be added to a course homepage to show only due and overdue learning activities from the course.
The Calendar widget can be added to a course homepage and displays content items with due dates and all calendar events.

Start Dates, Dues Dates, End Dates, Access, and Availability

In Brightspace, Start Date, Due Date, and End Date can be set for Assignments, Quizzes, and Content modules and module content items. Start and End dates can also be set for Discussions.

Due Date: Due dates specify when an activity or item is due. When you add a due date to an item, activity, or module, it will automatically be visible in the students’ Calendar.

Note about Due Date: Due dates do not restrict students’ ability to submit materials. If students submit work past the due date, the submission will be identified as late. To restrict access to an item, add a start and/or end date.

Start Date: Start dates specify when students can access items, activities, or modules. Before the start date students can see that an item exists, but they cannot access it. If no start date is set, students will be able to access the item immediately (unless it is hidden).

End Date: End dates specify when students will no longer be able to access an item, activity, or module. After the end date, students will only be able to see the title. If you want students to be able to submit late, do not set an end date.

If you want students to be able to submit late, do not set an end date.

Tip: Since items, activities, or modules with an end date are not accessible and students cannot submit their work after the date, it is important to clearly communicate expectations to students to prevent any misunderstandings.

Special access: It is possible to make exceptions for the end date for specific students with the Special Access option. You can use special access conditions to open content access for certain students outside the specified dates.

Availability: You will sometimes see this header before the option to add a start date and end dates. These start and end dates work the same as listed above.

Note about Availability: Be careful with Availability and Hide from Users. Clicking the Hide From Users checkbox will hide content from users until you uncheck the box. An Availability start date does not override the Hide from Users option. We recommend you only use one.

Display to calendar: Not all dates/times show up automatically on the Brightspace calendar. If a Display to calendar check box appears, select this option to push the dates to the calendar.

Our Recommendations

  • Add due dates to marked activities and assessments, so students can use the Calendar, Work To Do Widget, and Notifications to help manage their time.
  • Add Start and End dates when you want to limit access.
  • Use Due Dates or End Dates, but not both.
  • Use Dates judiciously, marking only those activities and assessments that have a firm due or end date.
  • For content due dates, rather than placing the due date on the content item, create a checklist with a due date for all the content and ungraded work that must be completed for a specific class.

Brightspace Accessibility in Five, 2: Colour

Brightspace plus accessibility logo

Brightspace is an excellent tool to provide equitable, inclusive access to course content, documents, and media.

As you create content, take advantage of Brightspace’s built-in tools and the Accessibility Checker to ensure what you share is accessible. Accessible content is inclusive, democratic, and maximizes learner independence.

In the second of this five-part series, we will learn about accessible colour.

Colour

Ensure you choose accessible colours. Text colour needs to have a contrast ratio of at least 4.5:1 against the background. Additionally, colour should not be used alone to emphasize content or convey meaning.

Accessible colour aids all learners. Primarily, accessible colour is required for people with color blindness. However, smart colour choices benefit all learners in numerous ways:

  • Includes all, regardless of access means.
  • Provides similar appearance regardless of device and user settings.
  • Retains all information if printed in black and white.
  • Reduces eye fatigue, glare from the sun, and allows use of dark/night mode or custom contrast settings.
  • Makes content easier to read for everyone.

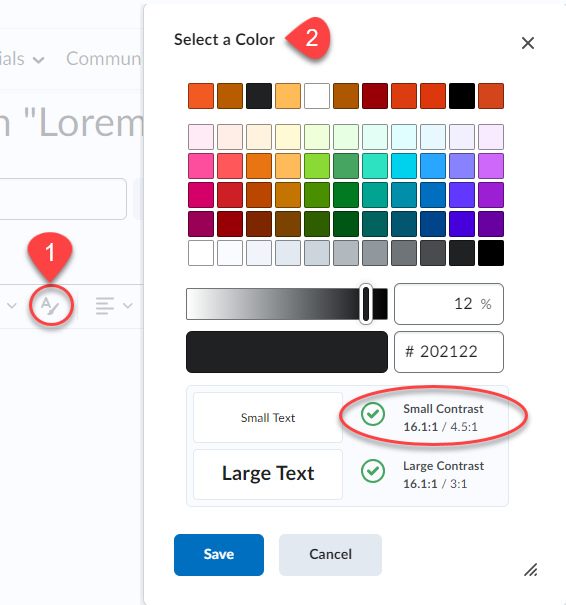
To change font colours in Brightspace

  1. Open the Select Colour tool in the Editor toolbar.
  2. Choose a colour and use the built-in contrast checker to ensure accessible colour choices./li>

A ratio of at least 4.5:1 is required. Remember that regardless of colours used, ensure that colour is not the only method used to highlight or differentiate content.

Learn more about accessible colour in the Langara Accessibility Handbook

Accessibility Checker

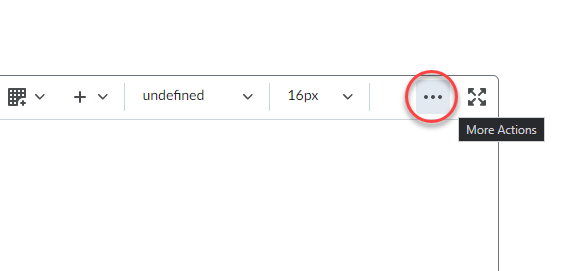
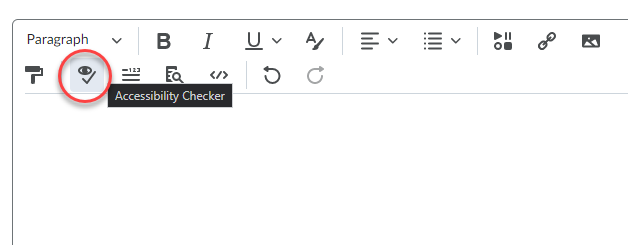
Brightspace includes a built-in accessibility checker. The checker appears on the second row of the editor toolbar.

  1. Select More Actions to reveal the second row of the toolbar
  2. Select Accessibility Checker

The accessibility checker will note colour contrast issues and offer solutions to improve the contrast of your content. The Accessibility Checker cannot determine if colour is used to convey meaning.


Watch for more posts in the Brightspace Accessibility in Five series coming soon, including:

  1. Link Text
  2. Colour
  3. Headings
  4. Tables
  5. Text Equivalents
  6. Bonus: Accessible Uploads

New Text to Speech Tools in Brightspace

EdTech is excited to announce new text to speech tools in Brightspace.

A new toolbar (pictured below) automatically appears on content pages, Quizzes, Assignments, and Discussions.

Screenshot of ReadSpeaker toolbar

The simple, intuitive interface allows for users to hear text read aloud. In Brightspace, simply select Listen and the toolbar instantly creates an audio version of text.

This tool offers students the choice of reading, listening, or both simultaneously. Allowing users choice and customization accounts for learner needs and preferences.

This tool may assist learners with:

  • Increased understanding
  • Improved reading comprehension
  • Information retention and recall
  • Vocabulary
  • Fluency and accuracy
  • Motivation and attitudes toward reading

Available user features include:

  • Customization of colour, style, and size of font
  • Choice of reading voice and speed
  • Synchronous text highlighting
  • Page masking and text-only view
  • Ability to select content to be read aloud
  • No download required
    • Learners can use this tool on campus, at home, on their phone, or on the bus

In addition to Brightspace pages, Word and PDF documents uploaded to Brightspace also have a text to speech reader option.

While a benefit to all learners, this tool is especially important to users that need content to be read aloud. The addition of text to speech is an important step in Langara’s work toward accessibility and universal design for learning.

For more information, read about the toolbar’s features or contact assistivetech@langara.

Using Peer Assessment for Collaborative Learning

Peer Assessment

Peer Assessment PictureThere are several benefits to using peer assessment within your course, one of which is to provide students with a more engaging experience. Opportunities to assess other learners’ work will help students learn to give constructive feedback and gain different perspectives through viewing their peers’ work. There is evidence to show that including students in the assessment process improves their performance. (1) (2) (3)
Research also shows that students can improve their linguistic and communicative skills through peer review. (4) The exposure to a variety of feedback can help students improve their work and can even enhance their understanding of the subject matter. Furthermore, learning to give effective feedback helps develop self-regulated learning, as ‘assessment for learning [shifts] to assessment as learning’ in that it is ‘an active process of cognitive restructuring that occurs when individuals interact with new ideas’ (5).

In addition to the benefits to students, peer assessment can also provide instructors with an efficient way of engaging with a formative assessment framework where the student is given the chance to learn from their initial submission of an assignment.

Options for Peer Assessment within Brightspace:

Within Brightspace, there are several ways that instructors can set up peer assessment activities depending on the nature of the assignment and the needs of the instructor. Here we highlight several use cases.

Peer Assessment Example #1:

The instructor wants to have students assess each other’s group contributions for an assignment within Brightspace.

Using a Fillable PDF, which gives the students a rubric-like experience, a student can rate their peers based on different criteria that has been built into the assessment by the instructor. Students can provide feedback on a rating scale but also can provide more in-depth feedback if needed.

The advantage of using a fillable PDF is that the student can easily download the file and fill in the blanks. The student can reflect on the built-in criteria and the entire process should be quick and easy. The scores are calculated, and the instructor can interpret the results once the student has uploaded the PDF into the assignment folder.

A few disadvantages of this method are that the instructor will have to download each fillable PDF and manually enter a grade if marks are captured for peer assessment. The other issue is the level of student digital literacy. Directions on downloading the fillable PDF to the student’s desktop and not using the PDF within the browser is a key step for this process to work. Not all students are aware that fillable PDFs cannot be used successfully in-browser.

Peer Assessment Example #2:

Students are working towards a final paper that is worth 15% of their overall mark. Before they submit the final version to the instructor, they will have the opportunity to evaluate another student’s draft and their own work using a rubric. If time is limited for this activity, learners can be invited to submit just the first paragraph of the paper, rather than the whole draft.

Through peer assessment, learners can often receive feedback more quickly than if they had to wait for the marker or instructor to review the class’s work.Aropa

Students upload their work to Brightspace Assignments where they are given a link to Aropä, a third-party open software which pairs students so they can assess each other’s work using a built-in rubric. Assessment can be anonymous, and the instructor can restrict feedback to students who have already submitted one review. Self-assessment can be required.

The advantages of Aropä is that it is free and gives instructors the ability to modify rubrics to suit one’s objectives. The disadvantage of this software is that it requires more time to set up. Rubrics provide only basic options: radio buttons or comment boxes. Instructors should be aware of privacy issues with Aropa and only upload first names of their students but avoid uploading student numbers.

Peer Assessment Activity #3

Students complete group presentations after which the class assesses each group’s performance, including their own group’s presentation, using a predetermined marking scheme.

The activity of assessing presentations encourages engagement with the work, versus passive observation, since students will be required to give feedback, encouraging deeper learning and enhancing retention.

The advantages of using an H5P Documentation tool are that H5P can be created directly within Brightspace. It looks nice and is versatile. The disadvantage is that learners will have to export their feedback and then upload it into Brightspace. This two-step process requires some digital literacy skills.

Sample H5P Documentation Tool

Peer Assessment Activity #4:

This peer assessment activity is more about checking completion. Instructor needs to ensure accountability with group work.

Students are given an MS Form with some basic criteria by which to rate themselves and their peers in terms of attendance to meetings, work on the final product / assignment and collaboration. Students will use a point rating scale and need to justify their evaluation by providing a concrete example.

Similar to Example #1, students can complete a form using a Fillable PDF or another software such as Jotform or MS Forms to reflect and assess their own work as well as the work of their teammates. Jotform allows for more complex form building and will calculate totals for each student while MS Forms will not calculate but will allow you to get a sense of how students are doing overall with a basic rating on each criteria. (Focus on qualitative assessment)

Sample MS Form

Sample Jotform

A Note on Third Party Peer Review Software:

There are many different software available for peer assessment. Edtech is currently testing out several different ones and hopes to pilot them in the spring or summer semester. Currently, the only one that we are recommending (because it’s 0-cost) is Aropa. Aropa does a great job of providing several options for peer assessment, including self-assessment, privacy options for students, anonymous assessment, etc. It does not integrate completely with Brightspace so that is one disadvantage over some of the paid peer assessment programs currently available. Programs such as peerScholar, Feedback Fruits and Peerceptive have the capability to integrate into the Gradebook, thereby making it very easy to provide marks for the feedback that your students provide for one another.

For more information on any of the above tools, please contact edtech@langara.ca

References

  1. Wu, Wenyan, et al. “Evaluating Peer Feedback as a Reliable and Valid Complementary Aid to Teacher Feedback in EFL Writing Classrooms: A Feedback Giver Perspective.” Studies in Educational Evaluation, vol. 73, June 2022. EBSCOhost, https://doi.org/10.1016/j.stueduc.2022.101140.
  2. Double, Kit S., et al. “The Impact of Peer Assessment on Academic Performance: A Meta-Analysis of Control Group Studies.” Educational Psychology Review, vol. 32, no. 2, June 2020, pp. 481–509. EBSCOhost, https://doi.org/10.1007/s10648-019-09510-3.
  3. Planas-Lladó, A. et al., 2018. Using peer assessment to evaluate teamwork from a multidisciplinary perspective. Assessment & Evaluation in Higher Education, 43(1), pp.14–30.
  4. de Brusa, M. F. P., & Harutyunyan, L. (2019). Peer Review: A Tool to Enhance the Quality of Academic Written Productions. English Language Teaching, 12(5), 30-39.
  5. Western and Northern Canadian Protocol for Collaboration in Education, 2006 p.41

PebblePad Brief: Feedback Options

Langara’s pilot of the ePortfolio learning platform, PebblePad, is now in its second year. This is the second in a series highlighting some of the platform’s features. Whether you’re already using PebblePad or considering using it at some point in the future, our hope is that the PebblePad Brief series extends your understanding of the platform’s capabilities.
This month’s “Brief” is going to focus on the variety of feedback options available within PebblePad, and how they can benefit students and instructors. Whether you’re looking for a tool to give formative or summative feedback, PebblePad has multiple options.

Feedback in Brightspace Versus PebblePad:

PebblePad functions differently than Brightspace when it comes to assignments. In Brightspace, students usually submit a file by a due date and the instructor has no way of giving formative feedback on the developing assignment unless they ask students to submit a draft of their work. PebblePad, on the other hand, doesn’t work with file submissions but with shared links. If an assignment is set up for auto-submission, the instructor is able to see the students’ work in real time as soon as they start it. This enables instructors to give formative feedback any time prior to a due date, as well as summative assessment after a due date. Further, unlike Brightspace, students have access to the feedback after their course finishes and even after they graduate.

Feedback Options:

Simple Comments:

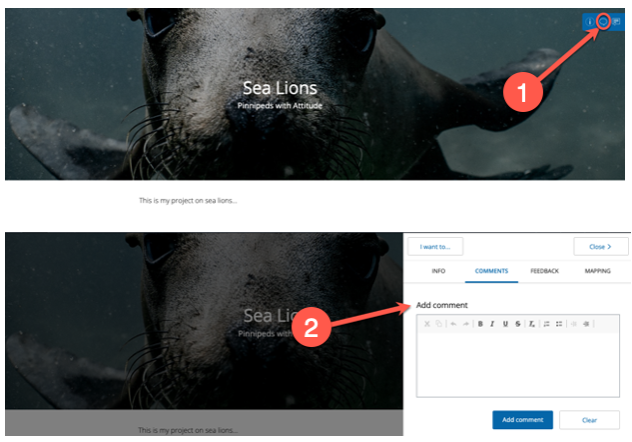
  • The simplest way to give feedback in PebblePad is through general comments. To use the comment feature, a student shares a link with someone else. When that person clicks on the link, there’s a comment icon on to the top-right which can be used to by instructors, mentors, or peers to provide feedback. The student can reply to the comments so feedback is potentially dialogic.

Adding Comments Via the Comment Icon


Feedback Comments:

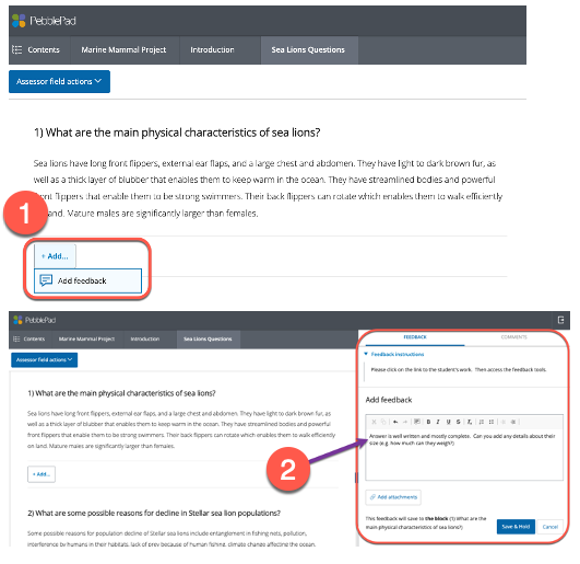
  • By using the tools in the formal assessment part of the platform called ATLAS, there are extended options. Here we can to a specific answer, a page, or the entire assignment. If an instructor will be using the same comments for many students, feedback statements can be created that will be available when marking. Any comments added via ATLAS have the advantage that they are only visible to the student and won’t be seen by anyone they share their work with. When assessing in ATLAS, instructors have the option to release feedback as it’s added, or hold all feedback for later release so that the whole class receives it at the same time.

Adding Block Feedback Comments via ATLAS

 Assessor Fields:

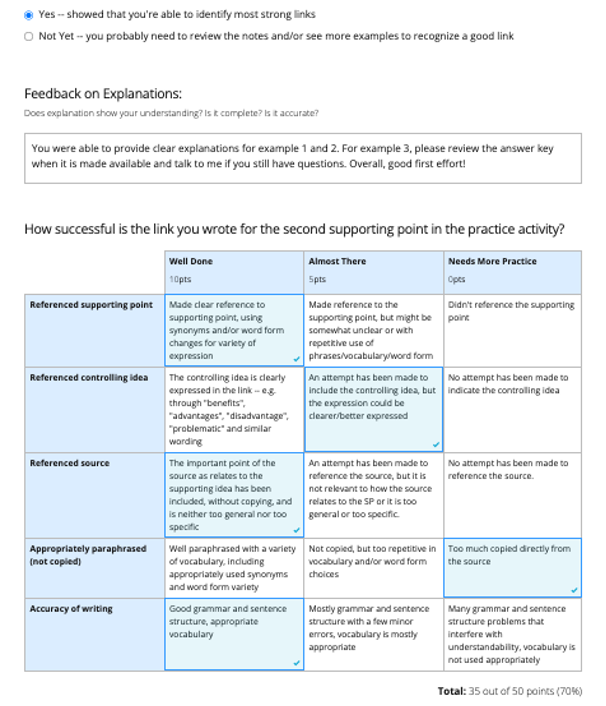
  • When creating scaffolded learning activities for students, assessor fields can be inserted right into body of the assignment. It’s possible to assign “blocks” or sections to either the students or the instructor to complete. Instructors can be assigned text fields, drop-downs, radio buttons, checkboxes, and rubrics that only they can complete (the student will see them but not be able to complete them). These fields are easy for instructors to find when they’re assessing, and easy for the student to see when they’re looking for feedback. This type of feedback will always be visible so is generally used for activities to develop knowledge or skills, rather than assignments that might be used as a showcase in future.

Adding Feedback via Assessor Fields

Feedback Templates:

  • These are very similar to rubrics in Brightspace, and can be created and used to assess students’ work in ATLAS. They can include any or all of: clickable rubric components, comment fields, radio buttons, drop-downs, and checkboxes. Because this feedback will only be visible to the student, this is a better option to use with assignments that the student might want to use as a showcase to show to others.

Providing Feedback via Feedback Templates

Grades:

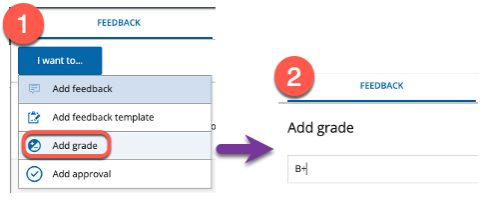
  • Assignments can also be graded in ATLAS. Grading is flexible as instructors can enter percentages, letter grades, or even pass/fail wording such as “meets expectations/does not meet expectations”. Although PebblePad is not currently integrated with Brightspace, it is possible to get a CSV file of all grades and easily transfer them to a gradebook.

    Adding Grades

Feedback Longevity:

  • We all know that it takes time and effort to provide meaningful feedback to learners. One of the advantages of using PebblePad is that the students have access to feedback long after the course ends and even after they graduate as students can get an alumni account. This will help them make meaningful connections between assignments, between courses, and between studies and career. Feedback can be fed forward.

If you have questions about PebblePad or any other learning technology that EdTech supports, we can be contacted at edtech@langara.ca

Spring 2022 Ed Tech Book Club

Spring, 2022 Book Club

The Spring, 2022 Book Club selection

This spring, the EdTech Book Club will be reading Should robots replace teachers? AI and the Future of Education by Neil Selwyn (2019).
The author shares his research on AI and robotics in education. By exploring how AI is being used to develop teacher-bots, ‘intelligent tutors,’ and pedagogical agents, among other EdTech tools, he shines a light on issues around the politics and ethics of automated teaching. He clarifies what AI can do to benefit education and what it cannot do. He also warns instructors about the dangers of AI in education and advocates for critical discussions among teachers, learners, AI developers, and communities.

We invite you to join us in weekly discussions inspired by this book and other topics related to Educational Technology.

Mode: Online through Zoom with the potential for an in-person option pending COVID-19 prevention protocols.

Time / Location: Tuesdays, 4:30 – 5:30 pm

Duration: 6 weeks

Dates: February 1st – March 15th (No gathering on Tuesday, Feb 22nd during Spring Break)

The first four (4) registrants will receive a free copy of the book.

Sign Up Here

For a lighthearted song to get you in the mood for reading this book, we will leave you with a song by the Flight of the Conchords which describes the distant future: Video on YouTube

Fall, 2020 Book Club

Last fall, the EdTech Book Club read The Manifesto for Teaching Online by Bayne, et al. (2020). Participants met weekly, either via Zoom and/or in-person, to discuss the book and create our very own Manifesto. Here are some of the highlights according to a few book clubbers:

“I really enjoyed the mix of people from other educational institutions taking part in the conversation, I enjoyed that different participants had the opportunity to facilitate, bringing in the author to take part in the conversation was a great idea! The book content was interesting, engaging and allowed for a broad conversation on a range of topics.”

“Being able to connect with colleagues, and learn about tools and techniques through them, such as H5P. Also, tea and chocolate.”

“Having Jen [one of the authors of The Manifesto] come in for a meeting was really great […]. It was great to hear how things are done at other institutions. “

“Having it open to colleagues from other institutions was very helpful, so keep advertising it to the public. Being hybrid was also good, because it allows more people to participate and allows for an “after-party” session, for less structured discussion.”

After 9 weeks of rich discussions, we created the following Manifesto:


Screencasting: Engaging learners with multimodalities

Screencasting involves the use of software to record the screen of your computer (or mobile device) while you narrate over the recording. It is an effective way to offer multiple representations of information (images, text, video, audio etc.) in order to widen access to learning. Making a screencast is relatively easy and requires technology that most of us have access to.  The completed file can easily be shared via learning platforms such as Kaltura, Brightspace or iWeb. They are great fun to create and you can invest as much or as little time as you want to produce either a professional quality screencast or one that may not be quite as slick but is perfectly acceptable for teaching and learning.

Ed Tech can support your efforts whether you are a first-timer or seasoned screencaster. We run regular workshops (the next one is on Tuesday May 30th – sign up here), we have produced a Little Guide to Screencasting and we can provide you with one-to-one support and advice on the best software and microphones to use, the planning process and how to share your screencast with your students.
Little Guide to ScreencastingSome great resources that cover screencasting in education are available, my personal favourite being Kathy Schrock’s Guide to Screencasting and Screen Recording in the Classroom.

Screencasting is a great way to make learning more fun, engaging and accessible. Whether you want to create a mini-lecture, demonstrate how a piece of software works or give assignment feedback, you are helping to ensure your students learn from a variety of  presentation methods which will be beneficial to their learning. And why not tap into your students’ creativity by getting them to create a screencast as part of their coursework?

Back(pack) to the Future: the renaissance of ePortfolios

Tracy Penny Light at the BC Open Badges Forum

ePortfolios are one of those technologies whose popularity in post-secondary education seems to come in waves, much like the interest in virtual worlds or classroom response systems (‘clickers’). Fifteen years ago when I was a Sociology lecturer at a further education college in the UK my colleagues were constantly clamouring for an easy to use and student-centred system for capturing progression in learning. In the mid-2000s there was again a peak in interest as dedicated ePortfolio solutions such as the open-source Mahara project began to emerge. And now in 2017 we have academic associations, conferences and journals dedicated to what JISC define as “a product created by learners , a collection of digital artefacts articulating learning (both formal and informal), experiences and achievements” (JISC, 2012). But why the renaissance? Why now?

I would argue there are three main reasons for the current popularity of ePortfolios in post-secondary education:

  1. Declining influence of the LMS. Back in 2009 it was controversial to speak of the demise of the LMS/VLE. Now there is far greater awareness of the limitations of systems which essentially put control of learning into the hands of instructors, learning technologists and system administrators. The ePortfolio model turns the LMS on its head. It empowers students, encourages creativity and self-reflection and, importantly, gives them an online space that they control. To borrow an idea from the Open Badges movement ePortfolios represent a ‘digital backpack’ that students can take with them throughout their learning journey, into employment and beyond.
  2. More and easier solutions. From the late 1990s until the mid-2000s ePortfolio solutions were at best clunky and at worst inaccessible and only for the technologically adept. Now there are many alternatives ranging from dedicated ePortfolio platforms such as Pebble Pad, Pathbrite and MyeFolio to website builders like Wix, Weebly and even Google Sites. Both Capilano University and UBC use a multi-site WordPress installation for student ePortfolios which allows for both customization and ease of use in a familiar web publishing environment. Under the leadership of Meg Goodine and Lesley McCannell KPU are using Mahara in subject areas such as Nursing and Health, and Trades and Technology. Mahara has an active and responsive developer community who are committed to creating a flexible, accessible yet powerful ePortfolio platform for education.
  3. Employability and Digital Identity. In an increasingly competitive global market for jobs, employers are looking for reflective and critical students who demonstrate “soft skills” in addition to subject-specific knowledge and competencies. Students require a vehicle to communicate their talents to employers but also to show them they can create and manage a professional online digital identity. Tracy Penny Light from Thompson Rivers University has recently argued that even when students are initially resistant to creating an ePortfolio they eventually come to value the thought process involved in building it which often gives them an advantage in interview situations (BC Open Badges Forum 2017).

If ePortfolios in the age of the read/write web are helping to turn students from passive consumers of knowledge into active producers of their own learning, this is not to down-play the significant challenges ahead. Two in particular seem worthy of mention. Firstly we must guard against ePortfolios becoming nothing more than a checklist or dumping ground for skills and competencies. If that is all ePortfolios are then, in the words of a colleague, “my students already have access to an ePortfolio: it’s called LinkedIn.” Secondly, if the metaphor of a digital backpack that students take with them from K-12 through college, university and into employment is to work then ePortfolios need to be truly portable, user-owned and interoperable with other learning systems. Imagine the frustration of spending many hours creating a beautiful digital portfolio showcasing one’s skills and talents only to be told that a college or university uses a different, incompatible system?

References and Resources: