Blog

New – Zoom Lifecycle Policy

Decorative

What is it?

Beginning in May, 2023, Zoom users will be required to have a minimum version of Zoom in order to join meetings.

Why update Zoom?

Updating Zoom will ensure users have access to the latest safety, functionality, and compatibility features. If users run an end-of-life version of Zoom, they will be prompted to update it or join the meeting from the Web browser.

How often do I have to update Zoom?

This update will be required every three months.

Please note: Langara IT’s version of Zoom will always be an older version than the Zoom version downloaded through personal computers and devices.

How do I update Zoom?

On Langara-Issued Computers and Devices

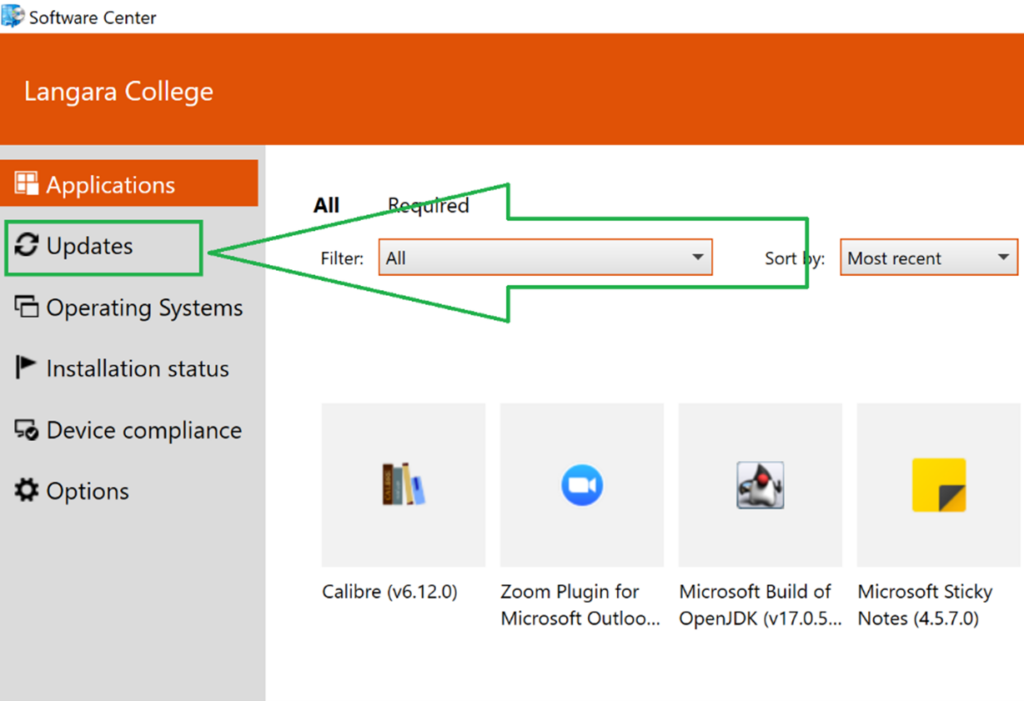
On a PC, log in to your computer and click the Start button .

Type “Software Center.” Select Updates to check for updates and download and install them if they are available.


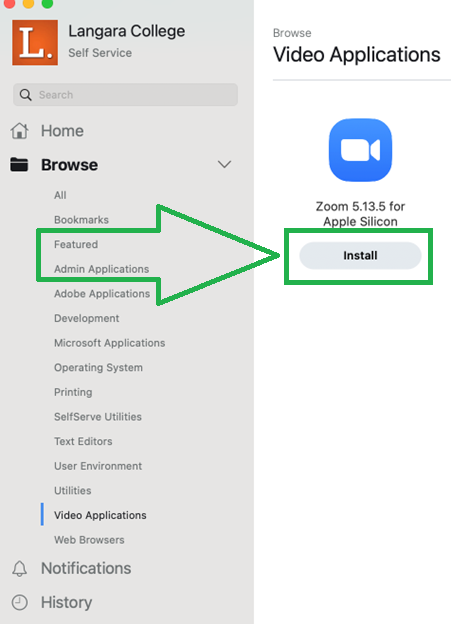
On a Mac, open the Langara College Self Service application from your Applications folder or search for “Self Service.”

Find the Zoom app by typing “Zoom” in the browser or scrolling to the end of the list. Click Install to upgrade Zoom.

On Personal Computers and Devices

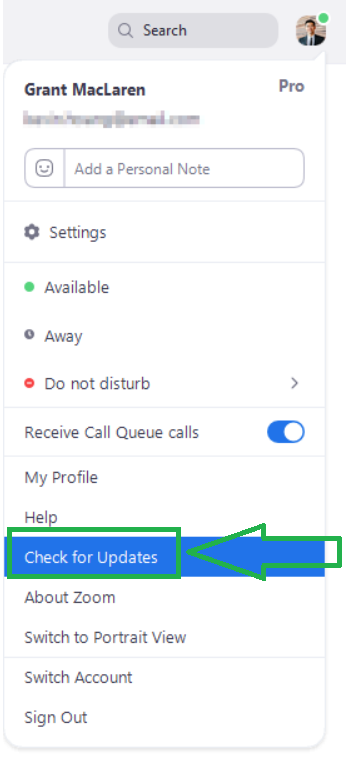
To update Zoom on your personal computer, or for devices on which you downloaded Zoom from the Web, open the Zoom Desktop Client or mobile app. Sign in and click on your profile picture, then select Check for Updates. When an update is available, Zoom will download and install the new version.

For more information, please refer to the Zoom Software Quarterly Lifecycle Policy.

ETUG Spring Workshop 2023

The Educational Technology Users Group (ETUG) is a community of BC post-secondary educators focused on the ways in which learning and teaching can be enhanced through technology. ETUG’s mission is to support and nurture a vibrant, innovative, evolving, and supportive community that thrives with the collegial sharing of ideas, resources, and ongoing professional development through face-to-face workshops and online activities.

Spring Workshop

This two-day online and in-person workshop will showcase how instructors, education developers, and education technologists are approaching design. For example, we’ll explore how digital literacy, inclusive technology, and AI could be “baked” into courses and how instructors are supported in making design decisions around technology. We’ll also consider the ongoing communication and capacity-building at institutions around digital literacy, accessibility, and AI, such as how teaching and learning centres and libraries get the word out to instructors and students about new approaches and resources.

Join ETUG online in Zoom or in-person at Kwantlen Polytechnic University Lansdowne Road Campus in Richmond, B.C. for this 2-day hybrid event, sponsored by BCcampus.

  • Day 1: June 1, 2023: 9:00 AM to 4:30 PM Pacific Time
  • Day 2: June 2, 2023: 9:00 AM to 4:00 PM Pacific Time

Workshop Rates: 2-day Registration Only

  • Early Bird In-Person: $175 CAD + 5% GST (ends April 29 at 11:59 PM)
  • Regular Rate In-Person: $200 CAD + 5% GST
  • Online: $150 CAD + 5% GST
  • Students: Free

Childcare

Attending an event sometimes means choosing professional development at the expense of spending time with family, but for large, multi-day events hosted by BCcampus, participants do not have to choose one over the other. Please let us know when you register if you will require childcare. You can read more about our childcare program and provider here Childcare Program Information

In order to secure nannies in time, our childcare registration cut-off date is May 15, 2023. 

Registration

Register online to attend the ETUG Spring Workshop


Brightspace Accessibility in Five, 3: Headings

Brightspace plus accessibility logo
Brightspace is an excellent tool to provide equitable, inclusive access to course content, documents, and media.

As you create content, take advantage of Brightspace’s built-in tools and the Accessibility Checker to ensure what you share is accessible. Accessible content is inclusive, democratic, and maximizes learner independence.

In the third of this five-part series, we will learn about headings.

Headings

Headings are an important part of documents and web pages. Headings create organizational flow, build connections between key concepts, and break up large blocks of text to increase readability. Screen reader users rely on headings to navigate the web and longer documents. For anything beyond a few paragraphs, headings are essential for screen reader users.

Use headings in a sequential, nested hierarchy. For example, use a Heading 1 for the title or topic. Use Heading 2 for major divisions of content and ideas. Use Heading 3 for subtopics of the major divisions. Brightspace supports 4 heading levels.

You can have multiple headings of the same level, but do not skip a heading level. A Heading 2 can follow a heading 1 or a heading 2. A heading 3 can follow a heading 2 or heading 3 and so on.

Headings benefit all readers. Headings:

• Include all, regardless of access means.
• Provide context and explains relationships between ideas.
• Emphasizes key concepts.
• Provides ‘bookmarks’ for natural breaks.
• Allows for easy review and location of content.

Creating Headings in Brightspace

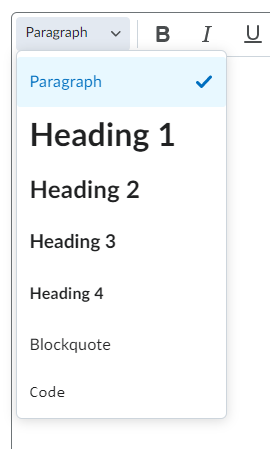
Select the Format tool in the top left of the editor toolbar and choose the appropriate heading level.

For more information about headings and document structure, consult the Langara Accessibility Handbook.

Accessibility Checker

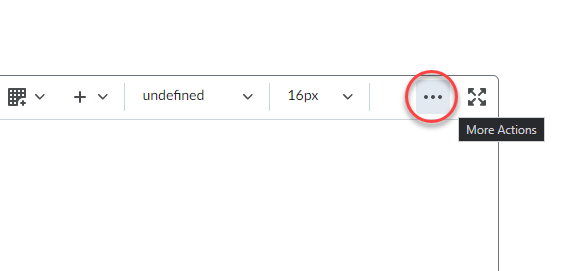
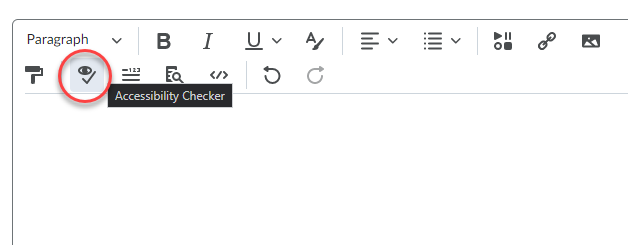
Brightspace includes a built-in accessibility checker. The checker appears on the second row of the editor toolbar.

  1. Select More Actions to reveal the second row of the toolbar
  2. Select Accessibility Checker

The accessibility checker will highlight many accessibility issues and offer solutions to correct them. For headings, the Brightspace accessibility checker will flag text that could be a heading due to formatting (bolded larger font on a line by itself for example) but is not properly coded as a heading. The accessibility checker also flags headings that are out of sequential order (for example a heading level 3 with no preceding heading level 2).


Watch for more posts in the Brightspace Accessibility in Five series coming soon, including:

  1. Link Text
  2. Colour
  3. Headings
  4. Tables
  5. Text Equivalents
  6. Bonus: Accessible Uploads

Improve Students’ Experience in Brightspace by Adding Dates

Adding dates in Brightspace is a great way to support students’ time management. Dates populate the Work To Do and Calendar widgets so that student can keep track of what’s due and when. Due dates can be added to almost all items, activities, and modules in Brightspace.

Students have two options for seeing upcoming items with a due date — The Work To Do widget and the Calendar widget.
Work To Do is an organizational widget, meaning that it appears on Langara’s Brightspace homepage and provides learners with a summary of assigned learning activities from all their courses that are overdue or have an upcoming due date or end date. Work To Do can also be added to a course homepage to show only due and overdue learning activities from the course.

The Calendar widget can be added to a course homepage and displays content items with due dates and all calendar events.

Start Dates, Dues Dates, End Dates, Access, and Availability

In Brightspace, Start Date, Due Date, and End Date can be set for Assignments, Quizzes, and Content modules and module content items. Start and End dates can also be set for Discussions.

Due Date: Due dates specify when an activity or item is due. When you add a due date to an item, activity, or module, it will automatically be visible in the students’ Calendar.

Note about Due Date: Due dates do not restrict students’ ability to submit materials. If students submit work past the due date, the submission will be identified as late. To restrict access to an item, add a start and/or end date.

Start Date: Start dates specify when students can access items, activities, or modules. Before the start date students can see that an item exists, but they cannot access it. If no start date is set, students will be able to access the item immediately (unless it is hidden).

End Date: End dates specify when students will no longer be able to access an item, activity, or module. After the end date, students will only be able to see the title. If you want students to be able to submit late, do not set an end date.

If you want students to be able to submit late, do not set an end date.

Tip: Since items, activities, or modules with an end date are not accessible and students cannot submit their work after the date, it is important to clearly communicate expectations to students to prevent any misunderstandings.

Special access: It is possible to make exceptions for the end date for specific students with the Special Access option. You can use special access conditions to open content access for certain students outside the specified dates.

Availability: You will sometimes see this header before the option to add a start date and end dates. These start and end dates work the same as listed above.

Note about Availability: Be careful with Availability and Hide from Users. Clicking the Hide From Users checkbox will hide content from users until you uncheck the box. An Availability start date does not override the Hide from Users option. We recommend you only use one.

Display to calendar: Not all dates/times show up automatically on the Brightspace calendar. If a Display to calendar check box appears, select this option to push the dates to the calendar.

Our Recommendations

  • Add due dates to marked activities and assessments, so students can use the Calendar, Work To Do Widget, and Notifications to help manage their time.
  • Add Start and End dates when you want to limit access.
  • Use Due Dates or End Dates, but not both.
  • Use Dates judiciously, marking only those activities and assessments that have a firm due or end date.
  • For content due dates, rather than placing the due date on the content item, create a checklist with a due date for all the content and ungraded work that must be completed for a specific class.

Brightspace Accessibility in Five, 2: Colour

Brightspace plus accessibility logo

Brightspace is an excellent tool to provide equitable, inclusive access to course content, documents, and media.

As you create content, take advantage of Brightspace’s built-in tools and the Accessibility Checker to ensure what you share is accessible. Accessible content is inclusive, democratic, and maximizes learner independence.

In the second of this five-part series, we will learn about accessible colour.

Colour

Ensure you choose accessible colours. Text colour needs to have a contrast ratio of at least 4.5:1 against the background. Additionally, colour should not be used alone to emphasize content or convey meaning.

Accessible colour aids all learners. Primarily, accessible colour is required for people with color blindness. However, smart colour choices benefit all learners in numerous ways:

  • Includes all, regardless of access means.
  • Provides similar appearance regardless of device and user settings.
  • Retains all information if printed in black and white.
  • Reduces eye fatigue, glare from the sun, and allows use of dark/night mode or custom contrast settings.
  • Makes content easier to read for everyone.

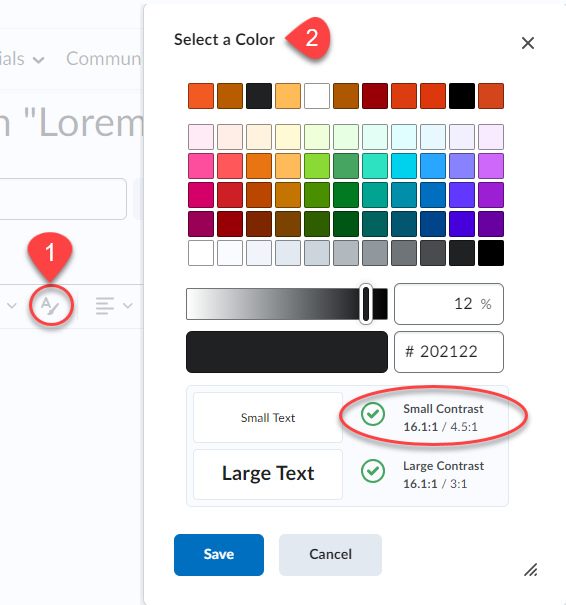
To change font colours in Brightspace

  1. Open the Select Colour tool in the Editor toolbar.
  2. Choose a colour and use the built-in contrast checker to ensure accessible colour choices./li>

A ratio of at least 4.5:1 is required. Remember that regardless of colours used, ensure that colour is not the only method used to highlight or differentiate content.

Learn more about accessible colour in the Langara Accessibility Handbook

Accessibility Checker

Brightspace includes a built-in accessibility checker. The checker appears on the second row of the editor toolbar.

  1. Select More Actions to reveal the second row of the toolbar
  2. Select Accessibility Checker

The accessibility checker will note colour contrast issues and offer solutions to improve the contrast of your content. The Accessibility Checker cannot determine if colour is used to convey meaning.


Watch for more posts in the Brightspace Accessibility in Five series coming soon, including:

  1. Link Text
  2. Colour
  3. Headings
  4. Tables
  5. Text Equivalents
  6. Bonus: Accessible Uploads

Brightspace Accessibility in Five, 1: Link Text

Brightspace plus accessibility logo

Brightspace is an exceptionally accessible platform. Using Brightspace for your course content, documents, and media is an excellent way to provide equitable, inclusive access to learning material.

Take advantage of Brightspace’s built-in tools and the Accessibility Checker to ensure what you share is accessible. Accessible content is inclusive, democratic, and maximizes learner independence.

In the first of this five-part series, we will learn about adding link text to your Brightspace content.

Link Text

Link text should provide a clear description of the destination, independent of the surrounding text.

Students that with a visual impairement may use screen reader software that allows them to navigate by links. Descriptive link text helps orient and guide them to resources. A list of “click here”, “click here”, “Read more”, etc. is not going to provide users with any meaningful information. Pasting raw URLs in Brightspace should also be avoided as, for example, heading “https://iweb.langara.ca/edtech/blog” is jarring and not a useful indicator of what that link would lead to.

Additionally, sighted users can easily spot or relocate a link when it has a clear text description. As well, all users benefit from quality link text to understand why they would want to click on the link.

Effective link text should be:

  • Descriptive
    • Describe the destination
  • Concise
    • Try to limit link text to a few words
  • Unique
    • If two links on a page go to the same destination, they should have the same link text, otherwise ensure all link text is unique
  • Visually distinct
    • Links should be visually distinct from surrounding text. In Brightspace, stick with default formatting (blue underlined text) for links.

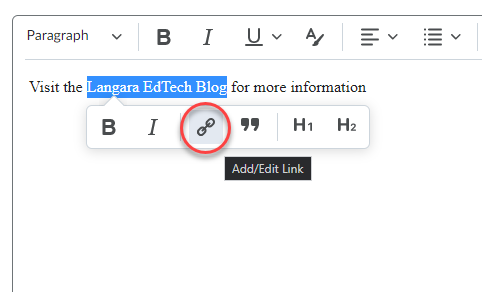
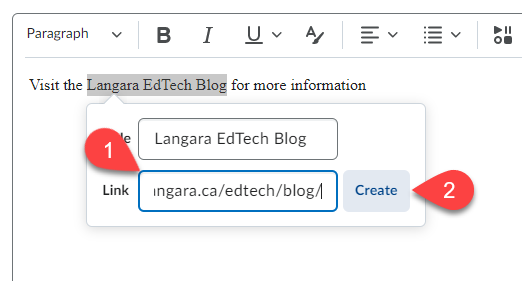
To Link Text in Brightspace

  1. Highlight the text to be linked and select Add/Edit Link
  2. The highlighted text will appear in the Title field. Paste the URL in the Link field and select Create.

Find more information about link text in the Langara Accessibility Handbook and read more about adding hyperlinks in Brightspace.

Accessibility Checker

Brightspace includes a built-in accessibility checker. The checker appears on the second row of the editor toolbar.

  1. Select More Actions to reveal the second row of the toolbar
  2. Select Accessibility Checker

The accessibility checker will highlight many accessibility issues and offer solutions to correct them.


Watch for more posts in the Brightspace Accessibility in Five series coming soon, including:

  1. Link Text
  2. Colour
  3. Headings
  4. Tables
  5. Text Equivalents
  6. Bonus: Accessible Uploads

‘De-clutter your Kaltura media’ competition winners!

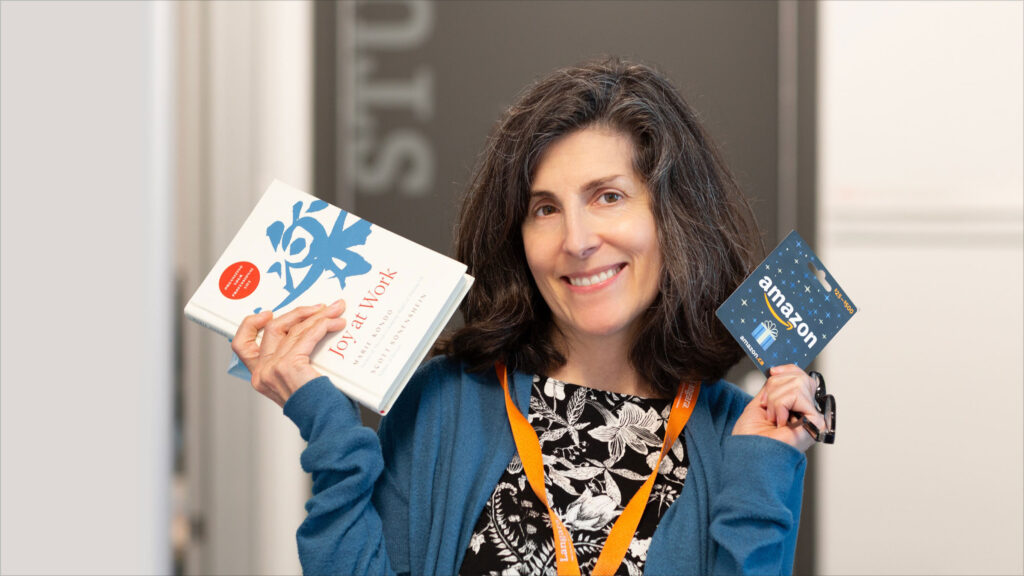
Krista Kieswetter receiving her prize of a book and gift card.

Back in October 2022 we launched a competition to see who could delete the most content from their Kaltura My Media, in order to help us save on storage and bandwidth costs. We were delighted with the response so a big thank-you to everyone who took on the challenge and deleted unwanted content to help us out. We are happy to announce that Krista Kieswetter from Continuing Studies (pictured) was the winner of the competition for which she received Marie Kondo’s book Joy at Work and an Amazon gift card. Runners-up were Yue-Ching Chen (Recreation Studies) and Katrina Erdos (Geography) who both receive gift cards.

While on the subject of deleting Kaltura media we would like to direct you to our Kaltura media retention policy which we recently formulated based on good practice from other institutions and in consultation with our Records Management and Privacy Manager. As well as continuing to encourage you to archive and delete any unwanted or unplayed media, we will be carrying out periodic deletions of unplayed media, at the end of the summer and fall semesters.

As ever, if you have any questions about our Kaltura media retention policy (or other Kaltura issues) please email edtech@langara.ca.

New Text to Speech Tools in Brightspace

EdTech is excited to announce new text to speech tools in Brightspace.

A new toolbar (pictured below) automatically appears on content pages, Quizzes, Assignments, and Discussions.

Screenshot of ReadSpeaker toolbar

The simple, intuitive interface allows for users to hear text read aloud. In Brightspace, simply select Listen and the toolbar instantly creates an audio version of text.

This tool offers students the choice of reading, listening, or both simultaneously. Allowing users choice and customization accounts for learner needs and preferences.

This tool may assist learners with:

  • Increased understanding
  • Improved reading comprehension
  • Information retention and recall
  • Vocabulary
  • Fluency and accuracy
  • Motivation and attitudes toward reading

Available user features include:

  • Customization of colour, style, and size of font
  • Choice of reading voice and speed
  • Synchronous text highlighting
  • Page masking and text-only view
  • Ability to select content to be read aloud
  • No download required
    • Learners can use this tool on campus, at home, on their phone, or on the bus

In addition to Brightspace pages, Word and PDF documents uploaded to Brightspace also have a text to speech reader option.

While a benefit to all learners, this tool is especially important to users that need content to be read aloud. The addition of text to speech is an important step in Langara’s work toward accessibility and universal design for learning.

For more information, read about the toolbar’s features or contact assistivetech@langara.