EdTech Tools and Privacy

Generative AI Tools & Privacy

Generative AI applications generate new content, such as text, images, videos, music, and other forms of media, based on user inputs. These systems learn from vast datasets containing millions of examples to recognize patterns and structures, without needing explicit programming for each task. This learning enables them to produce new content that mirrors the style and characteristics of the data they trained on.

AI-powered chatbots like ChatGPT can replicate human conversation. Specifically, ChatGPT is a sophisticated language model that understands and generates language by identifying patterns of word usage. It predicts the next words in a sequence, which proves useful for tasks ranging from writing emails and blogs to creating essays and programming code. Its adaptability to different writing and coding styles makes it a powerful and versatile tool. Major tech companies, such as Microsoft, are integrating ChatGPT into applications like MS Teams, Word, and PowerPoint, indicating a trend that other companies are likely to follow.

Despite their utility, these generative AI tools come with privacy risks for students. As these tools learn from the data they process, any personal information included in student assignments could be retained and used indefinitely. This poses several privacy issues: students may lose control over their personal data, face exposure to data breaches, and have their information used in ways they did not anticipate, especially when data is transferred across countries with varying privacy protections. To maintain privacy, it is crucial to handle student data transparently and with clear consent.

Detection tools like Turnitin now include features to identify content generated by AI, but these tools also collect and potentially store personal data for extended periods. While Turnitin has undergone privacy and risk evaluations, other emerging tools have not been similarly vetted, leaving their privacy implications unclear.

The ethical landscape of generative AI is complex, encompassing data bias concerns that can result in discriminatory outputs, and intellectual property issues, as these models often train on content without the original creators’ consent. Labour practices also present concerns: for example, OpenAI has faced criticism for the conditions of the workers it employs to filter out harmful content from its training data. Furthermore, the significant environmental impact of running large AI models, due to the energy required for training and data storage, raises sustainability questions. Users must stay well-informed and critical of AI platform outputs to ensure responsible and ethical use.


This article is part of a collaborative Data Privacy series by Langara’s Privacy Office and EdTech. If you have data privacy questions or would like to suggest a topic for the series, contact Joanne Rajotte (jrajotte@langara.ca), Manager of Records Management and Privacy, or Briana Fraser, Learning Technologist & Department Chair of EdTech

Learning Labs

Introducing Learning Labs

Learning Labs are interactive, focused, and supported learning sessions where you can learn how to implement Langara’s teaching and learning technologies and tools. Capacity is limited to ensure all attendees have an opportunity to ask questions, try out tools, and receive support. Support in the room will reflect the technology, tool, and learning outcomes; however, you can expect to interact with EdTech Advisors, Specialists, and Technologists as well as TCDC Curriculum Consultants. The Labs are an opportunity to implement something new or improve what already exists with experts who can answer technical questions and provide advice.

Fall Learning Lab session topics include:

Brightspace HTML Templates

After participating in this lab, participants should be able to:

  • Use the Brightspace HTML editor.
  • Explain the benefits of using the Brightspace HTML templates.
  • Apply the templates to a new Brightspace HTML page.
  • Apply the latest version of the template to an existing Brightspace HTML page.
  • Mix and match HTML elements—such as image placement, accordions, callouts, tables, and tabs—from the various templates.

Adding closed captions to a video in Brightspace

After participating in this lab, participants should be able to:

  • Upload a video to MediaSpace.
  • Add closed captions to a video.
  • Use the MediaSpace captions editor.
  • Use the OneDrive captioning tool.
  • Embed a video in a Brightspace course file.

Creating an accessible Word document

After participating in this lab, participants should be able to:

  • Employ plain language.
  • Select styles that improve legibility of text.
  • Structure a document.
  • Create accessible hyperlinks and tables.
  • Add alternative text to visual content.
  • Use the built-in accessibility checker.

Improving the accessibility of existing PowerPoint slides

After participating in this lab, participants should be able to:

  • Avoid the most common PowerPoint accessibility mistakes.
  • Use the accessibility checker and make corrections.
  • Apply templates.
  • Apply structure.
  • Select accessible fonts and font styling.
  • Employ accessible use of colour.
  • Add alternative text to images.
  • Write meaningful hyperlink text.

Save time marking with Rubrics

After participating in this lab, participants should be able to: 

  • Define the purpose of the assignment or assessment 
  • Decide which type of rubric will be used with assignments
  • Create statements of expected performance at each level of the rubric 
  • Transfer analog rubrics into a digital version on Brightspace 
  • Associate their rubric with the assignment in Brightspace 


Brightspace Accessibility in Five, 5: Text Equivalents

Brightspace plus accessibility logo

Brightspace is an excellent tool to provide equitable, inclusive access to course content, documents, and media.

As you create content, take advantage of Brightspace’s built-in tools and the Accessibility Checker to ensure what you share is accessible. Accessible content is inclusive, democratic, and maximizes learner independence.

In the fifth of this five-part series, we will learn about text equivalents (alternative text and closed captions).

Alternative Text

Alternative text explains the content and context of an image to screen reader users. To write effective alternative text, consider how you would describe the graphic to a friend over the phone. Try to include all relevant information using proper grammar in less than 120 characters. Learn more in the Langara Accessibility Handbook alternative text chapter. 

Images may be marked as decorative if they are only included for visual effect or if the information in the image is also present in text adjacent to the graphic. 

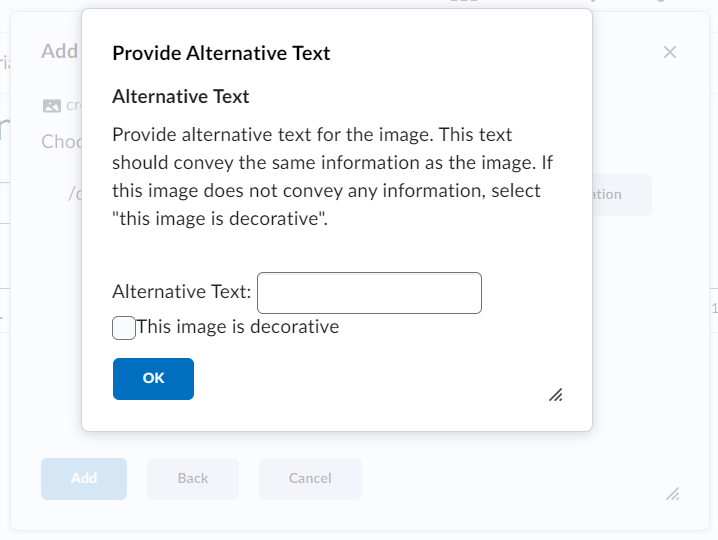
When uploading a new image, Brightspace automatically prompts for alternative text. Enter a description in the Alternative Text field or check This image is decorative. Screenshot of Brightspace provide alternative text prompt

To add alternative text to existing images: 

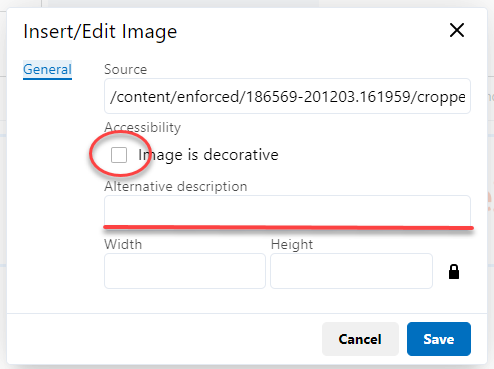
  1. Select an existing image and choose Image options
  2. Check Image is decorative or enter a description in the Alternative description field.

Closed Captions

Captions provide a text equivalent of all audio elements in a video, presented visually in time with the video. Closed captions can be toggled on or off by the viewer. Open captions are ‘burned’ into the video and cannot be turned off.

Traditionally, we think of captions as an accommodation for viewers who cannot hear the audio in a video due to hearing loss. Statistics suggest 4-5% of the general population suffer some form of hearing loss. That number increases to around 20% for people over aged 60. However, 80% of 18 to 25-year-olds regularly use captions when watching video.

Captions are not just an accessibility essential, but also an excellent universal design for learning tool.

All new uploads to Kaltura (either in Brightspace My Media or Mediaspace) will have machine-generated captions automatically ordered. Videos added to OneDrive/SharePoint can have machine-generated captions ordered manually. Machine-generated captions are not accurate enough and must be edited. To learn more about captioning, read the Captions and Transcripts chapter of the Langara Accessibility Handbook.

Accessibility Checker

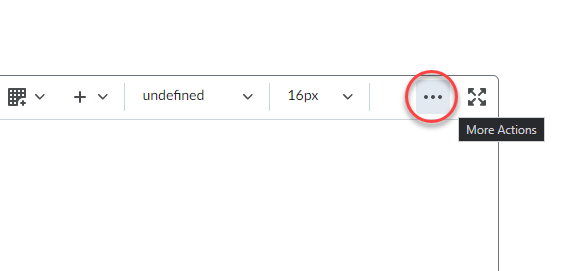
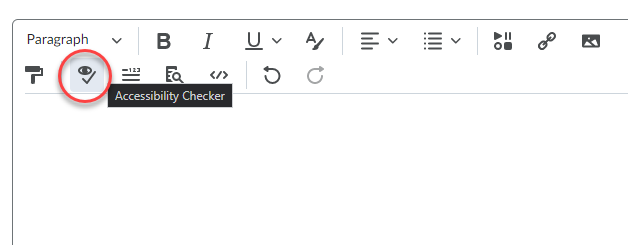
Brightspace includes a built-in accessibility checker. The checker appears on the second row of the editor toolbar.

  1. Select More Actions to reveal the second row of the toolbar
  2. Select Accessibility Checker

The accessibility checker will highlight many accessibility issues and offer solutions to correct them. However, the checker tool will not check videos for captions. This must be verified manually.


Check out the other posts in the Brightspace Accessibility in Five series:

  1. Link Text
  2. Colour
  3. Headings
  4. Tables
  5. Text Equivalents
  6. Bonus: Accessible Uploads

Brightspace Accessibility in Five, 4: Tables

Brightspace plus accessibility logo

Brightspace is an excellent tool to provide equitable, inclusive access to course content, documents, and media.

As you create content, take advantage of Brightspace’s built-in tools and the Accessibility Checker to ensure what you share is accessible. Accessible content is inclusive, democratic, and maximizes learner independence.

In the fourth of this five-part series, we will learn about tables.

Tables

Tables should only be used to present data, not for layout or formatting. Include a header row and/or column and avoid blank, split, and merged cells.

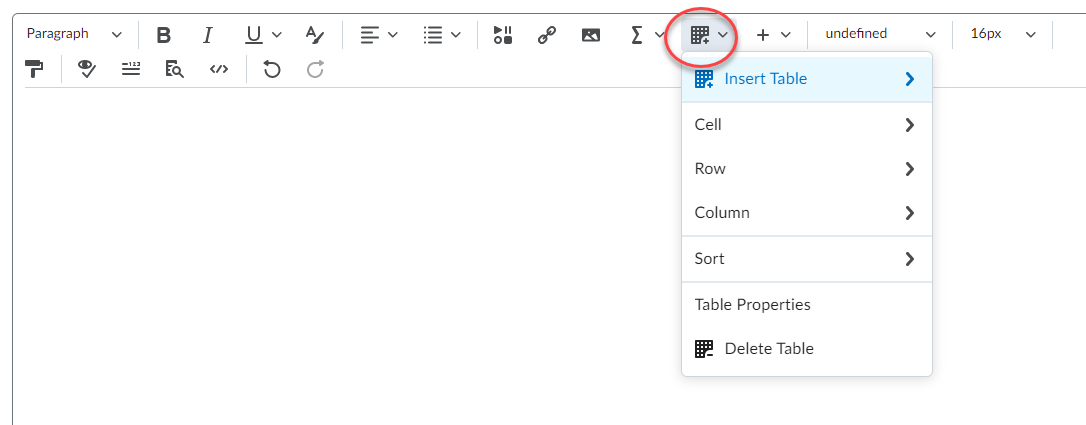
Use the Table tool to insert and modify tables:

Use Table Properties for advanced settings such as style, padding, and formatting.

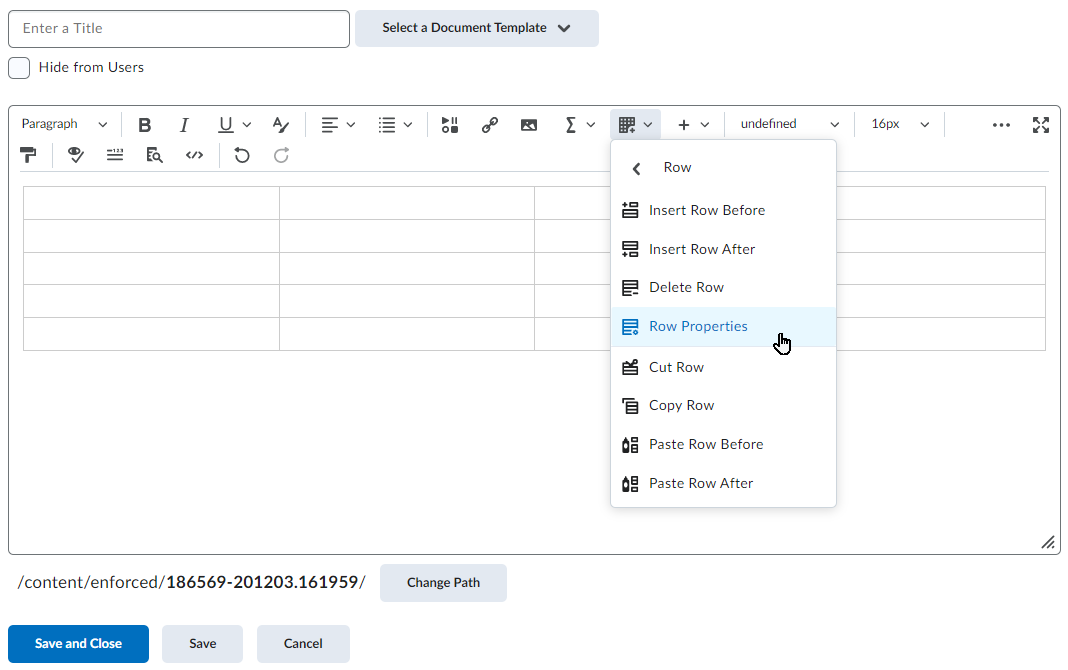
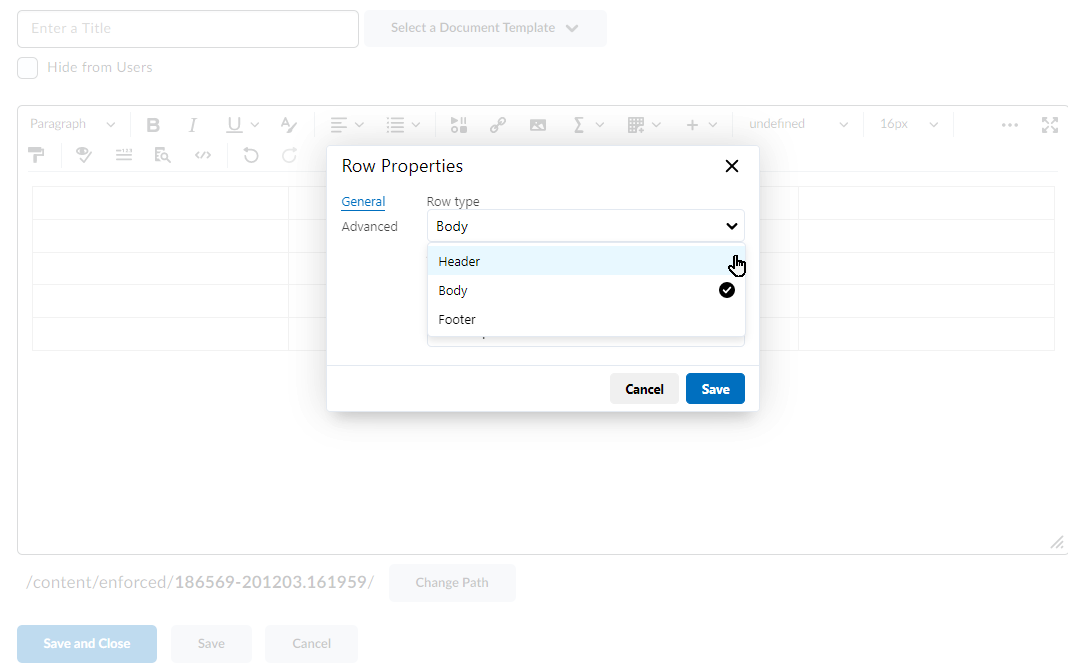
To set header rows:

  1. Select a cell in the row to be made a header
  2. Open the Table menu and choose Cell Properties
  3. Change Row type to Header and click Save

Do not add images of tables. If you must, ensure the image has alternative text that accurately conveys the table data.

Accessibility Checker

Brightspace includes a built-in accessibility checker. The checker appears on the second row of the editor toolbar.

  1. Select More Actions to reveal the second row of the toolbar
  2. Select Accessibility Checker

The accessibility checker will highlight many accessibility issues and offer solutions to correct them. For tables, the accessibility checker will flag tables without header rows or columns. The checker will also note tables without a caption and suggest users add a summary to long or complex tables.


Watch for more posts in the Brightspace Accessibility in Five series coming soon, including:

  1. Link Text
  2. Colour
  3. Headings
  4. Tables
  5. Text Equivalents
  6. Bonus: Accessible Uploads

Padlet, What is It, and How It Will Improve Student Engagement?

Decorative

Have you worked within a discussion board and wished it was more engaging? Hoped for a platform that had a visually appealing user experience? Have you longed for an intuitive space that allowed intuitive posting across all devices? Padlet may be the tool you are looking for.

Padlet is a digital notice board that allows users to post media, documents and links and collaborate with a “wall” based environment. An online platform that describes itself as “somewhere between a doc and a full-fledged website builder”, Padlet allows open dialogue from all users, instructors or students.

The interactive nature of Padlet is generally described as easy to use and engaging. Users can collaborate on real-time, shared boards by adding and editing posts. Users can add rich multimedia, such as images, links, and documents. Posts can be arranged in various formats to best suit the content, including whiteboards, grids, timelines, and maps. Padlet offers a range of interactive features such as anonymous contributions, comments, and reactions.

An example of how a Padlet wall can be organized.


Padlet is a highly versatile tool, limited only by our imagination. Some of the benefits of using Padlet to improve student engagement include:

  • Allows brainstorming and live question bank.
  • Ease of collaboration and organization.
  • Create a gallery of student work.
  • Get feedback from students with exit tickets.
  • Anonymous posting allows for inclusive participation and can empower students to share ideas.
  • Makes learning visible to the instructor and the students.
  • Allows the instructor to adjust their level of instruction to fit with students’ current level of learning.
  • Responses remain on the Padlet board for future reference while being shared in real-time with the whole class.
  • The Padlet walls can be embedded into the Langara learning management system (Brightspace).

Screenshot of a Padlet wall embedded within a Brightspace course.

Padlet can be used to:

  • Assess
  • Collaborate
  • Communicate
  • Create
  • Engage
  • Reflect

We will explore specific features of Padlet in future posts. If you are interested in triallingPadlet, please email EdTech to request a license. Afterwards, visit the Langara Padlet login page to login with your Langara account. This tool is centrally supported by Langara EdTech, and detailed help is available on our EdTech website or through the Padlet Help website.

Primary photograph by Keira Burton from Pexels used under Pexels License.

References and Additional Reading

Edwards, L. (2020, October 19). What is Padlet and how does it work for education? Retrieved January 11, 2022, from Tech Teaching website.

Meyer, K. A. (2014). Student engagement in online learning: What works and why. In Student Engagement Online: What Works and Why (pp. 1–14). John Wiley & Sons, Inc. DOI link.

Norman, M. (2017). Synchronous Online Classes: 10 Tips for Engaging Students. Faculty Focus. Faculty Focus website.

Padlet Features. (n.d.). Retrieved January 1, 2022, from https://padlet.com/features.

Simon, E. (2018). 10 Tips for Effective Online Discussions. EDUCAUSE Review. EduCause website.

Stake, J. (2021, January 22). Padlet For teachers: The best tips, tricks, and ideas for your classroom. We Are Teachers. We Are Teachers website.

PebblePad at Langara

What is PebblePad*?

PebblePad logo

PebblePad is Langara’s online portfolio and experiential learning platform. Digital portfolios, or ePortfolios, are powerful tools for learning, assessment, and career development because they enable users to document their skills, learning, and creativity, as well as reflect on what/how/why they learn. Using PebblePad, students can create portfolios, blogs, basic webpages, online collections of files, formal and informal reflections, action plans, and more. For authentic and scaffolded experiential learning, PebblePad is also a great fit.

How Might it Be Used Within a Course or Formal Learning Experience?

PebblePad is being used in many practicum and clinical courses at Langara. Students use interactive digital workbooks to document their experiences and demonstrate what they have learned. Links to these workbook assignments are then shared with faculty for feedback and assessment.

For programs where students have more open-ended and/or creative assignments, classic portfolios can be created on PebblePad where students document, showcase, and reflect on their creative work. This type of assignment empowers students to design and collate content ranging from text and hyperlinks, to images and video.

To find out more about the possibilities, we encourage you to go to the PebblePad Community Learner Showcase to explore some of the work being done at other institutions.

Why Use PebblePad?

PebblePad is student-owned. Once a student takes a course using PebblePad, they will be issued a PebblePad account that they will have for their entire time at Langara and beyond.  This makes it a great tool for them to make connections across their learning journey, and it can support the transition to further studies or employment.

Research indicates that using digital portfolios like PebblePad within courses and programs also seems to advance student retention and success (Eynon, Gambino, & Török, 2014). Proponents theorize that ePortfolios are beneficial because they support learning in the following ways:

  • learning can be made visible, including through reflection activities
  • connections can be made across and between academic (course, program), extracurricular (work experience, volunteering), and personal (family, community life) learning
  • personal, academic, and professional identity construction can be supported
  • social pedagogies can be employed, supporting group work, peer feedback, mentorship, etc.
  • competencies – within and outside of formal academic courses – can be documented and assessed

Want to Learn More?

If you are interested in learning more about PebblePad, contact EdTech to talk to an Advisor. Please also check the EdTech calendar for upcoming workshops.

Email edtech@langara.ca for more information.


*PebblePad is now the preferred ePortfolio technology of BCNET.

References

Blake Yancey, K. (Ed.). (2019). ePortfolio as Curriculum: Models and Practices for Developing Students’ ePortfolio Literacy. Sterling, VA: Stylus.

Eynon, B., & Gambino, L.M. (2017). High-Impact ePortfolio Practice: A Catalyst for Student, Faculty, and Institutional Learning. Sterling, VA: Stylus.

Eynon, B., Gambino, L. M., & Török, J. (2014). What difference can ePortfolio make? A field report from the Connect to Learning Project. International Journal of ePortfolio, 4(1), 95-114. https://www.theijep.com/pdf/IJEP127.pdf

Penny Light, T., Chen, H., & Ittelson, J. (2011). Documenting learning with ePortfolios: A guide for college instructors. San Francisco, CA: Jossey-Bass.

Watson, C. E., Kuh, G. D., Rhodes, T., Light, T. P., & Chen, H. L. (2016). Editorial: ePortfolios – The Eleventh High Impact Practice. International Journal of EPortfolio6(2), 65–69.

Yeo, N., & Rowley, J. (2020). ‘Putting on a Show’ Non-Placement WIL in the Performing Arts: Documenting Professional Rehearsal and Performance Using Eportfolio Reflections. Journal of University Teaching & Learning Practice, 17(4).

Improving Colour Accessibility for Students with Colour Deficiency

Improving Colour Accessibility for Students with Colour Deficiency

Colours as perceived by those with normal vision, deuteranoptia (green-blindness), tritanopia (blue-blindness), and protanopia (red-blindness).

Image CC by Johannes Ahlmann

Did you know that approximately 1 in 12 men is colour blind? Colour blindness — or more accurately, poor or deficient colour vision — can affect a person’s ability to distinguish between certain colors, usually greens and reds, and occasionally blues. Because colour vision deficiency reduces the number of color dimensions, it can be difficult for colour blind individuals to distinguish between certain colors. To improve colour accessibility of course content, it is important to ensure adequate colour contrast and not rely on colour alone as a means of conveying information.

Colour blind friendly alternatives

Use sufficient colour contrast

Effective contrast can make the text easier to read and images easier to see for all students. To ensure text is readable it should pass accessibility guidelines based on the combination of text colour, background colour, and text size. Test contrast using the WebAIM colour contrast checker.

Colours used to convey information on diagrams, maps, and other types of images must also be distinguishable from the background. To ensure adequate contrast use a combination of light and dark background and foreground colours.

Color combinations to avoid for people with color blindness include:

  • Red & green
  • Green & brown
  • Green & blue
  • Blue & gray
  • Blue & purple
  • Green & gray
  • Green & black

If you absolutely must use one of these combinations, adjust the contrast, making adjusting the shades so one is extremely dark, and the other extremely light.

Use colour with another cue to show emphasis or differences

Use elements such as patterns to visually distinguish information

Image source Smashing Magazine

Do not rely on colour alone to communicate meaning. Different patterns and textures can help colour-blind people further distinguish between different elements in charts and infographics.

Use color plus another element to emphasize a point or visually distinguish information differences. Emphasis elements include:

  • Bold
  • Size
  • Patterns or shapes

For more information on improving the accessibility and data visualization, visit Penn State’s Charts & Accessibility web page.

Increasing Accessibility of Course Content: Tips for using the Brightspace Accessibility Checker

Increasing accessibility of course content: Tips for using the Brightspace Accessibility Checker

Web Accessibility refers to the inclusive practice of making websites and online content usable by people of all abilities and disabilities. Use the Brightspace Accessibility Checker to identify common accessibility issues on your Brightspace course pages.

How to run the Accessibility Checker

The Check Accessibility button is located on the bottom right of the Brightspace HTML EditorThe Accessibility Checker is available within the HTML Editor. When you are in edit HTML mode, the checker is located on the bottom right corner of the Editor, next to the Spellcheck button.

Alternative Text

The most common accessibility issue is missing image alternative text (alt text). Alt text is background code added to a digital image that allows a screen reader or other assistive technology to describe the image’s content and meaning to those who cannot see the image or may be unable to process the image due to a cognitive disability. When alt text is missing, the Brightspace Accessibility Checker will flag the issue, noting Images must have an alternative text description.
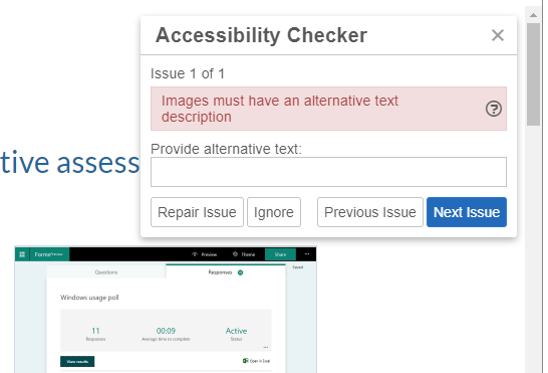
The Accessibility Checker flags missing alternative text with the message Images must have an alternative text description

How to add alt text

The easiest way to add alt text is to include it when inserting images into a Brightspace page. When you insert an image using the HTML editor, a pop-up appears, prompting you to add alt text. Brightspace add the alt text to the HTML code (e.g., <img src=”filename.jpg” alt=”Example of Microsoft Forms response results.” />).

Treat informative images as decorative by supplying an empty alt attribute or checking the box next to This image is decorative. Brightspace will add alt text of “” to indicate an empty alt attribute.

Brightspace prompts users to add alt text when inserting images

If the Accessibility Checker flags an image as missing alternative text, you can fix the issue by adding alt text inside the report panel or by adding it directly to the HTML code.

Tips for creating alt text

When deciding what to include as alternative text, imagine that you are describing the image aloud over the phone to someone who needs to understand the image.

According to WebAIM, alternative text should:

  • Be accurate and equivalent in presenting the same content and function of the image.
  • Be succinct.
  • Not be redundant or provide the same information as text within the context of the image.
  • Not use the phrases “image of…” or “graphic of…” to describe the image unless the fact that an image is a photograph or illustration, etc. is important content.

WebAIM offers a fantastic guide to creating appropriate alternative text for images.

Note: It is always a good idea to double-check the alt text included in your HTML code. An accessibility checker only indicates whether alt text is included, it cannot check the quality or usability of the alt text.

Contrast

Low colour contrast is another common accessibility issue. Insufficient contrast between the foreground and background reduces readers’ ability to perceive content on the page.

Insufficient colour contrast is flagged by the checher

The W3C Web Content Accessibility Guidelines 2.0 define specific contrast ratios that must be met in order to comply at particular levels. To meet the guidelines, text or images of text must have a contrast ratio of at least 4.5:1 (or 3:1 for large text).

The maximum contrast is black vs. white but other options are available such as navy/white, cream/dark brown, yellow/black, and similar color schemes. A colour scheme is considered legible if it can be read in grayscale/black and white mode.

The Accessibility Checker flags:

  • Large text that does not have a contrast ratio of at least 3:1.
  • Visual presentation that does not have a contrast ratio of at least 4.5:1.

Adjusting contrast

Try using the WebAIM Color Contrast Checker to adjust the contrast by lightening or darkening elements.

Headings

A heading describes the content that follows it, giving uses a sense of the page’s organization and structure. Headings give sighted users a way to quickly find what they want on the page.

If the underlying code for a page’s headings is correct, screen reader users can also benefit from headings. Screen reader and other assistive technology users can also skip from heading to heading.

The checker flags improperly applied heading styles

How to create headings in Brightspace

Select the text then set it to the proper heading using the Format dropdown menu. Do not skip levels. If the heading levels are not in the correct order, the Accessibility Checker will flag the issue.

Tips for creating headings

    • Headings are ranked <h1> through <h6>.
    • Every page should have an H1 heading, representing the most important idea on the page, and sub-sections organized with <h2> level headings. Those sub-sections can themselves be divided with <h3> level headings, and so on.
  • Headings need to be used in the correct order.
  • Do not skip heading levels to be more specific (for example, do not skip from <h2> to <h5>).
  • Do not select heading levels based on their appearance. Select the appropriate heading rank in your hierarchy.

Note: The Brightspace Accessibility Checker will not flag a page without headings; it only flags incorrectly ordered headings. 

Lists

Lists are great from an accessibility standpoint because they provide structured order to content in a linear fashion. Lists are recommended as potential replacements for simple tables, as tables can be more challenging to navigate. Properly code the lists so that they convey the hierarchical content structure to screen reader users. Use unordered lists <ul> when there is no specific order intended for the list you are creating. Use ordered lists <ol> when there is a defined sequence or order for the list.

The checker flags text that appears to be a list but has not been properly styled.

The Brightspace Accessibility Checker will flag items that appear to be a list but do have  unordered or ordered list styles applied.

How to use lists

Select the items, then choose the Unordered List icon if the order does not matter, or select Ordered List from the dropdown menu if it is sequential.

Use bullets for unordered lists and numbers for ordered lists

Descriptive Hyperlink Text

The Accessibility Checker cannot assess whether links are meaningful or accessible; however, making hypertext links accessible is one of the most basic and most important aspects of web accessibility.

How to create a hyperlink

Select Insert Quicklink icon, then select URL in the popup window, enter the URL and a title that describes the link’s destination.

Suggestions for creating meaningful and accessible hyperlinks

  • Link text should be unique within a page, should be meaningful when read out of context, and should help users to know something about their destination if they click on it. Link text such as “Click here” and “More” fail to meet these criteria.
  • Avoid providing two links right next to each other that point to the same location (it can be confusing for screen reader users).

To request help with improving the accessibility of your course content, email edtech@langara.ca
Using Padlet to Enhance Online Group work

Wondering how to keep your online students engaged?  EdTech Advisor and former Chair of Library Tech, Diane Thompson, suggests Padlet, a tool that facilitates interactive and collaborative creativity.

Using Padlet to Enhance Online Group work

The challenge of maintaining teaching continuity in the era of COVID, which has forced the rapid switch from classroom to online activities, requires creativity. Fear not: familiar ways of engaging our students can be modified for online use.

Collaborative work in the classroom is relatively straightforward. Students can be divided into groups and active learning techniques can be employed to explore relevant course topics. In an online course, this is a bit more challenging as students may be in other time zones, or have different schedules.

The goal of technology is to solve a problem. One technology tool that may prove to be very effective in the context of online group work is Padlet. This visual tool allows your students to express their thoughts on a given topic or assignment. Its application allows users to include various content, such as images, videos, documents, and texts in real time communications. In my experience, the collaborative nature of Padlet makes for a great way to explore ideas as a class or in small group projects. Padlet allows for a number of different templates, including a timeline template, grid or map.

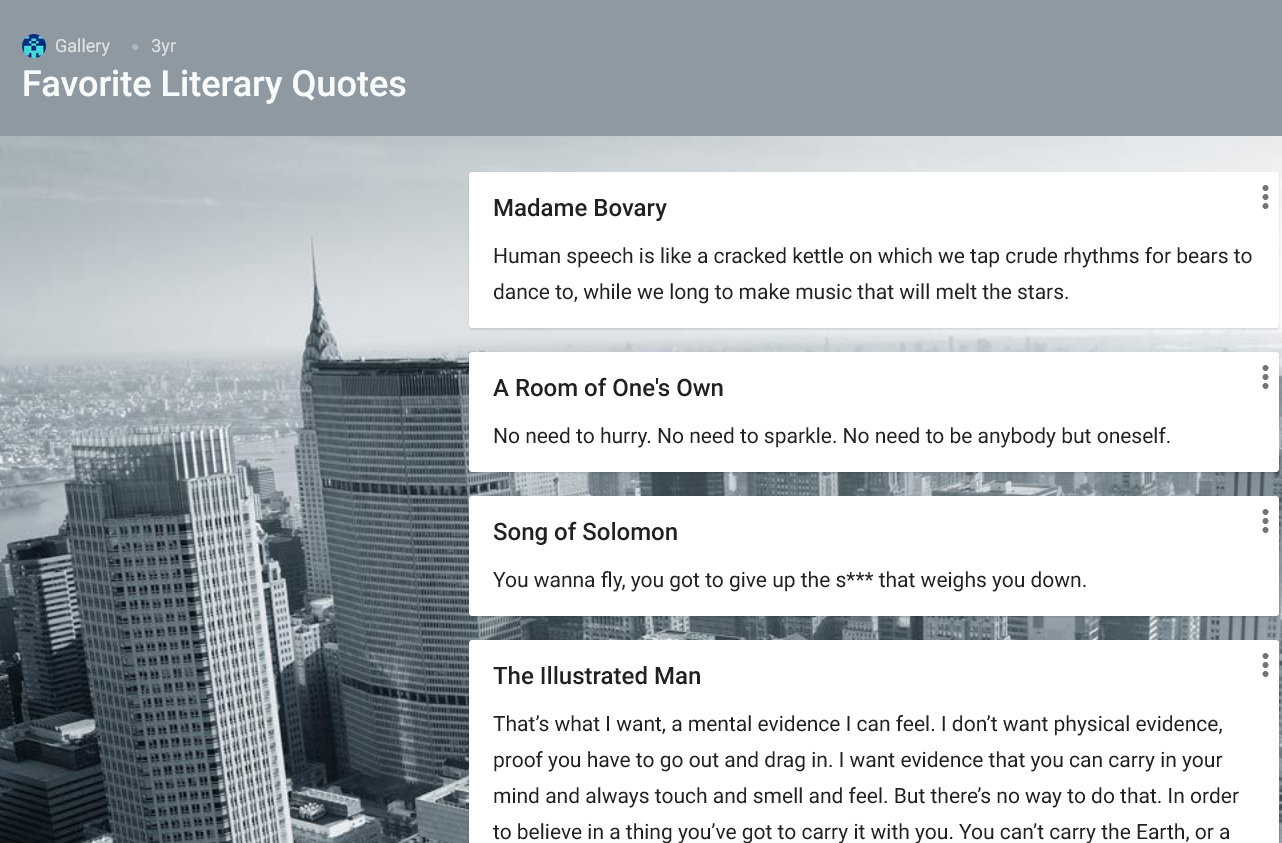
Here is an example from an English class where everyone contributed to literary quotes.

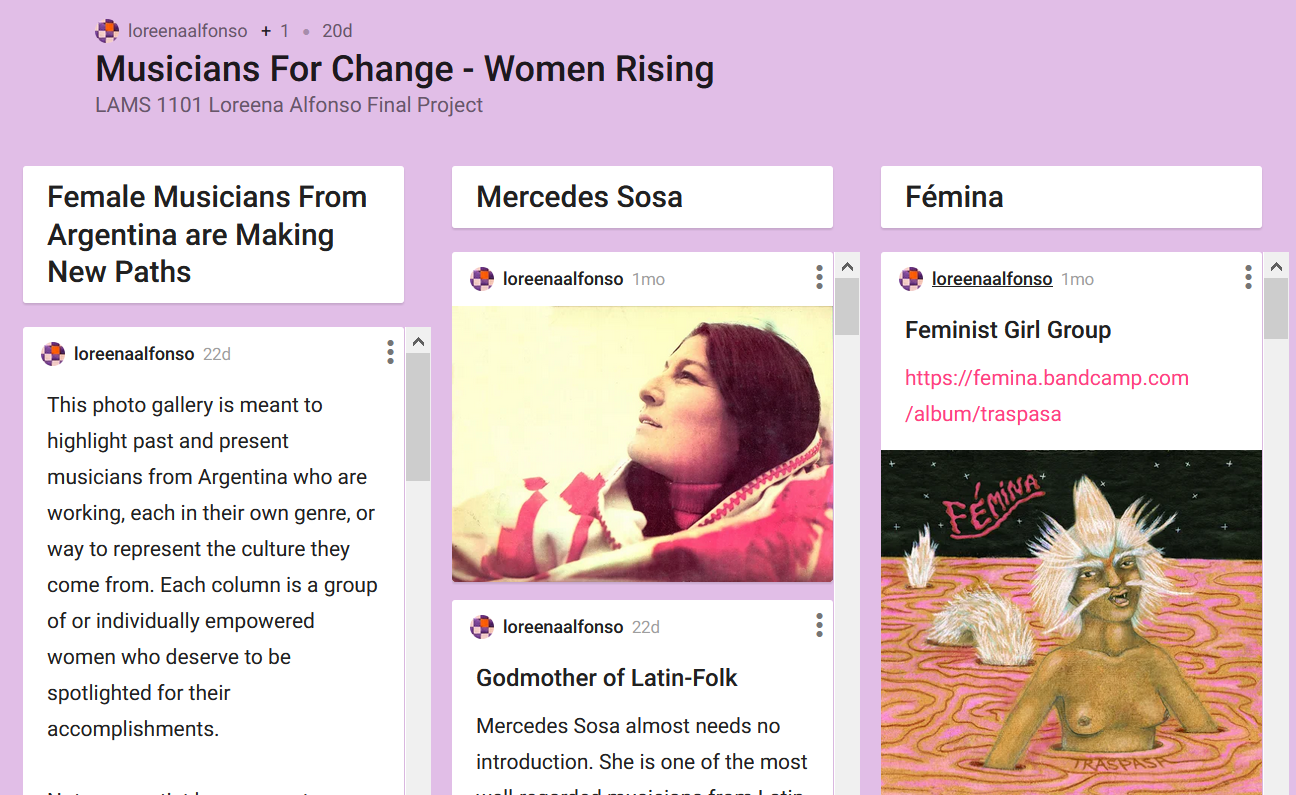
Here’s another example from Jessie Smith’s Collaborative Online International Learning (COIL) assignment. She used Padlet to explore specific topics for her Latin American Studies course in connection with her partner and class in Argentina.

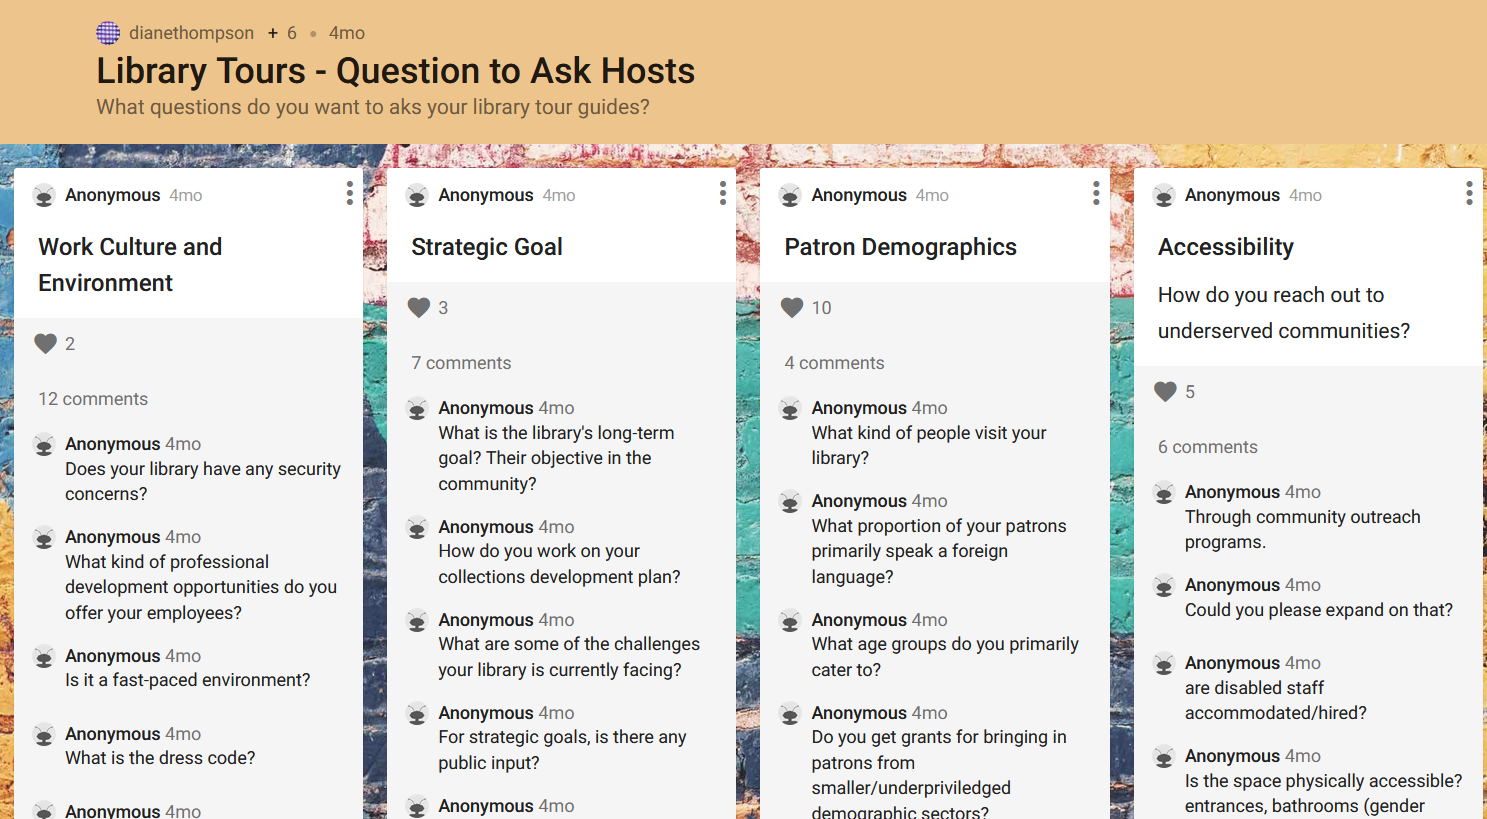
The last Padlet example demonstrated is from my own course (LIBR 1219) where students collaborate to come up with engaging questions to ask their tour guides when visiting various libraries in our community as part of their field work / practicum course. Students are asked to form groups and come up with categories. Once categories are established, they must then work together to come up with questions pertaining to the workplace. This is all done online.

Overall, Padlet is very easy to use. All you need to do is sign up at padlet.com and start creating. Security levels can be adjusted so that you can share your Padlets publicly or keep them password- protected. Sharing the link to your class is simple and, from your students’ perspective, editing is also straightforward once you have selected the template and explained how to complete the assignment.

The basic version of the programme will allow you to have up to three Padlets, whereas if you choose to sign up for the Pro version (not free), you can have multiple Padlets going at once.

If you have stories to share about how you are using Padlet, I would love to hear them.

Brightspace Quizzes now save automatically.

New: Auto-Save for Brightspace Quizzes

You’ve always been told to advise your students to save every quiz question as they finish it, and Save All Responses before submitting. This was to make sure that in-progress quizzes would be saved if a student was interrupted mid-quiz.

As of October 2018, it’s no longer necessary to need to manually save answers when taking a quiz. Quiz responses will now be saved as students complete each question. See below for images showing the old version (with Save button) versus the new, including what it will look like when a question auto-saves.

The old Brightspace quiz question interface, with Save button and disk icon (showing that the question is saved).


The new Brightspace quiz question interface, without Save button, with the "Saving/Saved" message highlighted.


Instructor Note: The quiz event log will show whenever a question is automatically saved, including an updated character count for Written Response questions.

Other Updates

No More Save Button

The “Save” and “Save All Responses” buttons at the bottom of a Quiz screen have been removed. The “Go to Submit Quiz” button is now called “Submit Quiz.”

There will still be a submission confirmation screen, after clicking “Submit Quiz,” that prompts students to submit the quiz when they’re ready.

Auto-Save Works Differently for Written Response Questions

If a Written Response question shows the format bar (also known as the HTML Editor), student responses will not be automatically saved as they type. To make sure that the answer is being saved as they work, students must click anywhere outside the text entry field to prompt the “Saving…/Saved” message to appear at the top right.

Other question types, or Written Response questions with the format bar disabled, will auto-save approximately every 30 seconds.

Internet Connection Status Notifications

Brightspace will now display a notification if the student loses their internet connection while taking a quiz.

a red-bordered notification box that reads "Internet connection lost. Trying to reconnect..."


Students will also see a notification when the connection is restored, at which point Brightspace will automatically save any unsaved answers.

A green-bordered notification that reads "Internet connection restored! Saving all answers..."


Instructor Note: The quiz log will record when a lost connection is restored.


Question is Still “Saving…”

If a student has answered a question and it seems to be stuck on “Saving…” for a very long time, they should double-check their internet connection. If they seem to be connected, they should continue writing their quiz. Any unsaved answers will be saved when they either move between pages, or go to submit the quiz.

Recommendations for Writing Quizzes

As always, we generally recommend using a wired internet connection, if possible. This greatly reduces the chances of losing an internet connection in the middle of a quiz.

If a student is writing a quiz from a mobile device like a phone or tablet, it’s best to access the quiz from Assessments > Quizzes, rather than from Course Materials > Content. This will provide more room on the screen for quiz questions. If possible, a desktop or laptop computer is best for taking quizzes, as these devices offer the best experience.

Updating Your Course Materials

If you’ve been advising your students to save each question as they go, please update those instructions in your courses to account for these updates. You can also just link to the student support page for these changes, which outline the new auto-save function and other new features now active in Brightspace quizzes. Click here, or access the link below, to see the student update.

https://iweb.langara.ca/lts/news/brightspace-quizzes-now-save-automatically/