EdTech Monthly Tip

The New Quiz Experience

Brightspace has released a New Quiz Creation Experience, a similar appearance to what you find in the Assignment tool. Over the coming weeks, we’ll highlight a couple changes that you should be aware of.

Changes to Timing & Display View

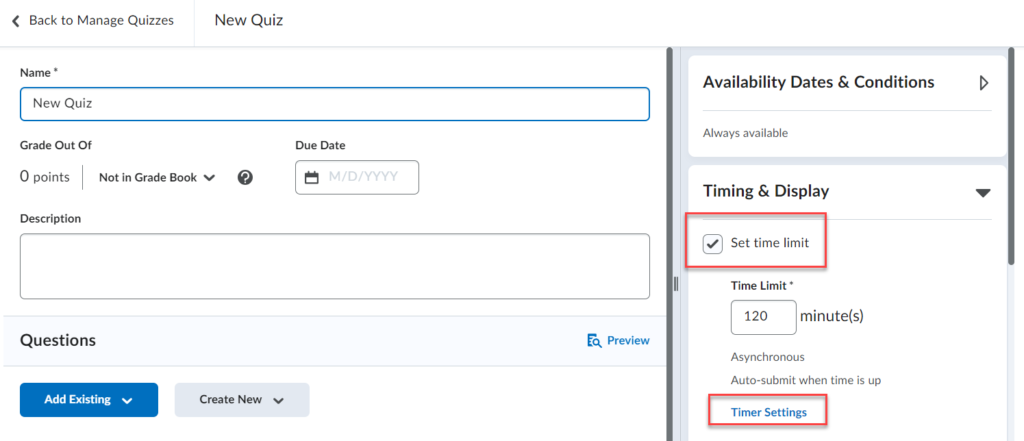
By default, no time limit is set on new quizzes. Use Time Limit to set the amount of time students are given to complete the quiz once they have started it.

To set a time limit:

  • Click Set Time Limit to add a countdown clock to the quiz. If this box is left unchecked, no time limit will be set. Be aware that setting a time limit does not, on its own, enforce the time limit — it only shows a countdown clock for the student.

Timer Settings

Timer settings are made once “Set Time Limit” is checked. Click on Timer Settings to control how a quiz behave once students exceed the time limit.

Timer setting options include:

  • Automatically submit the quiz attempt
    • This is the default on all new quizzes if the “Set Time Limit” box is checked. Quiz auto-submission automatically hands in quizzes on enforced time limit quizzes at the end of the set time.
  • Flag as “exceeded time limit” and allow the learner to continue working
    • This option allows the student to continue working but adds an “exceeded time limit” notation to the quiz when submitted.
  • Do nothing: the time limit is not enforced
    • The countdown clock is made available to students, but no time limit is enforced.

Old and New Experience Comparison

Previously Available OptionNew Behaviour
Prevent the student from making further changesAutomatically submit the quiz attempt
Allow students to continue working but automatically score zeroAutomatically submit the quiz attempt  
Allow the student to continue workingFlag the attempt as exceeded time limit and allow the learner to continue working
A quiz that has a grace periodGrace period no longer available. Quiz now uses only the time limit set

Adding Time to a Quiz in Progress

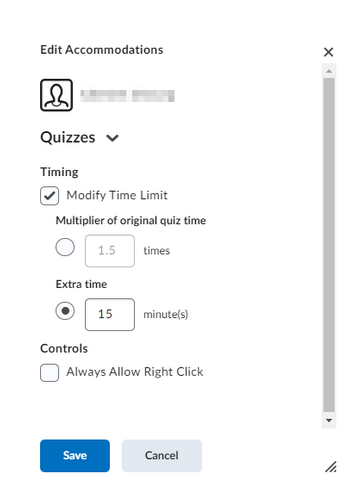
Changes to the timer may result in the need to add time to a Brightspace quiz in progress. Adding time is done through the Special Access feature and requires students refresh their browsers for the new time setting to take effect.

To add time to a Quiz in progress:

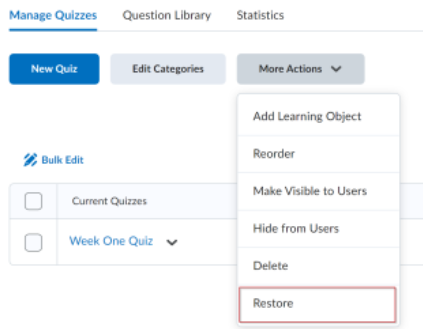
  • Navigate to the Brightspace Manage Quizzes tab and click on the quiz name to edit.
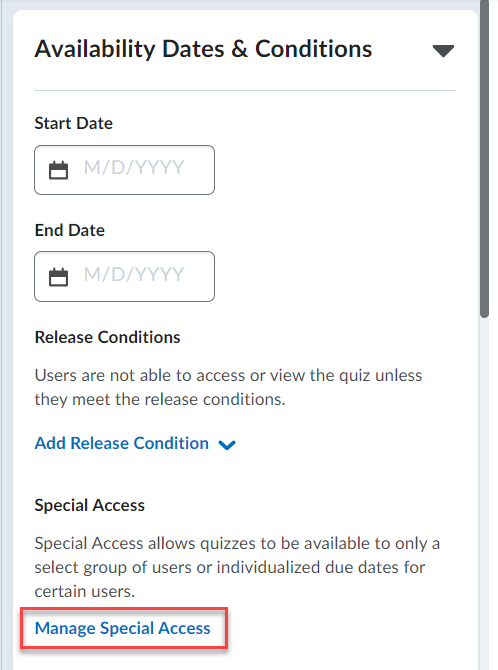
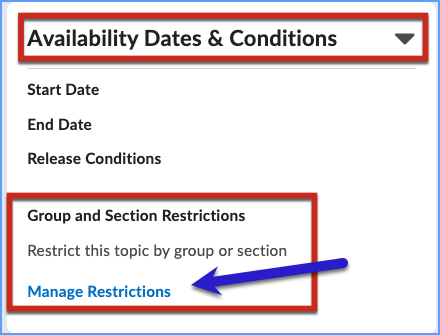
  • Select Availability Dates & Conditions.
  • Click on the Manage Special Access link.
  • Ensure “Allow selected users special access to this quiz” is selected.
  • Click on Add Users to Special Access.
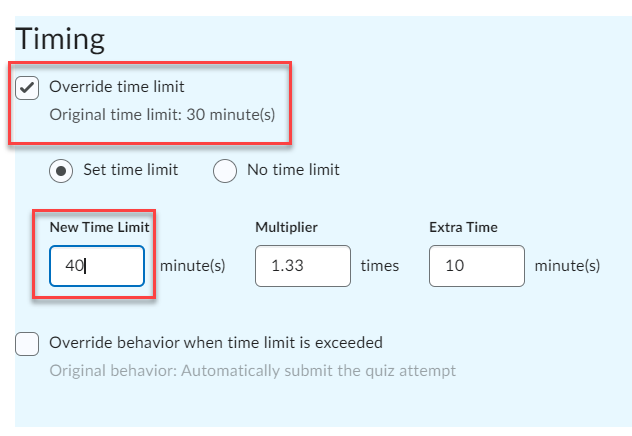
  • Scroll down to the Timing sections and check the box for “Override time limit.”
  • Enter the new time limit in the minutes field.
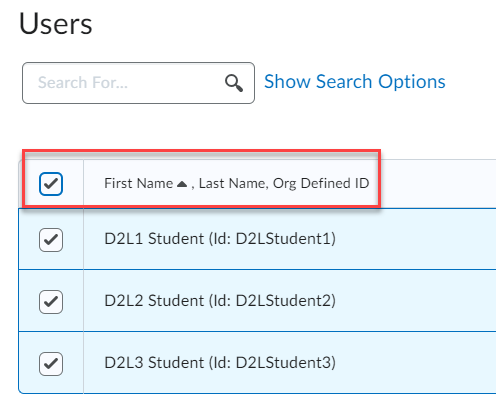
  • Scroll down to the Users section and check all the students’ names.
  • Click Save.
  • Click Save and Close.
  • Tell your students to refresh their browsers.

Watch Changes to the Brightspace Quiz Experience (video, 8:56) to learn more about the recent tool updates.

Brightspace Quiz Accommodation

When you have a student that has an “extended time on exams and quizzes” accommodation, there is a single process to set up modified time for every Brightspace quiz.

To set modified time, use the Classlist in Brightspace and the Edit Accommodations feature beside an individual student’s name. Activate Modify Time Limit and then apply a multiplier of original time or add extra time in minutes. These modifications will apply to that student for the duration of the course.

For more detailed instructions, consult Setting up Quiz Accommodations on the Brightspace Instructor Help site or view the self-directed mini-course on Brightspace Accommodations.

To allow a student or group to write an exam or submit an assignment on a different day, use Special Access.

The Accommodation tool is one of many Brightspace features designed to manage your workload and assist your students. Visit Langara’s Brightspace Instructor Help site for more!

Brightspace – New Quiz Experience

Brightspace has released a New Quiz Creation Experience, a similar appearance to what you find in the Assignment tool. We want to highlight a couple changes that you should be aware of: 

  • Description is automatically visible – doesn’t need to be toggled on (but also can’t be hidden from students) 
  • Custom pagination is not possible – here are the options: all questions on same page, by 1/5/10 question(s) or by section.

Watch the New Quiz Experience video for more details.

Brightspace – Introducing “New Experience” Discussions

As of August 28, 2023, Brightspace Discussions has a new look and feel, as well as some changes to functionality. Below we summarize the most important changes to the new version of Discussions.

Look & Feel

New Experience Discussions has been changed to bring it into alignment with how Assignments and Quizzes in Brightspace look and function. This consistency across tools is meant to make it easier for new users to Brightspace.

On the create/edit topic page, the main settings (title, grade out of, description, etc.) are on the left side of the page (1), and the more advanced settings (availability dates, restrictions, evaluation settings, etc.) are in the expandable tabs along the right (2).

Functionality

The are several changes to functionality and locations of settings that are significant in New Experience Discussions.

Automatically Create New Forum When Creating New Topic

All discussion topics need to sit within a forum (a container for topics). In New Experience Discussions, creating a new topic will automatically create a new forum of the same name. This eliminates the necessity of creating a forum prior to creating a topic. After the topic is created, instructors will be able to edit the name of the newly created forum or associate the current topic with another existing forum, if wanted.

Post and Completion

The Post and Completion settings are where you can allow anonymous posts and specify posting requirements. In New Experience discussions, only one of the following three options is possible:

1.     Default participation, which is a new option and has been added so that the default settings are clearly stated. The default settings do NOT allow for anonymous posts or require that users must start a thread.

2.     The option of Allow learners to hide their name from other learners is the setting that allows anonymous posts.

3.     The last option is Learners must start a thread before they can view or reply to other threads.

Manage Restrictions (replaces “Topic Type”)

The default for discussions is an “open topic” that all learners in the course can participate in; however, accessing the Manage Restrictions settings allows instructors to restrict discussions, if needed, so that learners can only see and reply to their own group or section’s posts. To set topic restrictions in New Experience, go to the Availability & Conditions settings on the right side of the edit page and look for Manage Restrictions.

Note: In Classic Experience, topic types could not be revised once set; however, in New Experience topic restrictions can now be revised up until a topic has an associated post, providing greater flexibility.

Restricting Topic and Separate Threads

To restrict a topic so that learners can only view threads from their group or section, go to Manage Restrictions and choose the option Restrict topic and separate threads. Then select which group category or section will have their threads separated.

Restrict Topic

To restrict a topic so that only selected groups or sections can view a topic and all threads, choose the radio option Restrict topic in the new Manage Restrictions workflow. Then select which sections/groups can see and participate in this discussion.

Availability Dates

Managing availability dates in Discussions is now similar to Assignments. Once a start or end date is added, additional settings can be adjusted to specify how learners see and access the topic outside of the availability dates.

Questions?

If you need assistance with Brightspace Discussions, please contact EdTech.

Improve Students’ Experience in Brightspace by Adding Dates

Adding dates in Brightspace is a great way to support students’ time management. Dates populate the Work To Do and Calendar widgets so that student can keep track of what’s due and when. Due dates can be added to almost all items, activities, and modules in Brightspace.

Students have two options for seeing upcoming items with a due date — The Work To Do widget and the Calendar widget.

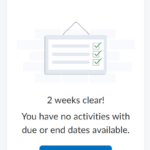
Work To Do is an organizational widget, meaning that it appears on Langara’s Brightspace homepage and provides learners with a summary of assigned learning activities from all their courses that are overdue or have an upcoming due date or end date. Work To Do can also be added to a course homepage to show only due and overdue learning activities from the course.

The Calendar widget can be added to a course homepage and displays content items with due dates and all calendar events.

Start Dates, Dues Dates, End Dates, Access, and Availability

In Brightspace, Start Date, Due Date, and End Date can be set for Assignments, Quizzes, and Content modules and module content items. Start and End dates can also be set for Discussions.

Due Date: Due dates specify when an activity or item is due. When you add a due date to an item, activity, or module, it will automatically be visible in the students’ Calendar.

Note about Due Date: Due dates do not restrict students’ ability to submit materials. If students submit work past the due date, the submission will be identified as late. To restrict access to an item, add a start and/or end date.

Start Date: Start dates specify when students can access items, activities, or modules. Before the start date students can see that an item exists, but they cannot access it. If no start date is set, students will be able to access the item immediately (unless it is hidden).

End Date: End dates specify when students will no longer be able to access an item, activity, or module. After the end date, students will only be able to see the title. If you want students to be able to submit late, do not set an end date.

If you want students to be able to submit late, do not set an end date.

Tip: Since items, activities, or modules with an end date are not accessible and students cannot submit their work after the date, it is important to clearly communicate expectations to students to prevent any misunderstandings.

Special access: It is possible to make exceptions for the end date for specific students with the Special Access option. You can use special access conditions to open content access for certain students outside the specified dates.

Availability: You will sometimes see this header before the option to add a start date and end dates. These start and end dates work the same as listed above.

Note about Availability: Be careful with Availability and Hide from Users. Clicking the Hide From Users checkbox will hide content from users until you uncheck the box. An Availability start date does not override the Hide from Users option. We recommend you only use one.

Display to calendar: Not all dates/times show up automatically on the Brightspace calendar. If a Display to calendar check box appears, select this option to push the dates to the calendar.

Our Recommendations

  • Add due dates to marked activities and assessments, so students can use the Calendar, Work To Do Widget, and Notifications to help manage their time.
  • Add Start and End dates when you want to limit access.
  • Use Due Dates or End Dates, but not both.
  • Use Dates judiciously, marking only those activities and assessments that have a firm due or end date.
  • For content due dates, rather than placing the due date on the content item, create a checklist with a due date for all the content and ungraded work that must be completed for a specific class.

New Text to Speech Tools in Brightspace

EdTech is excited to announce new text to speech tools in Brightspace.

A new toolbar (pictured below) automatically appears on content pages, Quizzes, Assignments, and Discussions.

Screenshot of ReadSpeaker toolbar

The simple, intuitive interface allows for users to hear text read aloud. In Brightspace, simply select Listen and the toolbar instantly creates an audio version of text.

This tool offers students the choice of reading, listening, or both simultaneously. Allowing users choice and customization accounts for learner needs and preferences.

This tool may assist learners with:

  • Increased understanding
  • Improved reading comprehension
  • Information retention and recall
  • Vocabulary
  • Fluency and accuracy
  • Motivation and attitudes toward reading

Available user features include:

  • Customization of colour, style, and size of font
  • Choice of reading voice and speed
  • Synchronous text highlighting
  • Page masking and text-only view
  • Ability to select content to be read aloud
  • No download required
    • Learners can use this tool on campus, at home, on their phone, or on the bus

In addition to Brightspace pages, Word and PDF documents uploaded to Brightspace also have a text to speech reader option.

While a benefit to all learners, this tool is especially important to users that need content to be read aloud. The addition of text to speech is an important step in Langara’s work toward accessibility and universal design for learning.

For more information, read about the toolbar’s features or contact assistivetech@langara.

Showcasing Innovative Teaching

Join us on December 8, 10 am – 12:30 pm, in C408, and be inspired! The Langara Educational Technology Instructor Gathering brings together educators to showcase their innovative work and foster dialogue and cross-college idea-sharing.

For the main event, instructors will share their teaching ideas using educational technology. Listen to talks about innovative ways to use Brightspace discussions for summative assessments, podcasting, strategies to ensure academic integrity in Brightspace quizzes, ungrading, accessibility, and more! These talks will be followed by a Q&A and a tour of EdTech’s Studio and the newly upgraded lecture theatre in A130. Refreshments and snacks will be served.

Bring a colleague to be eligible to win a draw prize. (Maximum capacity 30)

Register now to save your spot and remember to register your plus-one: Registration Link to the Instructor Gathering.

Grade Exemptions in Brightspace


Grade Exemptions in Brightspace 
Instructors now have a tool within Brightspace where they can clearly indicate why a student does not have a score for a grade item or an activity.  There are several reasons why a student may have a blank grade or a zero (0) which include an assignment not submitted, the instructor has not graded the item, or the student has failed the assignment.  Providing an exemption to your student for a grade item gives the instructor some flexibility to accommodate many different types of circumstances (I.e., illness, accommodation requirements, etc.). 

Instructors can provide exemptions to all the different types of grade items (I.e., numeric grades, selection box, pass / fail, etc.) however exemptions can’t be given to final calculated grades or final adjusted grades. 

Setting an exemption for a student: 
Exemptions can be set from several different content items, including a quiz, an activity, or a topic but also can be set directly from a grade item. 

Watch the following video for an overview of how to create a grade exemption or see the step-by-step process below: 

Set up Grade Exemptions for your Students: 
To set an exemption for a student from the Gradebook:  

  1. Once logged into your course, navigate to My Tools and Grades 
  2. Click on the context menu of the relevant grade item  
  3. Select Enter Grades from the drop-down menu 
  4. Click the checkbox next to the name of student you wish to exempt, then click Exempt and when you are ready, click Save and Close. 


You should now see the word “Exempt” under the Scheme heading in the table. It is also possible to set up multiple exemptions for your student 
To set an exemption for a student from the Content area: 

  1. In Content, on the context menu of the activity, select Edit Properties In-Place. 
  2. Click Add dates and restrictions…. 
  3. Under Exemptions, click Manage Exemption.
  4. Search for and select the students you want to exempt from the activity. 
  5. Click Exempt. 
  6. Click X to exit the Manage Exemptions page. 
  7. Click Update to save the restrictions. 

Note: When activities are exempted, any associated release conditions on these exempted activities must still be met. 


What’s New in Brightspace

Brightspace Updates 
Assignments:  

  • Instructors who teach several courses can save time by copying assignment folders to other courses.  From your assignment folder, use the context menu to copy your assignment to another course. 

Copy Assignment to Other Courses

  • Access new shortcuts to undo and redo PDF annotations on evaluations.  Previously, the only way to remove PDF annotations in Assignments was to use the eraser tool or delete the selection.  Now, an undo / redo button has been added for PDF annotations when evaluating in Assignments. 

Classlists: 

  • Pronouns can now be viewed from the Classlist and by hovering over a learner’s name or profile in the submission views within the assignment area.
  • If you have students in your course with Extended Time on Exams within their accommodation letter, you may now Edit Accommodations directly from your Classlist.  Using the context menu for the student with the Extended Time allotment, choose Edit Accommodations.  From there, you can adjust the timing to suit the accommodation letter.


Quizzes: 

  • “Disable Right Click” will be retired as of August 2022 within the quizzes area of Brightspace courses.  As the web has developed and browsers have become more secure, browsers have reduced the ability for web sites to control end-user behaviour.  Students are now able to install extensions such as “Allow Right Click” or use the browser developer console to skirt any restrictions, so “Disable Right Click” feature in Brightspace gives you a false sense of security.  
  • Save time and prevent data loss with the Restore Deleted Quizzes functionality.  This feature adds a new option in quizzes that allows instructors to restore deleted quizzes.  This option appears in the More Actions menu in the Quizzes tool.


Discontinuing LockDown Browser

LockDown Browser
As the spring semester winds down, you may now be shifting your focus to final exams and wondering if LockDown Browser will be available for the upcoming exam period. After over six months of troubleshooting, it has become clear that, unfortunately, LockDown Browser is no longer compatible with Langara’s computing infrastructure.
While this announcement may disappoint some faculty members, please know that this decision was not taken lightly. There were several key issues that contributed to our decision:

  • Random Freezing on Citrix Computers

    Since LockDown Browser was most frequently used during midterm and final exams, the fact that it might freeze up a Citrix computer during these critical and stressful times made it an unreliable solution—for both instructors and students. Furthermore, the conditions under which Citrix computers froze were quite random. This made it challenging to identify the specific circumstances / scenarios that might trigger these freezes. And given the prevalence of Citrix computers across Langara’s campus, EdTech and IT needed to ensure a solution that would work with all of Langara’s computers.

  • Only an Older Version Worked on Citrix Computers

    In trying to find a solution, EdTech discovered that only an older version (from Summer 2021) worked on the Citrix computers and this older version is no longer supported by Respondus, LockDown Browser’s parent company. Taking into consideration future support and compatibility issues, this was not a viable solution.

  • Reduced Use of LockDown Browser Post-Pandemic

    During the pandemic, many instructors revamped their online exams and quizzes to address academic integrity in new, innovative, and creative ways. As a result, fewer faculty required LockDown Browser after our return to campus.

That said, we are committed to supporting our faculty and instructional staff. So, if you are still concerned about academic integrity, please feel free to read our article, Designing Online Exams / Quizzes, and/or contact us. We are more than happy to help you explore and implement alternative online exam / quiz options!