Accessibility at Langara College

Empowering Accessibility: Register to Join Our Upcoming Workshops

EdTech is excited to announce a series of upcoming workshops dedicated to improving the accessibility of Microsoft Word documents and PowerPoint presentations.

Why Accessibility Matters

In today’s digital age, ensuring that everyone, regardless of their abilities, can access and understand information is crucial. This is where accessibility comes in. It’s about making sure that everyone has equal access to information and functionality.

What Our Workshops Offer

Our workshops are designed to provide you with the tools and knowledge to create accessible Word documents and PowerPoint presentations. We believe that with a little effort and the right guidance, we can make a significant difference in making information more accessible to all.

Who Should Attend

These workshops are for everyone! Whether you’re a content creator, an educator, or just someone looking to learn, these workshops are for you. No prior experience is required.

Let’s Make a Difference Together

By participating in these workshops, not only will you enhance your skills, but you’ll also contribute to a more inclusive and accessible digital world. So why wait? Join us to learn how to make information accessible to all.

Learning Lab: Create an Accessible Word Document

Date: January 19

Time: 10:30 AM – 12:00 PM

Location: C202

How to Create Accessible PowerPoint Slide Presentations

Date: January 26

Time: 10:30 AM – 12:00 PM

Location: Zoom

Learning Lab: Improve the Accessibility of Existing PowerPoint Slides

Date: February 16

Time: 10:30 AM – 12:30 PM

Location: C202

Learning Lab: Improve the Accessibility of Existing PowerPoint Slides Drop-In

Date: February 20

Time: 10:30 AM – 12:00 PM

Location: C203

Learning Lab: Create an Accessible Word Document

Date: April 5

Time: 10:30 AM – 12:00 PM

Location: C202

Explore the World of AI: Join Our Monthly AI Tinker Time Workshops

Are you curious about artificial intelligence and its applications but unsure where to begin? Look no further! Join us at AI Tinker Time, happening on the first Thursday of every month, and dive into the exciting world of AI tools.

Whether you’re new to AI or looking to expand your knowledge, these sessions are the perfect opportunity to experiment with various AI tools and discover how they can enhance your practice. Our EdTech faculty, staff, and TCDC colleagues will lead hands-on sessions, where we’ll test different AI tools for accuracy, quality, and effectiveness in addressing diverse teaching and learning needs.

Together, we’ll explore critical questions such as:

  • How accurate is the AI output?
  • Is the quality of AI output sufficient for practical application?
  • Can AI-generated content serve as a solid foundation for further refinement?
  • How do various AI tools compare in functionality and output?
  • Which AI tools can we recommend for specific needs based on our testing?

Don’t miss this chance to join a community of like-minded individuals eager to unlock the potential of AI in education. Whether you’re an educator, a technologist, or simply AI-curious, our AI Tinker Time workshops are the ideal space to learn, experiment, and collaborate.

Monthly topics:

  • January – Using AI to generate alternative text
  • February – Comparing output generated by Bing Chat’s different modes
  • March – Using AI audio generation and editing
  • April – Using AI to “break” assignments

Please register to join our AI tinker time.

EdTech Digital Media Can Help You Create Engaging Content for Your Courses

Are you looking for ways to enhance your online teaching and learning experience? Do you want to create media-rich content that captures the attention and interest of your students? If so, you should check out EdTech’s Digital Media services at Langara College.

EdTech Digital Media provides support and resources for Langara faculty and instructional staff who want to translate their ideas into educational, professional, and engaging media content. Whether you want to do it yourself or get some expert help, EdTech Digital Media has something for you.

Here are some of the services that EdTech Digital Media offers:

  • Studio: You can book the EdTech Digital Media studio, a professional space equipped with a green screen, a lightboard, a teleprompter, podcasting mixing desk and various cameras and microphones. You can use the studio to record lectures, presentations, interviews, demonstrations, and more. To book our studio, email us at edtech@langara.ca
  • Audio & Video Production: Get assistance from the EdTech Digital Media team to produce high-quality audio and video content for your courses. The team can help you with scripting, storyboarding, filming, editing, and publishing your media projects.
  • Digital Media Consultation: Before using our studio or other services we ask that you consult with one or more of our EdTech Digital Media team to discuss your media needs and goals. The team can provide you with advice, feedback, and recommendations on how to best use media in your courses. Email edtech@langara.ca to schedule a consultation.
  • Drop-Ins: You can pop by the EdTech Digital Media studio during our scheduled drop-in times for a studio tour or to get quick help or tips on any media-related projects.
  • Green Screen: Use our green screen technology to create immersive and interactive videos for your courses. You can replace the green background with any image or video of your choice, such as a map, a diagram, a historical scene, or a virtual environment.
  • Lightboard: You can use our lightboard technology to create engaging and dynamic videos for your courses. You can write or draw on a transparent glass board with fluorescent markers, while facing the camera and your audience. The lightboard allows you to illustrate your concepts and ideas in a clear and captivating way.
  • Motion Graphics: Take advantage of our expertise in motion graphics technology to create animated and eye-catching videos for your courses. You can use motion graphics to explain complex or abstract concepts, to visualize data or processes, or to add some fun and creativity to your media content.
  • Podcasting: Use our podcasting setup to create audio-only content for your courses. You can use podcasting to share your insights, opinions, or stories, to interview guests or experts, or to provide supplementary or alternative material for your students. Come and talk to us with any ideas or questions you might have about this popular way to share content.
  • Screen Capture: You can use screen capture technology (on your own or with our guidance) to create video tutorials, demonstrations or mini-lectures for your courses. You can use screen capture to show your students how to use software, a website, or an online tool, or to walk them through a problem or a solution.
  • Slide Design: Work with our team to create effective, attractive and accessible slides for your courses.

If you are interested in any of these services, please visit the EdTech Digital Media page to learn more, to book a service, or to contact the team. EdTech Digital Media is here to support you and your media needs. We hope to see you soon!

Brightspace – Introducing “New Experience” Discussions

As of August 28, 2023, Brightspace Discussions has a new look and feel, as well as some changes to functionality. Below we summarize the most important changes to the new version of Discussions.

Look & Feel

New Experience Discussions has been changed to bring it into alignment with how Assignments and Quizzes in Brightspace look and function. This consistency across tools is meant to make it easier for new users to Brightspace.

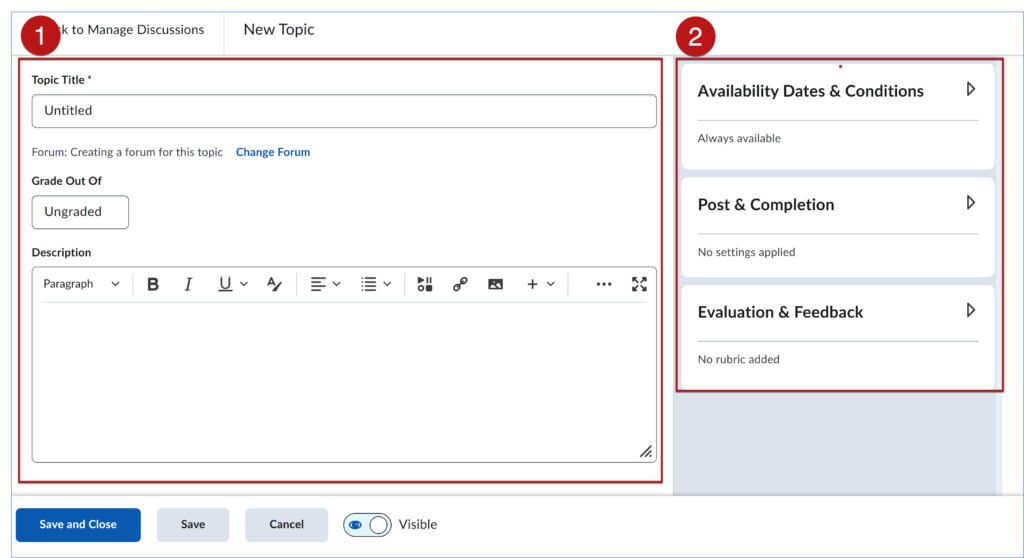
On the create/edit topic page, the main settings (title, grade out of, description, etc.) are on the left side of the page (1), and the more advanced settings (availability dates, restrictions, evaluation settings, etc.) are in the expandable tabs along the right (2).

Functionality

The are several changes to functionality and locations of settings that are significant in New Experience Discussions.

Automatically Create New Forum When Creating New Topic

All discussion topics need to sit within a forum (a container for topics). In New Experience Discussions, creating a new topic will automatically create a new forum of the same name. This eliminates the necessity of creating a forum prior to creating a topic. After the topic is created, instructors will be able to edit the name of the newly created forum or associate the current topic with another existing forum, if wanted.

Post and Completion

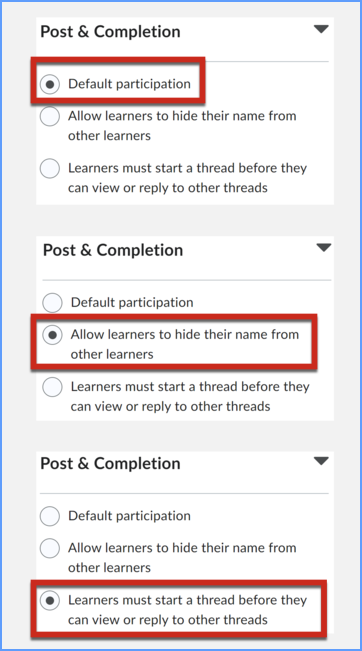
The Post and Completion settings are where you can allow anonymous posts and specify posting requirements. In New Experience discussions, only one of the following three options is possible:

1.     Default participation, which is a new option and has been added so that the default settings are clearly stated. The default settings do NOT allow for anonymous posts or require that users must start a thread.

2.     The option of Allow learners to hide their name from other learners is the setting that allows anonymous posts.

3.     The last option is Learners must start a thread before they can view or reply to other threads.

Manage Restrictions (replaces “Topic Type”)

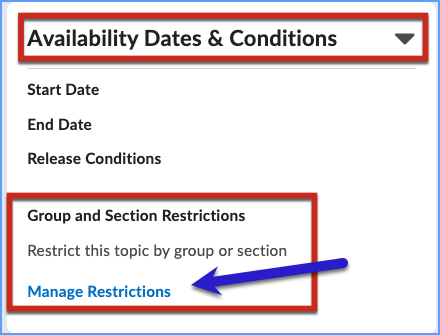
The default for discussions is an “open topic” that all learners in the course can participate in; however, accessing the Manage Restrictions settings allows instructors to restrict discussions, if needed, so that learners can only see and reply to their own group or section’s posts. To set topic restrictions in New Experience, go to the Availability & Conditions settings on the right side of the edit page and look for Manage Restrictions.

Note: In Classic Experience, topic types could not be revised once set; however, in New Experience topic restrictions can now be revised up until a topic has an associated post, providing greater flexibility.

Restricting Topic and Separate Threads

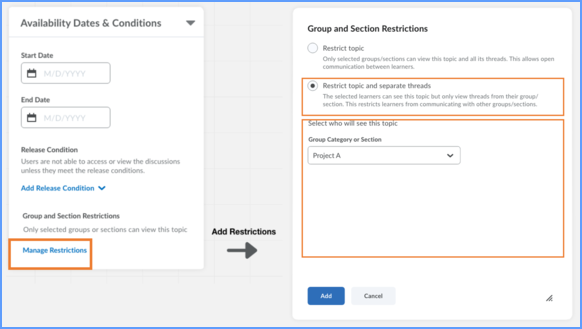
To restrict a topic so that learners can only view threads from their group or section, go to Manage Restrictions and choose the option Restrict topic and separate threads. Then select which group category or section will have their threads separated.

Restrict Topic

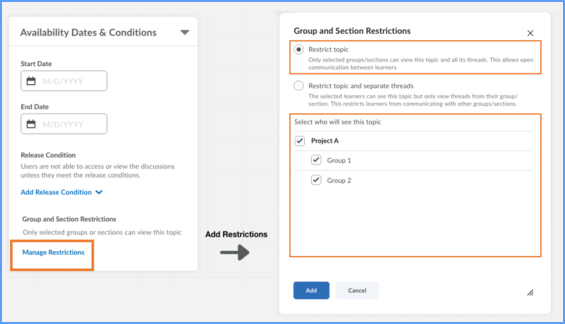
To restrict a topic so that only selected groups or sections can view a topic and all threads, choose the radio option Restrict topic in the new Manage Restrictions workflow. Then select which sections/groups can see and participate in this discussion.

Availability Dates

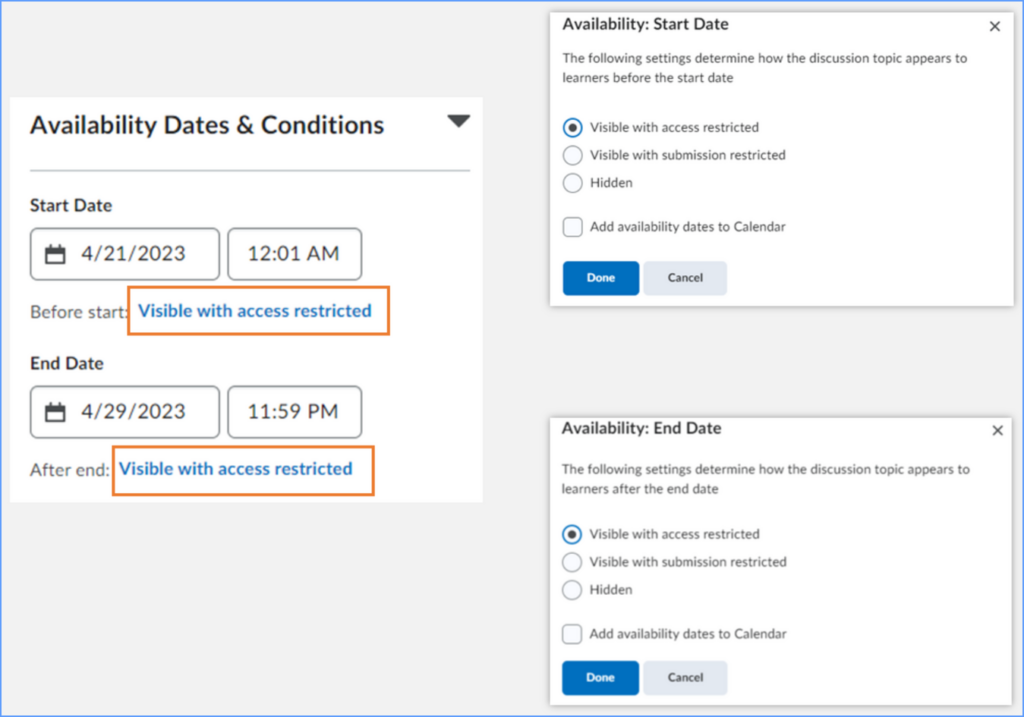
Managing availability dates in Discussions is now similar to Assignments. Once a start or end date is added, additional settings can be adjusted to specify how learners see and access the topic outside of the availability dates.

Questions?

If you need assistance with Brightspace Discussions, please contact EdTech.

Generative AI and STEM

Background

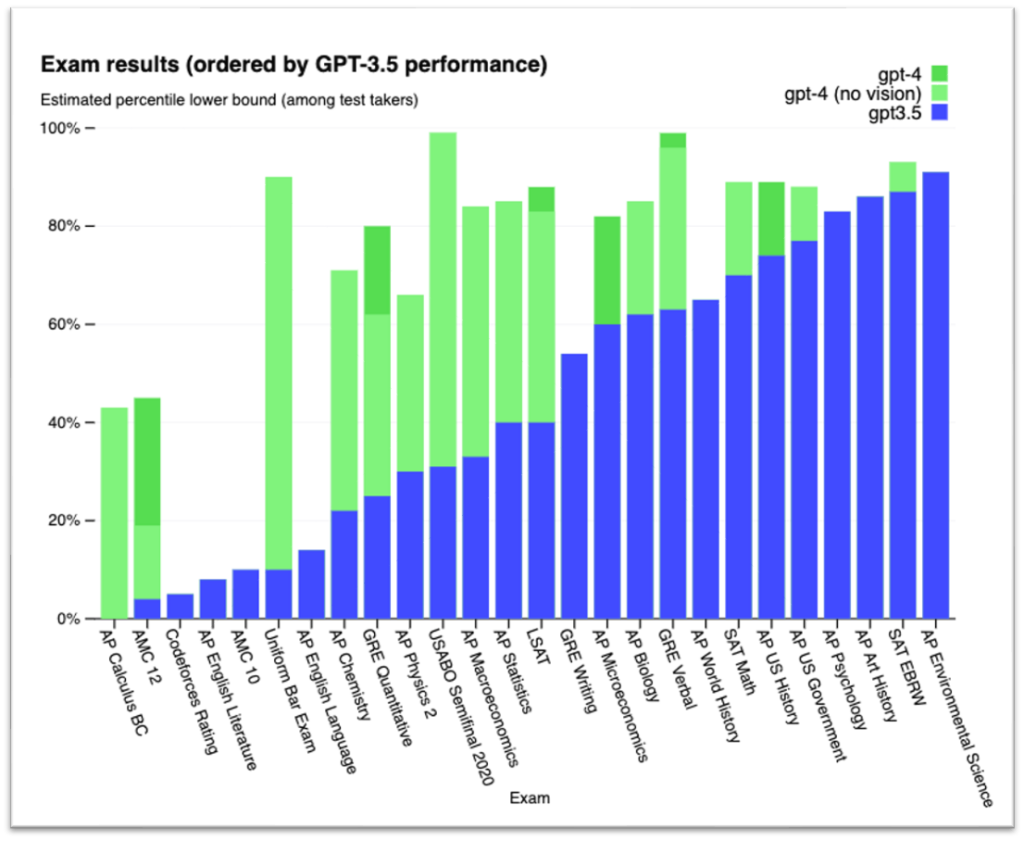
Artificial intelligence is not new. It has been part of our personal and work lives for a long time (autocorrect, facial recognition, satnav, etc.) and large language models like ChatGPT have been a big topic in education since version 3.5 was released in late November, 2022. Large language models (LLMs) are trained on enormous amounts of data in order to recognize the patterns of and connections between words, and then produce text based on the probabilities of which word is most likely to come next. One thing that LLMs don’t do, however, is computation; however, the most recent Open AI release, GPT-4, seems to have made strides in standardized tests in many STEM areas and GPT-4 now has a plug-in for Wolfram Alpha, which does do computation.

Chart from Open AI: exam result improvements from ChatGPT 3.5 to 4

Andrew Roberts (Math Dept) and Susan Bonham (EdTech) did some testing to see how ChatGPT (3.5), GPT-4, and GPT-4 with the Wolfram plugin would handle some questions from Langara’s math courses.

Test Details

Full test results are available. (accessible version of the problems and full details of the “chats” and subsequent discussion for each AI response are available at the link)

The following questions were tested:


Problem 1: (supplied by Langara mathematics instructor Vijay Singh)


Problem 2: (Precalculus)


Problem 3: (Calculus I)


Problem 4: (Calculus II)


Discussion

Responses from current versions of ChatGPT are not reliable enough to be accepted uncritically.

ChatGPT needs to be approached as a tool and careful proof-reading of responses is needed to check for errors in computation or reasoning. Errors may be blatant and readily apparent, or subtle and hard to spot without close reading and a solid understanding of the concepts.

Perhaps the biggest danger for a student learning a subject is in the “plausibility” of many responses even when they are incorrect. ChatGPT will present its responses with full confidence in their correctness, whether this is justified or not.

When errors or lack of clarity is noticed in a response, further prompting needs to be used to correct and refine the initial response. This requires a certain amount of base knowledge on the part of the user in order to guide ChatGPT to the correct solution.

Algebraic computations cannot be trusted as ChatGPT does not “know” the rules of algebra but is simply appending steps based on a probabilistic machine-learning model that references the material on which it was trained. The quality of the answers will depend on the quality of the content on which ChatGPT was trained. There is no way for us to know exactly what training material ChatGPT is referencing when generating its responses. The average quality of solutions sourced online should give us pause.

Below is one especially concerning example of an error encountered during our testing sessions:

In the response to the optimization problem (Problem 3), GPT-3.5 attempts to differentiate the volume function:

However, the derivative is computed as:

We see that it has incorrectly differentiated the first term with respect to R while correctly differentiating the second term with respect to h.

It is the plausibility of the above solution (despite the bad error) that is dangerous for a student who may take the ChatGPT response at face value.

Access to the Wolfram plugin in GPT-4 should mean that algebraic computations that occur within requests sent to Wolfram can be trusted. But the issues of errors in reasoning and interpretation still exist between requests sent to Wolfram.

Concluding Thought

It will be important for us educate our students about the dangers involved in using this tool uncritically while acknowledging the potential benefits if used correctly.

Want to Learn More?

EdTech and TCDC run workshops on various AI topics. You can request a bespoke AI workshop tailored to your department or check out the EdTech and TCDC workshop offerings. For all other questions, please contact edtech@langara.ca

AI tools & privacy

ChatGPT is underpinned by a large language model that requires massive amounts of data to function and improve. The more data the model is trained on, the better it gets at detecting patterns, anticipating what will come next and generating plausible text.

Uri Gal notes the following privacy concerns in The Conversation:

  • None of us were asked whether OpenAI could use our data. This is a clear violation of privacy, especially when data are sensitive and can be used to identify us, our family members, or our location.
  • Even when data are publicly available their use can breach what we call contextual integrity. This is a fundamental principle in legal discussions of privacy. It requires that individuals’ information is not revealed outside of the context in which it was originally produced.
  • OpenAI offers no procedures for individuals to check whether the company stores their personal information, or to request it be deleted. This is a guaranteed right in accordance with the European General Data Protection Regulation (GDPR) – although it’s still under debate whether ChatGPT is compliant with GDPR requirements.
  • This “right to be forgotten” is particularly important in cases where the information is inaccurate or misleading, which seems to be a regular occurrencewith ChatGPT.
  • Moreover, the scraped data ChatGPT was trained on can be proprietary or copyrighted.

When we use AI tools, including detection tools, we are feeding data into these systems. It is important that we understand our obligations and risks.

When an assignment is submitted to Turnitin, the student’s work is saved as part of Turnitin’s database of more than 1 billion student papers. This raises privacy concerns that include:

  • Students’ inability to remove their work from the database
  • The indefinite length of time that papers are stored
  • Access to the content of the papers, especially personal data or sensitive content, including potential security breaches of the server

AI detection tools, including Turnitin, should not be used without students’ knowledge and consent. While Turnitin is a college-approved tool, using it without students’ consent poses a copyright risk (Strawczynski, 2004).  Other AI detection tools have not undergone privacy and risk assessments by our institution and present potential data privacy and copyright risks.

For more information, see our Guidelines for Using Turnitin.

What’s New in Brightspace

Brightspace Updates 
Assignments:  

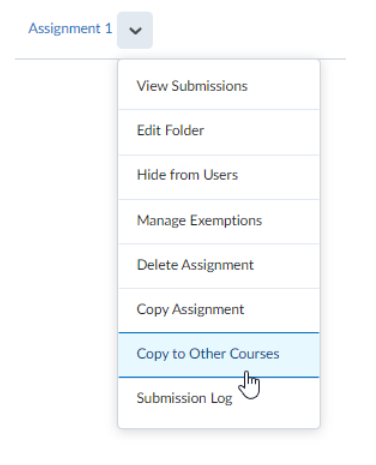
  • Instructors who teach several courses can save time by copying assignment folders to other courses.  From your assignment folder, use the context menu to copy your assignment to another course. 

Copy Assignment to Other Courses

  • Access new shortcuts to undo and redo PDF annotations on evaluations.  Previously, the only way to remove PDF annotations in Assignments was to use the eraser tool or delete the selection.  Now, an undo / redo button has been added for PDF annotations when evaluating in Assignments. 

Classlists: 

  • Pronouns can now be viewed from the Classlist and by hovering over a learner’s name or profile in the submission views within the assignment area.
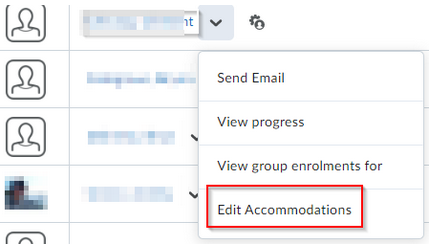
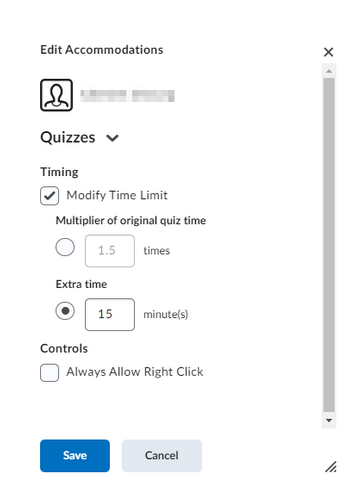
  • If you have students in your course with Extended Time on Exams within their accommodation letter, you may now Edit Accommodations directly from your Classlist.  Using the context menu for the student with the Extended Time allotment, choose Edit Accommodations.  From there, you can adjust the timing to suit the accommodation letter.


Quizzes: 

  • “Disable Right Click” will be retired as of August 2022 within the quizzes area of Brightspace courses.  As the web has developed and browsers have become more secure, browsers have reduced the ability for web sites to control end-user behaviour.  Students are now able to install extensions such as “Allow Right Click” or use the browser developer console to skirt any restrictions, so “Disable Right Click” feature in Brightspace gives you a false sense of security.  
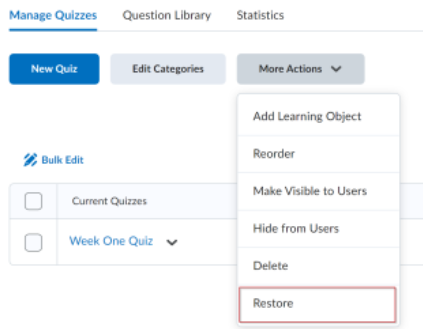
  • Save time and prevent data loss with the Restore Deleted Quizzes functionality.  This feature adds a new option in quizzes that allows instructors to restore deleted quizzes.  This option appears in the More Actions menu in the Quizzes tool.


PebblePad Brief: Feedback Options

Langara’s pilot of the ePortfolio learning platform, PebblePad, is now in its second year. This is the second in a series highlighting some of the platform’s features. Whether you’re already using PebblePad or considering using it at some point in the future, our hope is that the PebblePad Brief series extends your understanding of the platform’s capabilities.
This month’s “Brief” is going to focus on the variety of feedback options available within PebblePad, and how they can benefit students and instructors. Whether you’re looking for a tool to give formative or summative feedback, PebblePad has multiple options.

Feedback in Brightspace Versus PebblePad:

PebblePad functions differently than Brightspace when it comes to assignments. In Brightspace, students usually submit a file by a due date and the instructor has no way of giving formative feedback on the developing assignment unless they ask students to submit a draft of their work. PebblePad, on the other hand, doesn’t work with file submissions but with shared links. If an assignment is set up for auto-submission, the instructor is able to see the students’ work in real time as soon as they start it. This enables instructors to give formative feedback any time prior to a due date, as well as summative assessment after a due date. Further, unlike Brightspace, students have access to the feedback after their course finishes and even after they graduate.

Feedback Options:

Simple Comments:

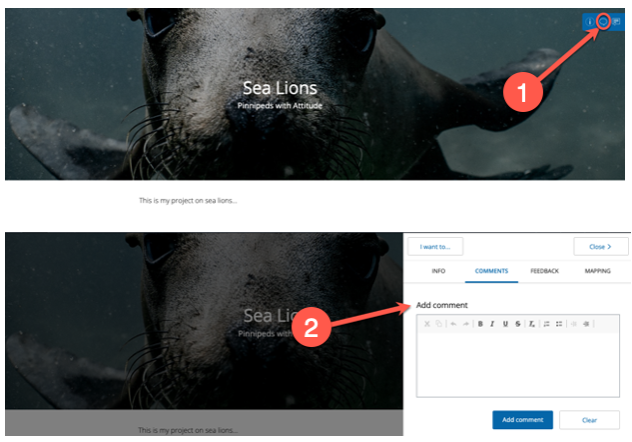
  • The simplest way to give feedback in PebblePad is through general comments. To use the comment feature, a student shares a link with someone else. When that person clicks on the link, there’s a comment icon on to the top-right which can be used to by instructors, mentors, or peers to provide feedback. The student can reply to the comments so feedback is potentially dialogic.

Adding Comments Via the Comment Icon


Feedback Comments:

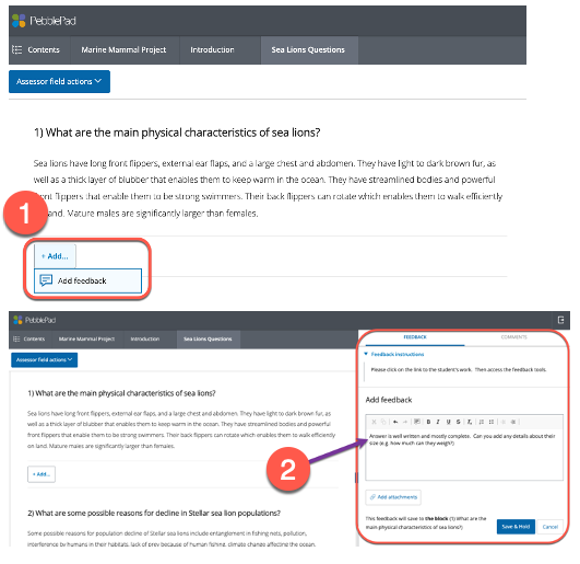
  • By using the tools in the formal assessment part of the platform called ATLAS, there are extended options. Here we can to a specific answer, a page, or the entire assignment. If an instructor will be using the same comments for many students, feedback statements can be created that will be available when marking. Any comments added via ATLAS have the advantage that they are only visible to the student and won’t be seen by anyone they share their work with. When assessing in ATLAS, instructors have the option to release feedback as it’s added, or hold all feedback for later release so that the whole class receives it at the same time.

Adding Block Feedback Comments via ATLAS

 Assessor Fields:

  • When creating scaffolded learning activities for students, assessor fields can be inserted right into body of the assignment. It’s possible to assign “blocks” or sections to either the students or the instructor to complete. Instructors can be assigned text fields, drop-downs, radio buttons, checkboxes, and rubrics that only they can complete (the student will see them but not be able to complete them). These fields are easy for instructors to find when they’re assessing, and easy for the student to see when they’re looking for feedback. This type of feedback will always be visible so is generally used for activities to develop knowledge or skills, rather than assignments that might be used as a showcase in future.

Adding Feedback via Assessor Fields

Feedback Templates:

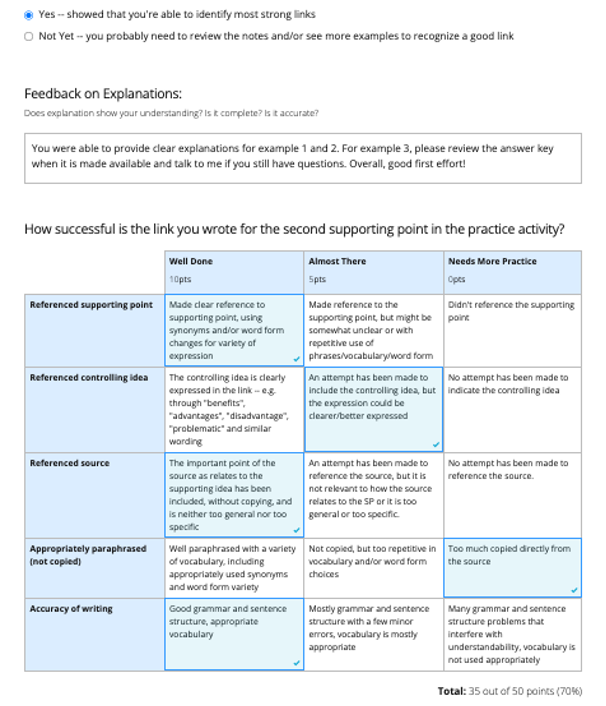
  • These are very similar to rubrics in Brightspace, and can be created and used to assess students’ work in ATLAS. They can include any or all of: clickable rubric components, comment fields, radio buttons, drop-downs, and checkboxes. Because this feedback will only be visible to the student, this is a better option to use with assignments that the student might want to use as a showcase to show to others.

Providing Feedback via Feedback Templates

Grades:

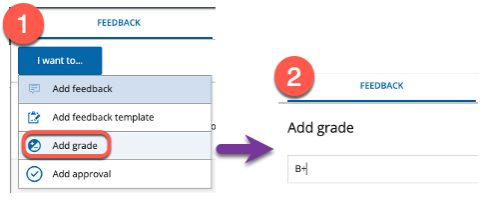
  • Assignments can also be graded in ATLAS. Grading is flexible as instructors can enter percentages, letter grades, or even pass/fail wording such as “meets expectations/does not meet expectations”. Although PebblePad is not currently integrated with Brightspace, it is possible to get a CSV file of all grades and easily transfer them to a gradebook.

    Adding Grades

Feedback Longevity:

  • We all know that it takes time and effort to provide meaningful feedback to learners. One of the advantages of using PebblePad is that the students have access to feedback long after the course ends and even after they graduate as students can get an alumni account. This will help them make meaningful connections between assignments, between courses, and between studies and career. Feedback can be fed forward.

If you have questions about PebblePad or any other learning technology that EdTech supports, we can be contacted at edtech@langara.ca

Summer EdTech Book Club: Intentional Tech

Join the EdTech Online Book Club as we read and discuss Derek Bruff’s:
Intentional Tech: Principles to Guide the Use of Educational Technology in College Teaching.

“Arguing that teaching and learning goals should drive instructors’ technology use, not the other way around, Intentional Tech explores seven research-based principles for matching technology to pedagogy. Through stories of instructors who creatively and effectively use educational technology, author Derek Bruff approaches technology not by asking ‘How to?’ but by posing a more fundamental question: ‘Why?’ “

The EdTech Book Club is a supportive environment in which to share ideas, pose questions, and learn about effective online teaching practices, EdTech theory, and hands-on online tools.

Date: Tuesday, May 11th – Tuesday, June 29th

Time: 4:30 – 5:45 pm

Location: Online

Register here.

Increasing Accessibility of Course Content: Tips for using the Brightspace Accessibility Checker

Increasing accessibility of course content: Tips for using the Brightspace Accessibility Checker

Web Accessibility refers to the inclusive practice of making websites and online content usable by people of all abilities and disabilities. Use the Brightspace Accessibility Checker to identify common accessibility issues on your Brightspace course pages.

How to run the Accessibility Checker

The Check Accessibility button is located on the bottom right of the Brightspace HTML EditorThe Accessibility Checker is available within the HTML Editor. When you are in edit HTML mode, the checker is located on the bottom right corner of the Editor, next to the Spellcheck button.

Alternative Text

The most common accessibility issue is missing image alternative text (alt text). Alt text is background code added to a digital image that allows a screen reader or other assistive technology to describe the image’s content and meaning to those who cannot see the image or may be unable to process the image due to a cognitive disability. When alt text is missing, the Brightspace Accessibility Checker will flag the issue, noting Images must have an alternative text description.
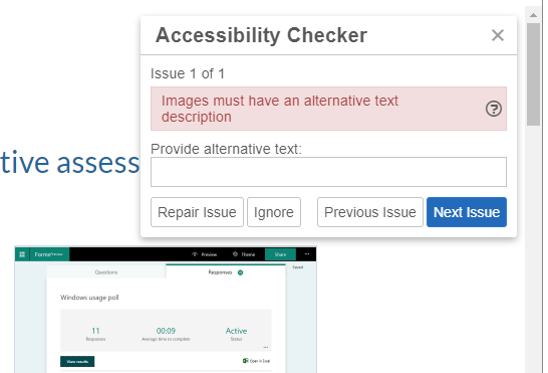
The Accessibility Checker flags missing alternative text with the message Images must have an alternative text description

How to add alt text

The easiest way to add alt text is to include it when inserting images into a Brightspace page. When you insert an image using the HTML editor, a pop-up appears, prompting you to add alt text. Brightspace add the alt text to the HTML code (e.g., <img src=”filename.jpg” alt=”Example of Microsoft Forms response results.” />).

Treat informative images as decorative by supplying an empty alt attribute or checking the box next to This image is decorative. Brightspace will add alt text of “” to indicate an empty alt attribute.

Brightspace prompts users to add alt text when inserting images

If the Accessibility Checker flags an image as missing alternative text, you can fix the issue by adding alt text inside the report panel or by adding it directly to the HTML code.

Tips for creating alt text

When deciding what to include as alternative text, imagine that you are describing the image aloud over the phone to someone who needs to understand the image.

According to WebAIM, alternative text should:

  • Be accurate and equivalent in presenting the same content and function of the image.
  • Be succinct.
  • Not be redundant or provide the same information as text within the context of the image.
  • Not use the phrases “image of…” or “graphic of…” to describe the image unless the fact that an image is a photograph or illustration, etc. is important content.

WebAIM offers a fantastic guide to creating appropriate alternative text for images.

Note: It is always a good idea to double-check the alt text included in your HTML code. An accessibility checker only indicates whether alt text is included, it cannot check the quality or usability of the alt text.

Contrast

Low colour contrast is another common accessibility issue. Insufficient contrast between the foreground and background reduces readers’ ability to perceive content on the page.

Insufficient colour contrast is flagged by the checher

The W3C Web Content Accessibility Guidelines 2.0 define specific contrast ratios that must be met in order to comply at particular levels. To meet the guidelines, text or images of text must have a contrast ratio of at least 4.5:1 (or 3:1 for large text).

The maximum contrast is black vs. white but other options are available such as navy/white, cream/dark brown, yellow/black, and similar color schemes. A colour scheme is considered legible if it can be read in grayscale/black and white mode.

The Accessibility Checker flags:

  • Large text that does not have a contrast ratio of at least 3:1.
  • Visual presentation that does not have a contrast ratio of at least 4.5:1.

Adjusting contrast

Try using the WebAIM Color Contrast Checker to adjust the contrast by lightening or darkening elements.

Headings

A heading describes the content that follows it, giving uses a sense of the page’s organization and structure. Headings give sighted users a way to quickly find what they want on the page.

If the underlying code for a page’s headings is correct, screen reader users can also benefit from headings. Screen reader and other assistive technology users can also skip from heading to heading.

The checker flags improperly applied heading styles

How to create headings in Brightspace

Select the text then set it to the proper heading using the Format dropdown menu. Do not skip levels. If the heading levels are not in the correct order, the Accessibility Checker will flag the issue.

Tips for creating headings

    • Headings are ranked <h1> through <h6>.
    • Every page should have an H1 heading, representing the most important idea on the page, and sub-sections organized with <h2> level headings. Those sub-sections can themselves be divided with <h3> level headings, and so on.
  • Headings need to be used in the correct order.
  • Do not skip heading levels to be more specific (for example, do not skip from <h2> to <h5>).
  • Do not select heading levels based on their appearance. Select the appropriate heading rank in your hierarchy.

Note: The Brightspace Accessibility Checker will not flag a page without headings; it only flags incorrectly ordered headings. 

Lists

Lists are great from an accessibility standpoint because they provide structured order to content in a linear fashion. Lists are recommended as potential replacements for simple tables, as tables can be more challenging to navigate. Properly code the lists so that they convey the hierarchical content structure to screen reader users. Use unordered lists <ul> when there is no specific order intended for the list you are creating. Use ordered lists <ol> when there is a defined sequence or order for the list.

The checker flags text that appears to be a list but has not been properly styled.

The Brightspace Accessibility Checker will flag items that appear to be a list but do have  unordered or ordered list styles applied.

How to use lists

Select the items, then choose the Unordered List icon if the order does not matter, or select Ordered List from the dropdown menu if it is sequential.

Use bullets for unordered lists and numbers for ordered lists

Descriptive Hyperlink Text

The Accessibility Checker cannot assess whether links are meaningful or accessible; however, making hypertext links accessible is one of the most basic and most important aspects of web accessibility.

How to create a hyperlink

Select Insert Quicklink icon, then select URL in the popup window, enter the URL and a title that describes the link’s destination.

Suggestions for creating meaningful and accessible hyperlinks

  • Link text should be unique within a page, should be meaningful when read out of context, and should help users to know something about their destination if they click on it. Link text such as “Click here” and “More” fail to meet these criteria.
  • Avoid providing two links right next to each other that point to the same location (it can be confusing for screen reader users).

To request help with improving the accessibility of your course content, email edtech@langara.ca