Learning Labs

Introducing Learning Labs

Learning Labs are interactive, focused, and supported learning sessions where you can learn how to implement Langara’s teaching and learning technologies and tools. Capacity is limited to ensure all attendees have an opportunity to ask questions, try out tools, and receive support. Support in the room will reflect the technology, tool, and learning outcomes; however, you can expect to interact with EdTech Advisors, Specialists, and Technologists as well as TCDC Curriculum Consultants. The Labs are an opportunity to implement something new or improve what already exists with experts who can answer technical questions and provide advice.

Fall Learning Lab session topics include:

Brightspace HTML Templates

After participating in this lab, participants should be able to:

  • Use the Brightspace HTML editor.
  • Explain the benefits of using the Brightspace HTML templates.
  • Apply the templates to a new Brightspace HTML page.
  • Apply the latest version of the template to an existing Brightspace HTML page.
  • Mix and match HTML elements—such as image placement, accordions, callouts, tables, and tabs—from the various templates.

Adding closed captions to a video in Brightspace

After participating in this lab, participants should be able to:

  • Upload a video to MediaSpace.
  • Add closed captions to a video.
  • Use the MediaSpace captions editor.
  • Use the OneDrive captioning tool.
  • Embed a video in a Brightspace course file.

Creating an accessible Word document

After participating in this lab, participants should be able to:

  • Employ plain language.
  • Select styles that improve legibility of text.
  • Structure a document.
  • Create accessible hyperlinks and tables.
  • Add alternative text to visual content.
  • Use the built-in accessibility checker.

Improving the accessibility of existing PowerPoint slides

After participating in this lab, participants should be able to:

  • Avoid the most common PowerPoint accessibility mistakes.
  • Use the accessibility checker and make corrections.
  • Apply templates.
  • Apply structure.
  • Select accessible fonts and font styling.
  • Employ accessible use of colour.
  • Add alternative text to images.
  • Write meaningful hyperlink text.

Save time marking with Rubrics

After participating in this lab, participants should be able to: 

  • Define the purpose of the assignment or assessment 
  • Decide which type of rubric will be used with assignments
  • Create statements of expected performance at each level of the rubric 
  • Transfer analog rubrics into a digital version on Brightspace 
  • Associate their rubric with the assignment in Brightspace 


Using Peer Assessment for Collaborative Learning

Peer Assessment

Peer Assessment PictureThere are several benefits to using peer assessment within your course, one of which is to provide students with a more engaging experience. Opportunities to assess other learners’ work will help students learn to give constructive feedback and gain different perspectives through viewing their peers’ work. There is evidence to show that including students in the assessment process improves their performance. (1) (2) (3)

Research also shows that students can improve their linguistic and communicative skills through peer review. (4) The exposure to a variety of feedback can help students improve their work and can even enhance their understanding of the subject matter. Furthermore, learning to give effective feedback helps develop self-regulated learning, as ‘assessment for learning [shifts] to assessment as learning’ in that it is ‘an active process of cognitive restructuring that occurs when individuals interact with new ideas’ (5).

In addition to the benefits to students, peer assessment can also provide instructors with an efficient way of engaging with a formative assessment framework where the student is given the chance to learn from their initial submission of an assignment.

Options for Peer Assessment within Brightspace:

Within Brightspace, there are several ways that instructors can set up peer assessment activities depending on the nature of the assignment and the needs of the instructor. Here we highlight several use cases.

Peer Assessment Example #1:

The instructor wants to have students assess each other’s group contributions for an assignment within Brightspace.

Using a Fillable PDF, which gives the students a rubric-like experience, a student can rate their peers based on different criteria that has been built into the assessment by the instructor. Students can provide feedback on a rating scale but also can provide more in-depth feedback if needed.

The advantage of using a fillable PDF is that the student can easily download the file and fill in the blanks. The student can reflect on the built-in criteria and the entire process should be quick and easy. The scores are calculated, and the instructor can interpret the results once the student has uploaded the PDF into the assignment folder.

A few disadvantages of this method are that the instructor will have to download each fillable PDF and manually enter a grade if marks are captured for peer assessment. The other issue is the level of student digital literacy. Directions on downloading the fillable PDF to the student’s desktop and not using the PDF within the browser is a key step for this process to work. Not all students are aware that fillable PDFs cannot be used successfully in-browser.

Peer Assessment Example #2:

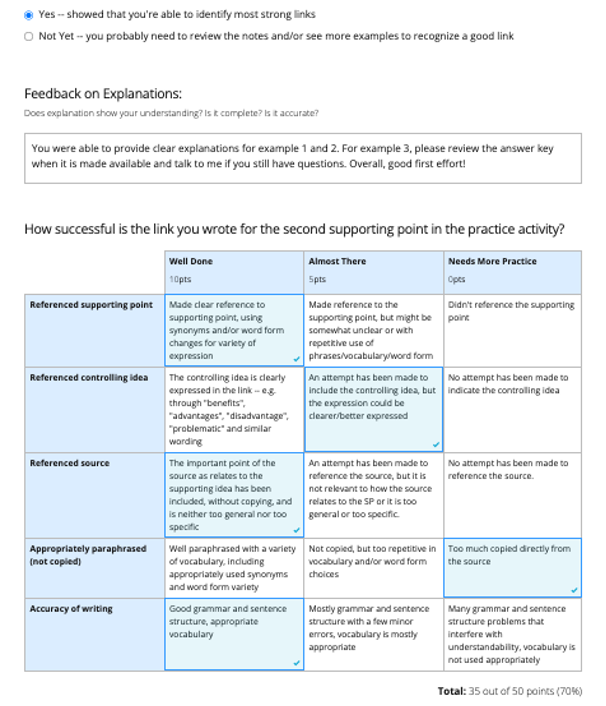
Students are working towards a final paper that is worth 15% of their overall mark. Before they submit the final version to the instructor, they will have the opportunity to evaluate another student’s draft and their own work using a rubric. If time is limited for this activity, learners can be invited to submit just the first paragraph of the paper, rather than the whole draft.

Through peer assessment, learners can often receive feedback more quickly than if they had to wait for the marker or instructor to review the class’s work.Aropa

Students upload their work to Brightspace Assignments where they are given a link to Aropä, a third-party open software which pairs students so they can assess each other’s work using a built-in rubric. Assessment can be anonymous, and the instructor can restrict feedback to students who have already submitted one review. Self-assessment can be required.

The advantages of Aropä is that it is free and gives instructors the ability to modify rubrics to suit one’s objectives. The disadvantage of this software is that it requires more time to set up. Rubrics provide only basic options: radio buttons or comment boxes. Instructors should be aware of privacy issues with Aropa and only upload first names of their students but avoid uploading student numbers.

Peer Assessment Activity #3

Students complete group presentations after which the class assesses each group’s performance, including their own group’s presentation, using a predetermined marking scheme.

The activity of assessing presentations encourages engagement with the work, versus passive observation, since students will be required to give feedback, encouraging deeper learning and enhancing retention.

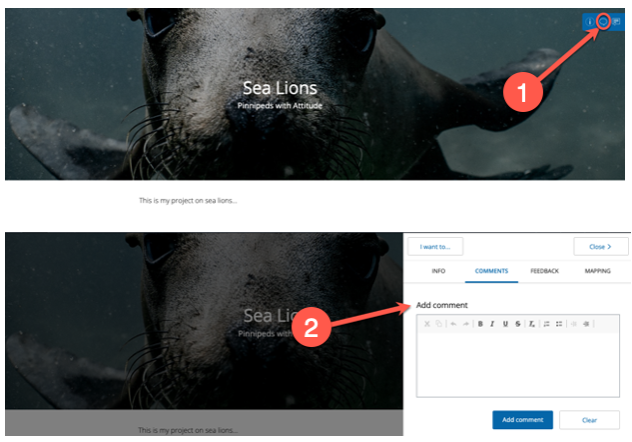
The advantages of using an H5P Documentation tool are that H5P can be created directly within Brightspace. It looks nice and is versatile. The disadvantage is that learners will have to export their feedback and then upload it into Brightspace. This two-step process requires some digital literacy skills.

Sample H5P Documentation Tool

Peer Assessment Activity #4:

This peer assessment activity is more about checking completion. Instructor needs to ensure accountability with group work.

Students are given an MS Form with some basic criteria by which to rate themselves and their peers in terms of attendance to meetings, work on the final product / assignment and collaboration. Students will use a point rating scale and need to justify their evaluation by providing a concrete example.

Similar to Example #1, students can complete a form using a Fillable PDF or another software such as Jotform or MS Forms to reflect and assess their own work as well as the work of their teammates. Jotform allows for more complex form building and will calculate totals for each student while MS Forms will not calculate but will allow you to get a sense of how students are doing overall with a basic rating on each criteria. (Focus on qualitative assessment)

Sample MS Form

Sample Jotform

A Note on Third Party Peer Review Software:

There are many different software available for peer assessment. Edtech is currently testing out several different ones and hopes to pilot them in the spring or summer semester. Currently, the only one that we are recommending (because it’s 0-cost) is Aropa. Aropa does a great job of providing several options for peer assessment, including self-assessment, privacy options for students, anonymous assessment, etc. It does not integrate completely with Brightspace so that is one disadvantage over some of the paid peer assessment programs currently available. Programs such as peerScholar, Feedback Fruits and Peerceptive have the capability to integrate into the Gradebook, thereby making it very easy to provide marks for the feedback that your students provide for one another.

For more information on any of the above tools, please contact edtech@langara.ca

References

  1. Wu, Wenyan, et al. “Evaluating Peer Feedback as a Reliable and Valid Complementary Aid to Teacher Feedback in EFL Writing Classrooms: A Feedback Giver Perspective.” Studies in Educational Evaluation, vol. 73, June 2022. EBSCOhost, https://doi.org/10.1016/j.stueduc.2022.101140.
  2. Double, Kit S., et al. “The Impact of Peer Assessment on Academic Performance: A Meta-Analysis of Control Group Studies.” Educational Psychology Review, vol. 32, no. 2, June 2020, pp. 481–509. EBSCOhost, https://doi.org/10.1007/s10648-019-09510-3.
  3. Planas-Lladó, A. et al., 2018. Using peer assessment to evaluate teamwork from a multidisciplinary perspective. Assessment & Evaluation in Higher Education, 43(1), pp.14–30.
  4. de Brusa, M. F. P., & Harutyunyan, L. (2019). Peer Review: A Tool to Enhance the Quality of Academic Written Productions. English Language Teaching, 12(5), 30-39.
  5. Western and Northern Canadian Protocol for Collaboration in Education, 2006 p.41

PebblePad Brief: Feedback Options

Langara’s pilot of the ePortfolio learning platform, PebblePad, is now in its second year. This is the second in a series highlighting some of the platform’s features. Whether you’re already using PebblePad or considering using it at some point in the future, our hope is that the PebblePad Brief series extends your understanding of the platform’s capabilities.
This month’s “Brief” is going to focus on the variety of feedback options available within PebblePad, and how they can benefit students and instructors. Whether you’re looking for a tool to give formative or summative feedback, PebblePad has multiple options.

Feedback in Brightspace Versus PebblePad:

PebblePad functions differently than Brightspace when it comes to assignments. In Brightspace, students usually submit a file by a due date and the instructor has no way of giving formative feedback on the developing assignment unless they ask students to submit a draft of their work. PebblePad, on the other hand, doesn’t work with file submissions but with shared links. If an assignment is set up for auto-submission, the instructor is able to see the students’ work in real time as soon as they start it. This enables instructors to give formative feedback any time prior to a due date, as well as summative assessment after a due date. Further, unlike Brightspace, students have access to the feedback after their course finishes and even after they graduate.

Feedback Options:

Simple Comments:

  • The simplest way to give feedback in PebblePad is through general comments. To use the comment feature, a student shares a link with someone else. When that person clicks on the link, there’s a comment icon on to the top-right which can be used to by instructors, mentors, or peers to provide feedback. The student can reply to the comments so feedback is potentially dialogic.

Adding Comments Via the Comment Icon


Feedback Comments:

  • By using the tools in the formal assessment part of the platform called ATLAS, there are extended options. Here we can to a specific answer, a page, or the entire assignment. If an instructor will be using the same comments for many students, feedback statements can be created that will be available when marking. Any comments added via ATLAS have the advantage that they are only visible to the student and won’t be seen by anyone they share their work with. When assessing in ATLAS, instructors have the option to release feedback as it’s added, or hold all feedback for later release so that the whole class receives it at the same time.

Adding Block Feedback Comments via ATLAS

 Assessor Fields:

  • When creating scaffolded learning activities for students, assessor fields can be inserted right into body of the assignment. It’s possible to assign “blocks” or sections to either the students or the instructor to complete. Instructors can be assigned text fields, drop-downs, radio buttons, checkboxes, and rubrics that only they can complete (the student will see them but not be able to complete them). These fields are easy for instructors to find when they’re assessing, and easy for the student to see when they’re looking for feedback. This type of feedback will always be visible so is generally used for activities to develop knowledge or skills, rather than assignments that might be used as a showcase in future.

Adding Feedback via Assessor Fields

Feedback Templates:

  • These are very similar to rubrics in Brightspace, and can be created and used to assess students’ work in ATLAS. They can include any or all of: clickable rubric components, comment fields, radio buttons, drop-downs, and checkboxes. Because this feedback will only be visible to the student, this is a better option to use with assignments that the student might want to use as a showcase to show to others.

Providing Feedback via Feedback Templates

Grades:

  • Assignments can also be graded in ATLAS. Grading is flexible as instructors can enter percentages, letter grades, or even pass/fail wording such as “meets expectations/does not meet expectations”. Although PebblePad is not currently integrated with Brightspace, it is possible to get a CSV file of all grades and easily transfer them to a gradebook.

    Adding Grades

Feedback Longevity:

  • We all know that it takes time and effort to provide meaningful feedback to learners. One of the advantages of using PebblePad is that the students have access to feedback long after the course ends and even after they graduate as students can get an alumni account. This will help them make meaningful connections between assignments, between courses, and between studies and career. Feedback can be fed forward.

If you have questions about PebblePad or any other learning technology that EdTech supports, we can be contacted at edtech@langara.ca

PebblePad Brief: Interactive Curriculum Materials

Langara’s pilot of the ePortfolio learning platform, PebblePad, is now in its second year. This will be the first in a series highlighting some of the platform’s features. Whether you’re already using PebblePad or considering using it at some point in the future, our hope is that the PebblePad Brief series extends your understanding of the platform’s capabilities.
Our first “Brief” is going to focus on what components you can include in learning materials.  Although ePortfolio (electronic/digital portfolio) technology is a tool for students to showcase their work, that’s not all PebblePad can do. In fact, it’s also a great platform to build scaffolded learning activities.
When building learning resources in PebblePad, content can be multimodal and responses can be dynamic. A learning activity, for example, might have text for students to read, a podcast for them to listen to, and a video for them to watch.  You could then add interactive fields for the students to respond to this content by checking their comprehension, rating their response, reflecting on what they’ve learned, or planning their next steps – all on the same page (or in a separate tab or resource if you’d prefer).
Content types that can be added to a learning resource include:

  • text
  • image
  • audio
  • video
  • links to other resources

Interactive response fields that can be added for students to actively engage in learning can include:

  • text fields (single or multi-line)
  • radio buttons (one answer only), checkboxes (multiple answers possible) or drop-downs
  • ratings (binary, Likert, numeric)
  • fillable tables
  • rubrics
  • add evidence buttons (allows comment or file upload)
  • date pickers
  • signature fields

Those at Langara already using PebblePad have provided feedback that the templates look great and, even more importantly, students find them easy to use.
It’s also easy to share these learning resources with your students… but we’ll leave that for another PebblePad Brief.
If you have questions about PebblePad or any other learning technology that EdTech supports, we can be contacted at edtech@langara.ca

PebblePad template with text and video in the top half and questions for students to answer in the bottom half
PebblePad Interactive Worksheet

PebblePad Briefs: Interactive Curriculum Materials

Langara’s pilot of the ePortfolio learning platform, PebblePad, is now in its second year. This will be the first in a series highlighting some of the platform’s features. Whether you’re already using PebblePad or considering using it at some point in the future, our hope is that the PebblePad Briefs extend your understanding of the platform’s capabilities.
Our first “Brief” is going to focus on what components you can include in learning materials.  Although ePortfolio (electronic/digital portfolio) technology is a tool for students to showcase their work, that’s not all PebblePad can do. In fact, it’s also a great platform to build scaffolded learning activities.
When building learning resources in PebblePad, content can be multimodal and responses can be dynamic. A learning activity, for example, might have text for students to read, a podcast for them to listen to, and a video for them to watch.  You could then add interactive fields for the students to respond to this content by checking their comprehension, rating their response, reflecting on what they’ve learned, or planning their next steps – all on the same page (or in a separate tab or resource if you’d prefer).
Content types that can be added to a learning resource include:

  • text
  • image
  • audio
  • video
  • links to other resource

Interactive response fields that can be added for students to actively engage in learning can include:

  • text fields (single or multi-line)
  • radio buttons (one answer only), checkboxes (multiple answers possible) or drop-downs
  • ratings (binary, Likert, numeric)
  • fillable tables
  • rubrics
  • add evidence buttons (allows comment or file upload)
  • date pickers
  • signature fields

Those at Langara already using PebblePad have provided feedback that the templates look great and, even more importantly, students find them easy to use.
It’s also easy to share these learning resources with your students… but we’ll leave that for another PebblePad Brief.
If you have questions about PebblePad or any other learning technology that EdTech supports, we can be contacted at edtech@langara.ca

PebblePad template with text and video in the top half and questions for students to answer in the bottom half
PebblePad Interactive Worksheet

Ed Tech Sandbox Sessions

What is an Ed Tech sandbox?

Playground

The Ed Tech sandbox is a small, contained space to safely learn and practice using various educational technologies and tools. Participants may explore a specific tool or a range of tools that can be adopted to support a specific teaching or learning goal. To create a safe environment and allow time for practice, enrollment is limited to 10 participants.

Do you want to gain confidence with teaching & learning tools?

These weekly sessions are an opportunity to develop an understanding of how technologies and tools can be effectively used in teaching, learning, and assessment before introducing them in the classroom.

When are the sessions held?

Ed Tech sandbox sessions are planned for every Friday from 11:00 am – 12:30 pm. Participants choose whether to attend via Zoom or in-person.

Upcoming sessions

October 22nd – Kaltura Mediaspace and Capture

Kaltura Capture controls.

Using video in your course is a great way to engage students and present learning content in alternative ways, following the principles of UDL.

In this session we will demonstrate recording your screen, using the Kaltura Capture application to record your screen, and uploading the recording to Mediaspace. There will be lots of time to ask questions and play.

October 29th – Brightspace Rubrics Tool

""A Brightspace rubric can:

  • Be reused (they can be copied and used in multiple course shells).
  • Set out expectations and criteria for students.
  • Provide grading transparency and clear feedback.

Join us to learn how to associate rubrics with assignments, graded discussion topics and grade items.

D2L Updates

Welcome back to a new semester.  D2L has made some changes to the names of tools and added a My Media tool, as well as new features for the Grades, Groups, Quizzes and Discussions tools.

Tool name changes:

Former Name   Updated Name
Dropbox Assignments
News Announcements
Pager Instant Messages
Edit Course Course Admin
In Content, New Upload/Create
In Content, Add Existing Activities Existing Activities

If you refer to any of the tools within your course materials, you will need to update the language.

For example, if you have instructions in your course outline for students to submit assignments to “Dropbox,” you will need to edit it to read “Assignments tool.”

Read More