 Langara’s pilot of the ePortfolio learning platform, PebblePad, is now in its second year. This is the second in a series highlighting some of the platform’s features. Whether you’re already using PebblePad or considering using it at some point in the future, our hope is that the PebblePad Brief series extends your understanding of the platform’s capabilities.
This month’s “Brief” is going to focus on the variety of feedback options available within PebblePad, and how they can benefit students and instructors. Whether you’re looking for a tool to give formative or summative feedback, PebblePad has multiple options.
Feedback in Brightspace Versus PebblePad:
PebblePad functions differently than Brightspace when it comes to assignments. In Brightspace, students usually submit a file by a due date and the instructor has no way of giving formative feedback on the developing assignment unless they ask students to submit a draft of their work. PebblePad, on the other hand, doesn’t work with file submissions but with shared links. If an assignment is set up for auto-submission, the instructor is able to see the students’ work in real time as soon as they start it. This enables instructors to give formative feedback any time prior to a due date, as well as summative assessment after a due date. Further, unlike Brightspace, students have access to the feedback after their course finishes and even after they graduate.
Feedback Options:
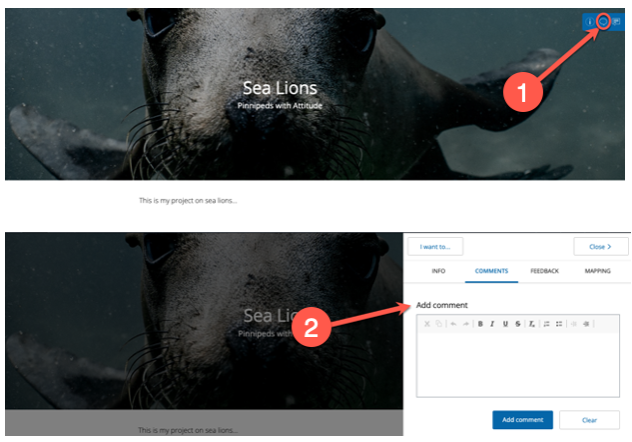
Simple Comments:
- The simplest way to give feedback in PebblePad is through general comments. To use the comment feature, a student shares a link with someone else. When that person clicks on the link, there’s a comment icon on to the top-right which can be used to by instructors, mentors, or peers to provide feedback. The student can reply to the comments so feedback is potentially dialogic.
Feedback Comments:
- By using the tools in the formal assessment part of the platform called ATLAS, there are extended options. Here we can to a specific answer, a page, or the entire assignment. If an instructor will be using the same comments for many students, feedback statements can be created that will be available when marking. Any comments added via ATLAS have the advantage that they are only visible to the student and won’t be seen by anyone they share their work with. When assessing in ATLAS, instructors have the option to release feedback as it’s added, or hold all feedback for later release so that the whole class receives it at the same time.

Assessor Fields:
- When creating scaffolded learning activities for students, assessor fields can be inserted right into body of the assignment. It’s possible to assign “blocks” or sections to either the students or the instructor to complete. Instructors can be assigned text fields, drop-downs, radio buttons, checkboxes, and rubrics that only they can complete (the student will see them but not be able to complete them). These fields are easy for instructors to find when they’re assessing, and easy for the student to see when they’re looking for feedback. This type of feedback will always be visible so is generally used for activities to develop knowledge or skills, rather than assignments that might be used as a showcase in future.

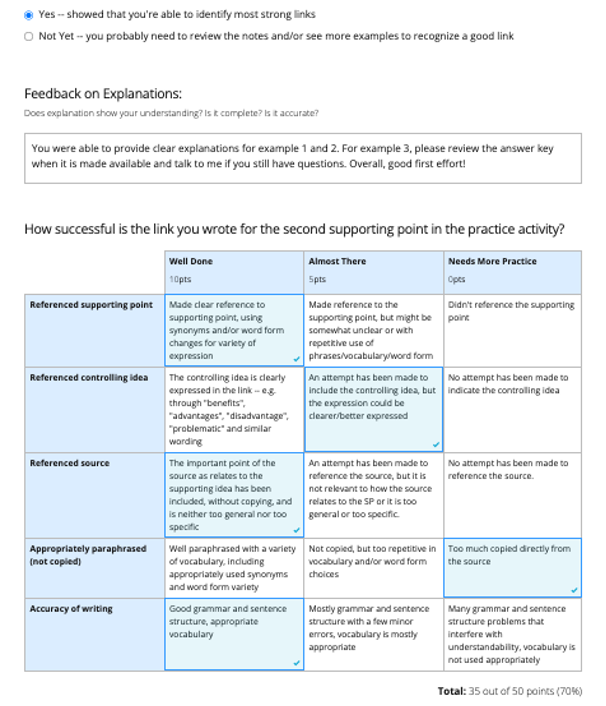
Feedback Templates:
- These are very similar to rubrics in Brightspace, and can be created and used to assess students’ work in ATLAS. They can include any or all of: clickable rubric components, comment fields, radio buttons, drop-downs, and checkboxes. Because this feedback will only be visible to the student, this is a better option to use with assignments that the student might want to use as a showcase to show to others.
Grades:
- Assignments can also be graded in ATLAS. Grading is flexible as instructors can enter percentages, letter grades, or even pass/fail wording such as “meets expectations/does not meet expectations”. Although PebblePad is not currently integrated with Brightspace, it is possible to get a CSV file of all grades and easily transfer them to a gradebook.

Adding Grades
Feedback Longevity:
- We all know that it takes time and effort to provide meaningful feedback to learners. One of the advantages of using PebblePad is that the students have access to feedback long after the course ends and even after they graduate as students can get an alumni account. This will help them make meaningful connections between assignments, between courses, and between studies and career. Feedback can be fed forward.
If you have questions about PebblePad or any other learning technology that EdTech supports, we can be contacted at edtech@langara.ca