Fall EdTEch Book Club 2021

This fall, the EdTech Book Club will read and discuss The Manifesto for Teaching Online by Siân Bayne, Peter Evans, Rory Ewins, Jeremy Knox, James Lamb, Hamish Macleod, Clara O’Shea, Jen Ross, Philippa Sheail and Christine Sinclair.

This book is an update to a provocative manifesto intended to serve as a platform for debate and as a resource and inspiration for those teaching in online environments. In 2011, a group of scholars associated with the Centre for Research in Digital Education at the University of Edinburgh released “A Manifesto for Teaching Online,” a series of provocative statements intended to articulate their pedagogical philosophy. In the original manifesto and a 2016 update, the authors counter both the “impoverished” vision of education being advanced by corporate and governmental edtech and higher education’s traditional view of online students and teachers as second-class citizens. The two versions of the manifesto were much discussed, shared, and debated. In this book, the authors have expanded the text of the 2016 manifesto, revealing the sources and larger arguments behind the abbreviated provocations.

Join us for discussions on The Manifesto for Teaching Online. We will reflect on our practices as users of educational technology, question assumptions and consider new ideas.

We will meet on Tuesdays, from 4:30 – 5:30, from September 21st – November 16th (for 9 weeks). We will be experimenting with a hybrid model; you can join us online and/or in person in the TCDC/ETech space (cookies and coffee/tea available).

Please note: While we encourage participants to sign up for the duration, if you wish to attend only one or two sessions, please contact us at tcdc@langara.ca to get the Zoom link and meeting details.

Unlimited e-book access and limited hard copies of the book are available through the Langara library. The book is also available for purchase via Book WarehouseChapters, and Amazon.

The EdTech Book Club is a supportive environment in which to share ideas, pose questions, and learn about effective online teaching practices, EdTech theory, and hands-on online tools.


Increasing accessibility of course content: How to create closed-captioned videos

Increasing accessibility of course content: How to create closed-captioned videos

What are closed captions?

Closed captions are a transcription of dialogue that is added to a video or digital presentation and, when turned on, appears as text on the bottom of the screen. The primary purpose of captions is to support people who are deaf or hard-of-hearing. However, captions have also been shown to support the learning of students who speak English as an additional language, students with learning disabilities, and students who are new to a discipline and may be unfamiliar with the jargon and unique terminology.

Share closed-captioned videos with students in four easy steps

Step one: Upload your video to Kaltura MediaSpace

Before you can add closed captions to a video you will need to upload it to your MediaSpace library. If you are unfamiliar with uploading videos, click through the steps below. If you have experience with MediaSpace, skip ahead to find out how to add closed captions.

Step two: Add and edit closed captions in Kaltura MediaSpace

The following video will walk you through the steps of ordering and editing machine-generated closed captions in MediaSpace.

Direct video link: Kaltura MediaSpace: Adding closed captions

Step three: Publish your video in Kaltura MediaSpace

Newly uploaded media is set to Private by default so after adding closed captions, you will need to publish your video.

Setting a video to Unlisted allows you to share your video with students but makes it unsearchable. Setting a video to Published allows you to share your video or make it available in a Channel or playlist.

""Save the changes, and then Click Go To Media to view the video, or Go To My Media to see the video in your MyMedia library.

Step four: Share your video with your students in Brightspace

You are now ready to share your closed-captioned video with students.  In Brightspace, you can insert Kaltura videos anywhere you find the HTML Editor.

Increasing Accessibility of Course Content: Tips for using the Brightspace Accessibility Checker

Increasing accessibility of course content: Tips for using the Brightspace Accessibility Checker

Web Accessibility refers to the inclusive practice of making websites and online content usable by people of all abilities and disabilities. Use the Brightspace Accessibility Checker to identify common accessibility issues on your Brightspace course pages.

How to run the Accessibility Checker

The Check Accessibility button is located on the bottom right of the Brightspace HTML EditorThe Accessibility Checker is available within the HTML Editor. When you are in edit HTML mode, the checker is located on the bottom right corner of the Editor, next to the Spellcheck button.

Alternative Text

The most common accessibility issue is missing image alternative text (alt text). Alt text is background code added to a digital image that allows a screen reader or other assistive technology to describe the image’s content and meaning to those who cannot see the image or may be unable to process the image due to a cognitive disability. When alt text is missing, the Brightspace Accessibility Checker will flag the issue, noting Images must have an alternative text description.
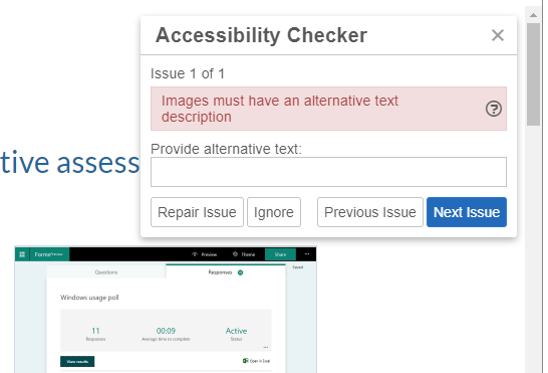
The Accessibility Checker flags missing alternative text with the message Images must have an alternative text description

How to add alt text

The easiest way to add alt text is to include it when inserting images into a Brightspace page. When you insert an image using the HTML editor, a pop-up appears, prompting you to add alt text. Brightspace add the alt text to the HTML code (e.g., <img src=”filename.jpg” alt=”Example of Microsoft Forms response results.” />).

Treat informative images as decorative by supplying an empty alt attribute or checking the box next to This image is decorative. Brightspace will add alt text of “” to indicate an empty alt attribute.

Brightspace prompts users to add alt text when inserting images

If the Accessibility Checker flags an image as missing alternative text, you can fix the issue by adding alt text inside the report panel or by adding it directly to the HTML code.

Tips for creating alt text

When deciding what to include as alternative text, imagine that you are describing the image aloud over the phone to someone who needs to understand the image.

According to WebAIM, alternative text should:

  • Be accurate and equivalent in presenting the same content and function of the image.
  • Be succinct.
  • Not be redundant or provide the same information as text within the context of the image.
  • Not use the phrases “image of…” or “graphic of…” to describe the image unless the fact that an image is a photograph or illustration, etc. is important content.

WebAIM offers a fantastic guide to creating appropriate alternative text for images.

Note: It is always a good idea to double-check the alt text included in your HTML code. An accessibility checker only indicates whether alt text is included, it cannot check the quality or usability of the alt text.

Contrast

Low colour contrast is another common accessibility issue. Insufficient contrast between the foreground and background reduces readers’ ability to perceive content on the page.

Insufficient colour contrast is flagged by the checher

The W3C Web Content Accessibility Guidelines 2.0 define specific contrast ratios that must be met in order to comply at particular levels. To meet the guidelines, text or images of text must have a contrast ratio of at least 4.5:1 (or 3:1 for large text).

The maximum contrast is black vs. white but other options are available such as navy/white, cream/dark brown, yellow/black, and similar color schemes. A colour scheme is considered legible if it can be read in grayscale/black and white mode.

The Accessibility Checker flags:

  • Large text that does not have a contrast ratio of at least 3:1.
  • Visual presentation that does not have a contrast ratio of at least 4.5:1.

Adjusting contrast

Try using the WebAIM Color Contrast Checker to adjust the contrast by lightening or darkening elements.

Headings

A heading describes the content that follows it, giving uses a sense of the page’s organization and structure. Headings give sighted users a way to quickly find what they want on the page.

If the underlying code for a page’s headings is correct, screen reader users can also benefit from headings. Screen reader and other assistive technology users can also skip from heading to heading.

The checker flags improperly applied heading styles

How to create headings in Brightspace

Select the text then set it to the proper heading using the Format dropdown menu. Do not skip levels. If the heading levels are not in the correct order, the Accessibility Checker will flag the issue.

Tips for creating headings

    • Headings are ranked <h1> through <h6>.
    • Every page should have an H1 heading, representing the most important idea on the page, and sub-sections organized with <h2> level headings. Those sub-sections can themselves be divided with <h3> level headings, and so on.
  • Headings need to be used in the correct order.
  • Do not skip heading levels to be more specific (for example, do not skip from <h2> to <h5>).
  • Do not select heading levels based on their appearance. Select the appropriate heading rank in your hierarchy.

Note: The Brightspace Accessibility Checker will not flag a page without headings; it only flags incorrectly ordered headings. 

Lists

Lists are great from an accessibility standpoint because they provide structured order to content in a linear fashion. Lists are recommended as potential replacements for simple tables, as tables can be more challenging to navigate. Properly code the lists so that they convey the hierarchical content structure to screen reader users. Use unordered lists <ul> when there is no specific order intended for the list you are creating. Use ordered lists <ol> when there is a defined sequence or order for the list.

The checker flags text that appears to be a list but has not been properly styled.

The Brightspace Accessibility Checker will flag items that appear to be a list but do have  unordered or ordered list styles applied.

How to use lists

Select the items, then choose the Unordered List icon if the order does not matter, or select Ordered List from the dropdown menu if it is sequential.

Use bullets for unordered lists and numbers for ordered lists

Descriptive Hyperlink Text

The Accessibility Checker cannot assess whether links are meaningful or accessible; however, making hypertext links accessible is one of the most basic and most important aspects of web accessibility.

How to create a hyperlink

Select Insert Quicklink icon, then select URL in the popup window, enter the URL and a title that describes the link’s destination.

Suggestions for creating meaningful and accessible hyperlinks

  • Link text should be unique within a page, should be meaningful when read out of context, and should help users to know something about their destination if they click on it. Link text such as “Click here” and “More” fail to meet these criteria.
  • Avoid providing two links right next to each other that point to the same location (it can be confusing for screen reader users).

To request help with improving the accessibility of your course content, email edtech@langara.ca

Spring 2021 Online Book Club

Pivoting to remote online teaching has been a learning journey that has felt more like a roller coaster ride than a road trip at times. Let’s continue on this adventure together.

Join the online book club as we read selected parts of Tony Bates’s Teaching in a Digital Age and continue evolving and improving our teaching practices through reading, discussion, and self-reflection.

“Through 12 informative chapters, Teaching in a Digital Age: Guidelines for Teaching and Learning answers your questions and provides helpful guidance and suggestions on a host of topics including:

  • How do I decide whether my courses should be campus-based, blended or fully online?
  • What strategies work best when teaching in a technology-rich environment? What methods of teaching are most effective for blended and online classes?
  • How do I make choices among all the available media, whether text, audio, video, computer, or social media, in order to benefit my students and my subject?
  • How do I maintain quality of teaching, learning, and resources in a rapidly changing learning environment?
  • What are the real possibilities for teaching and learning using MOOCs, OERS, open textbooks?

While understanding and respecting the individual nature of teaching, Tony talks theory, options, best practices, point-by-point strategies – offering clear, practical, and actionable advice and guidance based on research and best practices.”

As a group, we will decide on which chapters to focus and set goals together. The book club is a supportive environment in which to share ideas, questions, and learn about effective online teaching practices, EdTech theory, and hands-on online tools.

Date: Tuesday, January 12 – Tuesday, March 23, no meeting on Feb. 16

Time: 4:30 – 5:45 pm

Location: Online

Link to e-book: https://pressbooks.bccampus.ca/teachinginadigitalagev2/

Sign up here: Spring 2021 Online Book Club

New Ed Tech Online Course Assistance Program

Have you heard about Ed Tech’s Online Course Assistants (OCA) pilot program? We have hired and trained three Co-op students who can provide online course support for your department or individual instructors.

Our Co-op students are all hard-working and detail-oriented, with strong technical skills.  They have had specific training on BrightSpace, Kaltura Capture, and Adobe Acrobat, in addition to the technical skills they acquired prior to joining Ed Tech, such as video editing.  They are very keen to take some of the non-teaching and non-marking work off your plate, including helping to get test banks into Brightspace for Fall final exams, and helping you prep your Spring 2021 courses.

Through the OCA pilot program, the OCAs can:

  • help you to organize and populate your courses, making sure there is a consistent look and feel to everything;
  • ensure course links are working, or add in new links;
  • organize your modules and submodules so that students find it easier to navigate the course, with the likelihood that you’ll have less student confusion and fewer inquiries to deal with;
  • turn your printed handouts into interactive PDF fillable files that students can type in and upload to assignment folders – no scanners needed;
  • edit your videos, such as breaking them into chapters and adding titles;
  • assist you with other functions as appropriate.

All we need is content, such as Word or PDF documents or your exam in a Word format and we’ll work with the Online Course Assistants (OCAs) to upload this content to your course. In most situations the OCAs will work in a course that isn’t live, thus protecting your students’ data. If they must work in a live course, they will sign a non-disclosure form.

Taking advantage of the OCA program may help you enjoy your winter break more. Please contact us edtech@langara.ca  to find out more about how we can help.

Who are the OCAs?

Picture of Fredrick Chen

Frederick Chen

Frederick is a 4th year BBA Marketing Management Student. He has worked in technology sales, acquiring advanced knowledge of productivity software and file transfer support, as well as developing excellent customer service skills.  He has advanced Excel skills, as well as experience course building in BrightSpace, and making Adobe fillable files. Frederick is excited about this opportunity to provide support for instructors in their transition to an online teaching environment.

Picture of Michael Cui

Michael Cui

Mike is a 4th year BBA Student. Mike is detail-oriented and highly committed to excellence in project execution.  Well-versed with educational technologies like Brightspace, Kaltura, and Zoom, he also has excellent skills converting handouts into fillable PDF documents. He looks forward to helping relieve some of the pressure instructors are experiencing because of the transition to online course delivery.

Photo of Lily Tran

Lily Tran

Lily is a 4th year accounting student who is proficient in Microsoft Office, BrightSpace, WordPress, and Sage 50, as well as video editing. She has 3 years’ experience as a Langara accounting marker, a position that has honed her attention to detail. She looks forward to helping instructors save time and create a better distant learning experience.

Video Introduction to the OCAs

Video Showcasing OCA Skills

Using Padlet to Enhance Online Group work

Wondering how to keep your online students engaged?  EdTech Advisor and former Chair of Library Tech, Diane Thompson, suggests Padlet, a tool that facilitates interactive and collaborative creativity.

Using Padlet to Enhance Online Group work

The challenge of maintaining teaching continuity in the era of COVID, which has forced the rapid switch from classroom to online activities, requires creativity. Fear not: familiar ways of engaging our students can be modified for online use.

Collaborative work in the classroom is relatively straightforward. Students can be divided into groups and active learning techniques can be employed to explore relevant course topics. In an online course, this is a bit more challenging as students may be in other time zones, or have different schedules.

The goal of technology is to solve a problem. One technology tool that may prove to be very effective in the context of online group work is Padlet. This visual tool allows your students to express their thoughts on a given topic or assignment. Its application allows users to include various content, such as images, videos, documents, and texts in real time communications. In my experience, the collaborative nature of Padlet makes for a great way to explore ideas as a class or in small group projects. Padlet allows for a number of different templates, including a timeline template, grid or map.

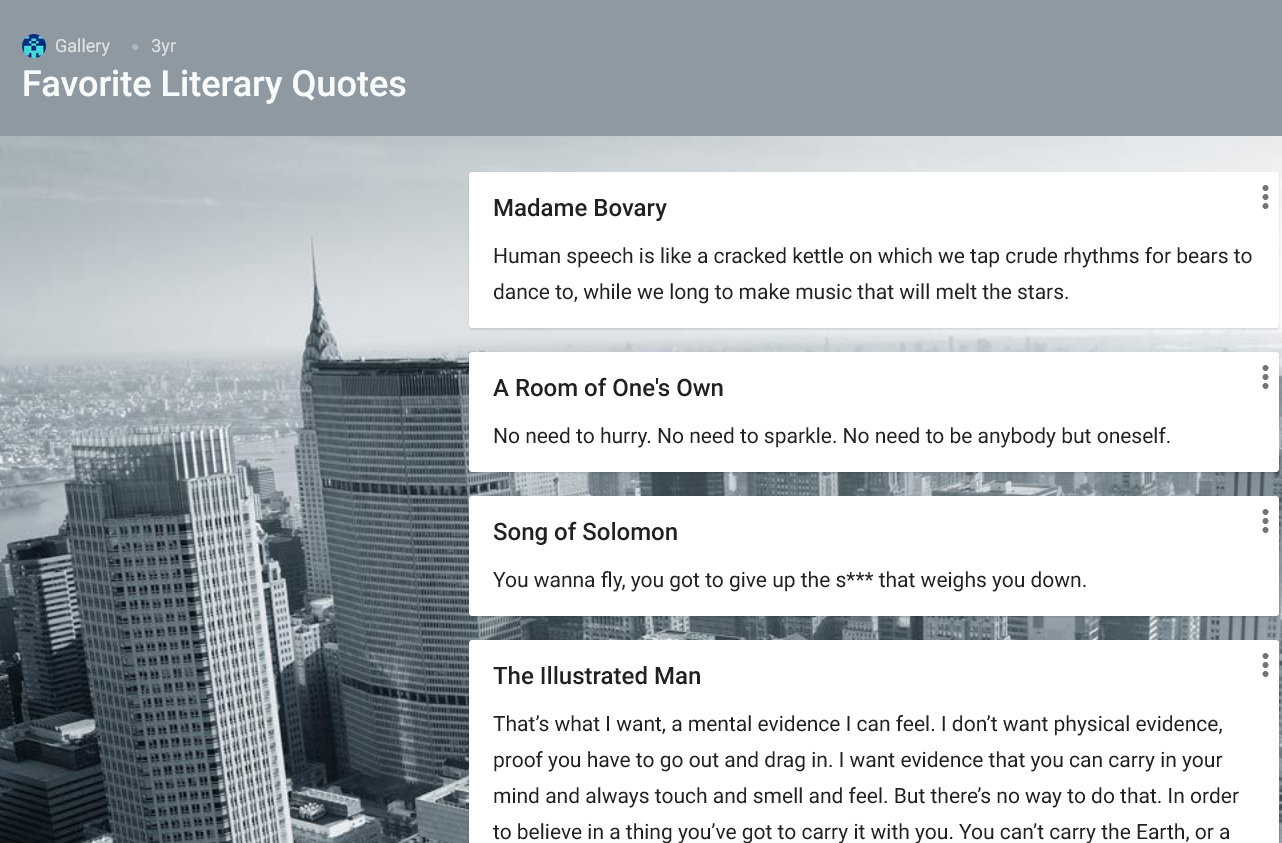
Here is an example from an English class where everyone contributed to literary quotes.

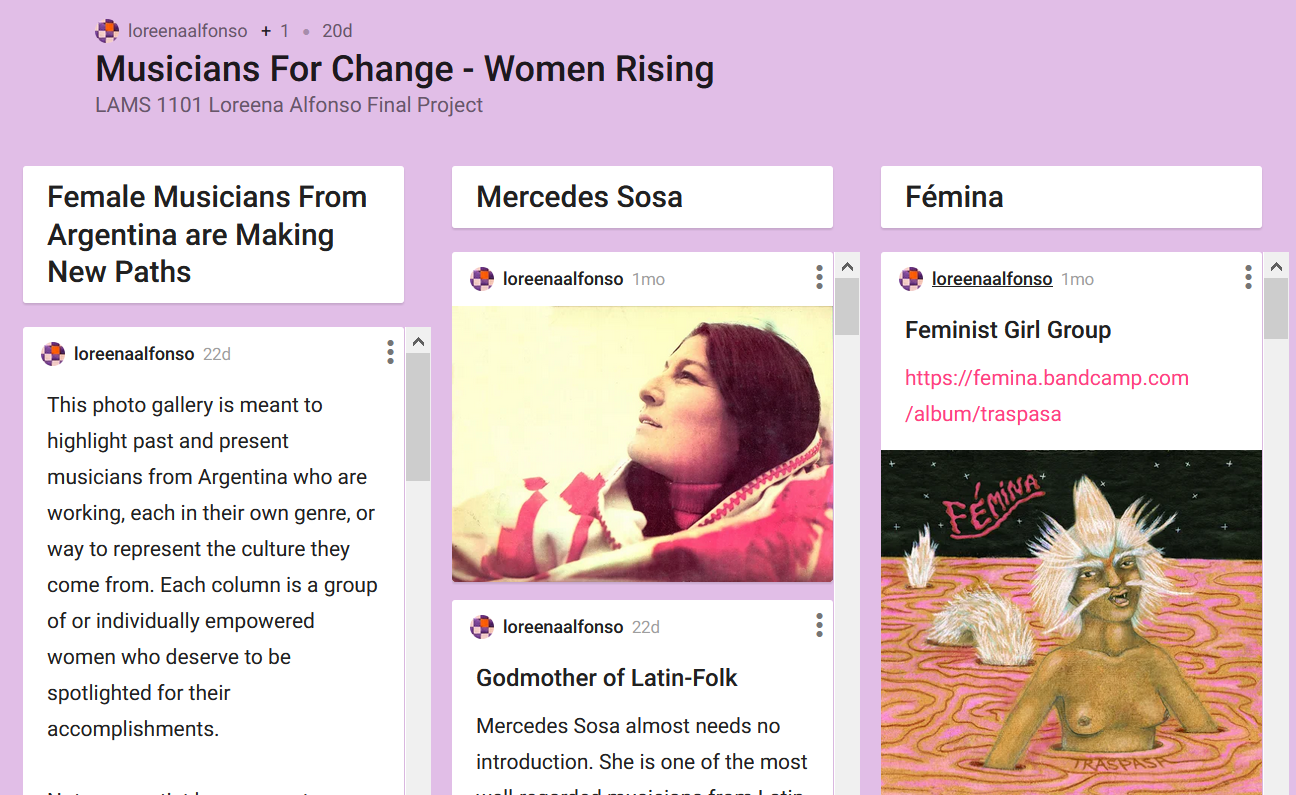
Here’s another example from Jessie Smith’s Collaborative Online International Learning (COIL) assignment. She used Padlet to explore specific topics for her Latin American Studies course in connection with her partner and class in Argentina.

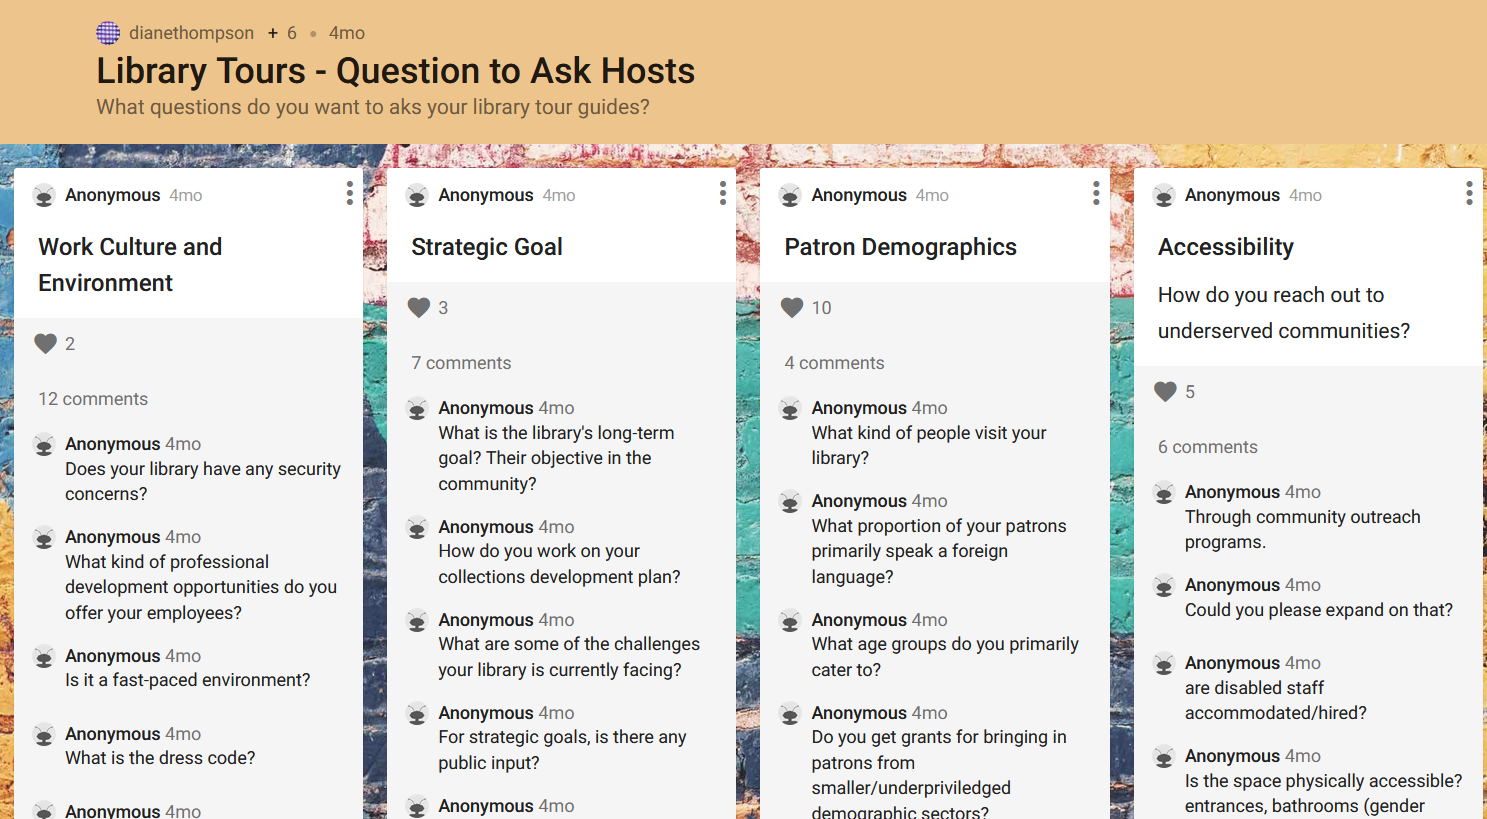
The last Padlet example demonstrated is from my own course (LIBR 1219) where students collaborate to come up with engaging questions to ask their tour guides when visiting various libraries in our community as part of their field work / practicum course. Students are asked to form groups and come up with categories. Once categories are established, they must then work together to come up with questions pertaining to the workplace. This is all done online.

Overall, Padlet is very easy to use. All you need to do is sign up at padlet.com and start creating. Security levels can be adjusted so that you can share your Padlets publicly or keep them password- protected. Sharing the link to your class is simple and, from your students’ perspective, editing is also straightforward once you have selected the template and explained how to complete the assignment.

The basic version of the programme will allow you to have up to three Padlets, whereas if you choose to sign up for the Pro version (not free), you can have multiple Padlets going at once.

If you have stories to share about how you are using Padlet, I would love to hear them.

Brightspace Quizzes now save automatically.

New: Auto-Save for Brightspace Quizzes

You’ve always been told to advise your students to save every quiz question as they finish it, and Save All Responses before submitting. This was to make sure that in-progress quizzes would be saved if a student was interrupted mid-quiz.

As of October 2018, it’s no longer necessary to need to manually save answers when taking a quiz. Quiz responses will now be saved as students complete each question. See below for images showing the old version (with Save button) versus the new, including what it will look like when a question auto-saves.

The old Brightspace quiz question interface, with Save button and disk icon (showing that the question is saved).


The new Brightspace quiz question interface, without Save button, with the "Saving/Saved" message highlighted.


Instructor Note: The quiz event log will show whenever a question is automatically saved, including an updated character count for Written Response questions.

Other Updates

No More Save Button

The “Save” and “Save All Responses” buttons at the bottom of a Quiz screen have been removed. The “Go to Submit Quiz” button is now called “Submit Quiz.”

There will still be a submission confirmation screen, after clicking “Submit Quiz,” that prompts students to submit the quiz when they’re ready.

Auto-Save Works Differently for Written Response Questions

If a Written Response question shows the format bar (also known as the HTML Editor), student responses will not be automatically saved as they type. To make sure that the answer is being saved as they work, students must click anywhere outside the text entry field to prompt the “Saving…/Saved” message to appear at the top right.

Other question types, or Written Response questions with the format bar disabled, will auto-save approximately every 30 seconds.

Internet Connection Status Notifications

Brightspace will now display a notification if the student loses their internet connection while taking a quiz.

a red-bordered notification box that reads "Internet connection lost. Trying to reconnect..."


Students will also see a notification when the connection is restored, at which point Brightspace will automatically save any unsaved answers.

A green-bordered notification that reads "Internet connection restored! Saving all answers..."


Instructor Note: The quiz log will record when a lost connection is restored.


Question is Still “Saving…”

If a student has answered a question and it seems to be stuck on “Saving…” for a very long time, they should double-check their internet connection. If they seem to be connected, they should continue writing their quiz. Any unsaved answers will be saved when they either move between pages, or go to submit the quiz.

Recommendations for Writing Quizzes

As always, we generally recommend using a wired internet connection, if possible. This greatly reduces the chances of losing an internet connection in the middle of a quiz.

If a student is writing a quiz from a mobile device like a phone or tablet, it’s best to access the quiz from Assessments > Quizzes, rather than from Course Materials > Content. This will provide more room on the screen for quiz questions. If possible, a desktop or laptop computer is best for taking quizzes, as these devices offer the best experience.

Updating Your Course Materials

If you’ve been advising your students to save each question as they go, please update those instructions in your courses to account for these updates. You can also just link to the student support page for these changes, which outline the new auto-save function and other new features now active in Brightspace quizzes. Click here, or access the link below, to see the student update.

https://iweb.langara.ca/lts/news/brightspace-quizzes-now-save-automatically/

Do you or someone you know use classroom polling or another type of student response system (SRS) at Langara?

The Education Technology department wants to know how many instructors at Langara use a student response system, or SRS. Examples of popular SRS are iClicker desktop or cloud, Top Hat, Turning Point, Socrative, Quizziz, Poll Everywhere, etc.  If you do not use a SRS but you know of someone who does, please kindly forward the link to this announcement.

Marianne Gianacopoulos, and Nimmy Nelson are guiding this review of the use of student response systems (SRS) across the college.

If you currently use a SRS, do you mind answering a few short questions via the below survey link? We want to gather information on numbers of users and types of SRS programs currently in use. If you previously answered a survey sent specifically to you, please disregard this request. We already have your information.  Please click on the following link:

https://www.surveymonkey.ca/r/FZXDB6Z

Thank you. We appreciate your taking the time and for your participation. Access to the survey will close as of November 15th.