Generative Artificial Intelligence (Gen AI) Resources

AI generated image of a humanoid robot teacher with a pointer in a classroom, standing in front of a blackboard with equations
Image generated by DALL-E.

Whether you are a superuser or a novice, the number of resources on generative artificial intelligence can be overwhelming. EdTech and TCDC have curated some that we’d like to recommend.

  • How to access Copilot (Microsoft)
    • Interested in trying a generative AI tool or using it in your course? ChatGPT and Copilot (formerly Bing Chat) are currently available in Canada. Langara College students and employees have access to a premium version of Copilot through Microsoft Enterprise and the Edge browser. Microsoft’s FAQs provide information on how to access Copilot through Microsoft Edge. 
  • Practical AI for Instructors and Students (Ethan Mollick/Wharton School, August 2023)
    • If you’re looking for a great primer on AI, this series of five videos is worth the watch. Each video is approximately 10 minutes so the whole series can be viewed in under an hour. Topics include: 1) an introduction to AI; 2) what large language model (LLM) platforms like ChatGPT are and how to start using them; 3) how to prompt AI; 4) how instructors can leverage AI; and 5) how students can use AI.
    • Note: this series references four LLMs: ChatGPT, BingCopilot, Bard, and Claude. Bard and Claude are not yet available in Canada. 
  • AI Primer by Educause
    • This article is a reading (and viewing) list that links to resources that do a deeper dive into generative AI. A good resource for those who know the basics and would like to learn more.  

EdTech and TCDC also regularly offer professional learning opportunities on AI topics. Check the PD Events Calendar for current offerings.

As always, if you’re planning to integrate AI into your course, please be aware that: 

  • There are privacy concerns with AI platforms. We recommend using caution when inputting – or having your students input – private, personal, or sensitive information (e.g. resumes or other identifying data).  
  • For those using assistive technology such as screen readers, some AI platforms are more accessible than others. For more information, please see Accessibility of AI Interfaces by Langara Assistive Technologist, Luke McKnight. 

If you would like more recommendations for AI resources, or any other AI-related support, please contact EdTech or TCDC

EdTech Monthly Tip

The New Quiz Experience

Brightspace has released a New Quiz Creation Experience, a similar appearance to what you find in the Assignment tool. Over the coming weeks, we’ll highlight a couple changes that you should be aware of.

Changes to Timing & Display View

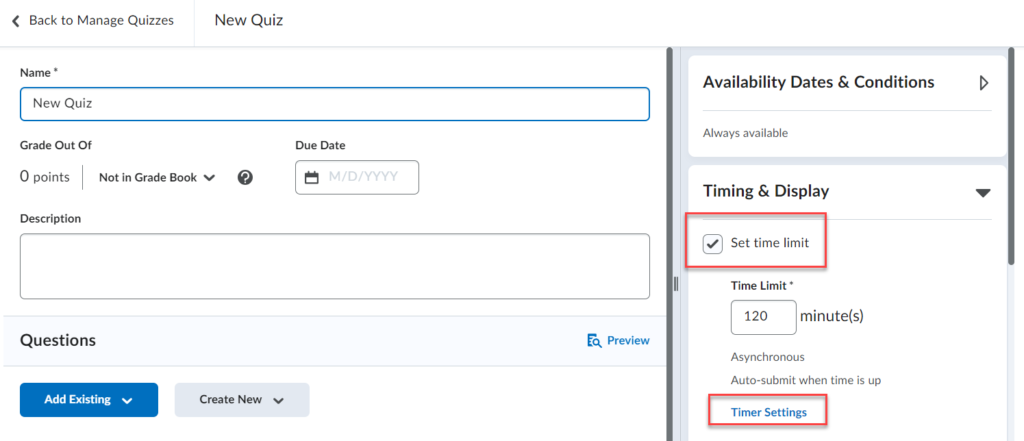
By default, no time limit is set on new quizzes. Use Time Limit to set the amount of time students are given to complete the quiz once they have started it.

To set a time limit:

  • Click Set Time Limit to add a countdown clock to the quiz. If this box is left unchecked, no time limit will be set. Be aware that setting a time limit does not, on its own, enforce the time limit — it only shows a countdown clock for the student.

Timer Settings

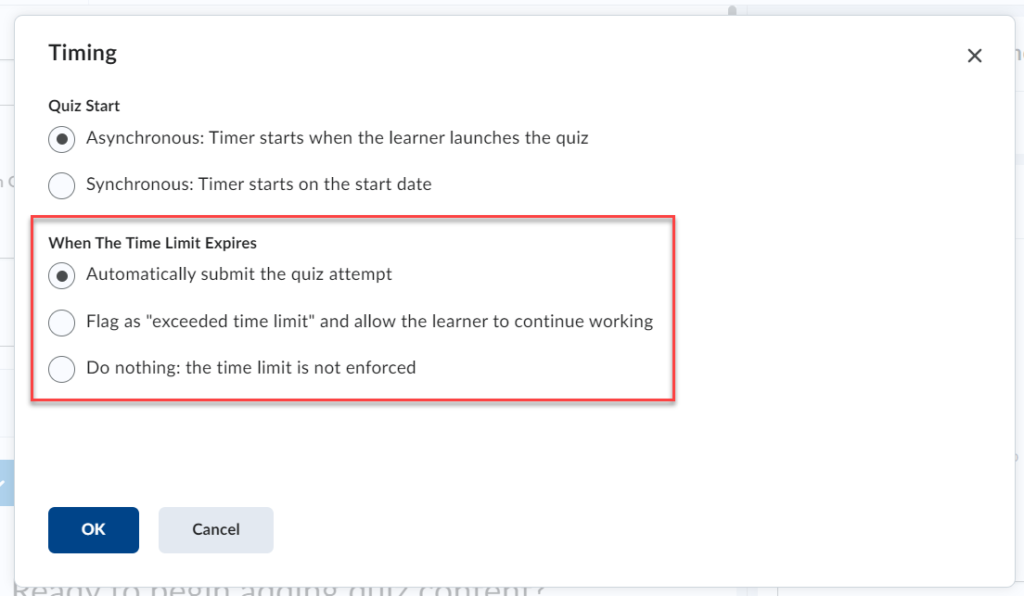
Timer settings are made once “Set Time Limit” is checked. Click on Timer Settings to control how a quiz behave once students exceed the time limit.

Timer setting options include:

  • Automatically submit the quiz attempt
    • This is the default on all new quizzes if the “Set Time Limit” box is checked. Quiz auto-submission automatically hands in quizzes on enforced time limit quizzes at the end of the set time.
  • Flag as “exceeded time limit” and allow the learner to continue working
    • This option allows the student to continue working but adds an “exceeded time limit” notation to the quiz when submitted.
  • Do nothing: the time limit is not enforced
    • The countdown clock is made available to students, but no time limit is enforced.

Old and New Experience Comparison

Previously Available OptionNew Behaviour
Prevent the student from making further changesAutomatically submit the quiz attempt
Allow students to continue working but automatically score zeroAutomatically submit the quiz attempt  
Allow the student to continue workingFlag the attempt as exceeded time limit and allow the learner to continue working
A quiz that has a grace periodGrace period no longer available. Quiz now uses only the time limit set

Adding Time to a Quiz in Progress

Changes to the timer may result in the need to add time to a Brightspace quiz in progress. Adding time is done through the Special Access feature and requires students refresh their browsers for the new time setting to take effect.

To add time to a Quiz in progress:

  • Navigate to the Brightspace Manage Quizzes tab and click on the quiz name to edit.
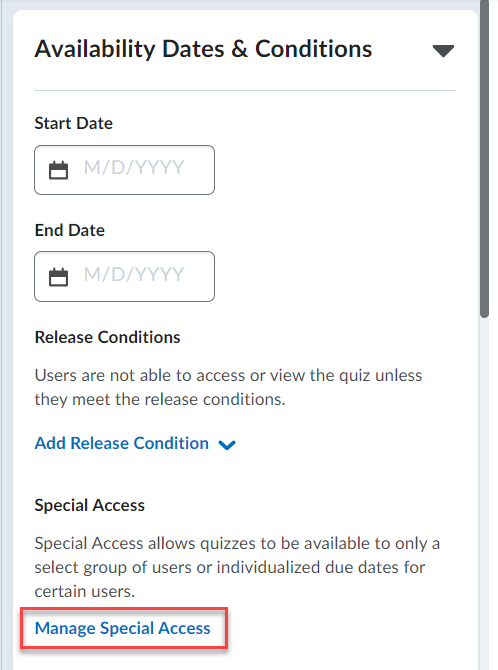
  • Select Availability Dates & Conditions.
  • Click on the Manage Special Access link.
  • Ensure “Allow selected users special access to this quiz” is selected.
  • Click on Add Users to Special Access.
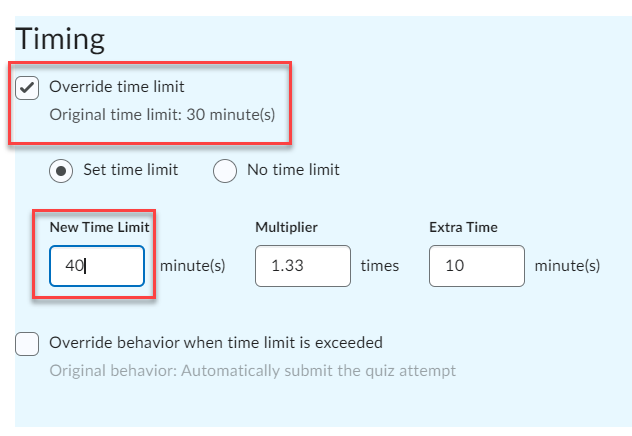
  • Scroll down to the Timing sections and check the box for “Override time limit.”
  • Enter the new time limit in the minutes field.
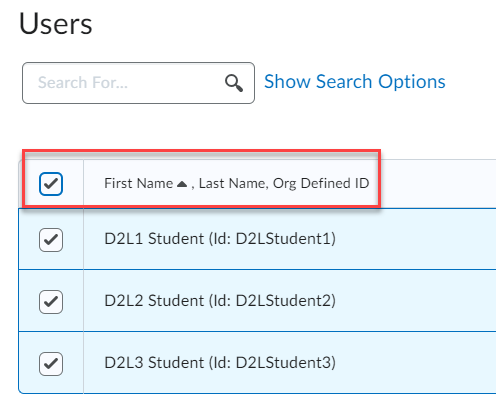
  • Scroll down to the Users section and check all the students’ names.
  • Click Save.
  • Click Save and Close.
  • Tell your students to refresh their browsers.

Watch Changes to the Brightspace Quiz Experience (video, 8:56) to learn more about the recent tool updates.

Learning Labs

Introducing Learning Labs

Learning Labs are interactive, focused, and supported learning sessions where you can learn how to implement Langara’s teaching and learning technologies and tools. Capacity is limited to ensure all attendees have an opportunity to ask questions, try out tools, and receive support. Support in the room will reflect the technology, tool, and learning outcomes; however, you can expect to interact with EdTech Advisors, Specialists, and Technologists as well as TCDC Curriculum Consultants. The Labs are an opportunity to implement something new or improve what already exists with experts who can answer technical questions and provide advice.

Fall Learning Lab session topics include:

Brightspace HTML Templates

After participating in this lab, participants should be able to:

  • Use the Brightspace HTML editor.
  • Explain the benefits of using the Brightspace HTML templates.
  • Apply the templates to a new Brightspace HTML page.
  • Apply the latest version of the template to an existing Brightspace HTML page.
  • Mix and match HTML elements—such as image placement, accordions, callouts, tables, and tabs—from the various templates.

Adding closed captions to a video in Brightspace

After participating in this lab, participants should be able to:

  • Upload a video to MediaSpace.
  • Add closed captions to a video.
  • Use the MediaSpace captions editor.
  • Use the OneDrive captioning tool.
  • Embed a video in a Brightspace course file.

Creating an accessible Word document

After participating in this lab, participants should be able to:

  • Employ plain language.
  • Select styles that improve legibility of text.
  • Structure a document.
  • Create accessible hyperlinks and tables.
  • Add alternative text to visual content.
  • Use the built-in accessibility checker.

Improving the accessibility of existing PowerPoint slides

After participating in this lab, participants should be able to:

  • Avoid the most common PowerPoint accessibility mistakes.
  • Use the accessibility checker and make corrections.
  • Apply templates.
  • Apply structure.
  • Select accessible fonts and font styling.
  • Employ accessible use of colour.
  • Add alternative text to images.
  • Write meaningful hyperlink text.

Save time marking with Rubrics

After participating in this lab, participants should be able to: 

  • Define the purpose of the assignment or assessment 
  • Decide which type of rubric will be used with assignments
  • Create statements of expected performance at each level of the rubric 
  • Transfer analog rubrics into a digital version on Brightspace 
  • Associate their rubric with the assignment in Brightspace 


Generative AI and STEM

Background

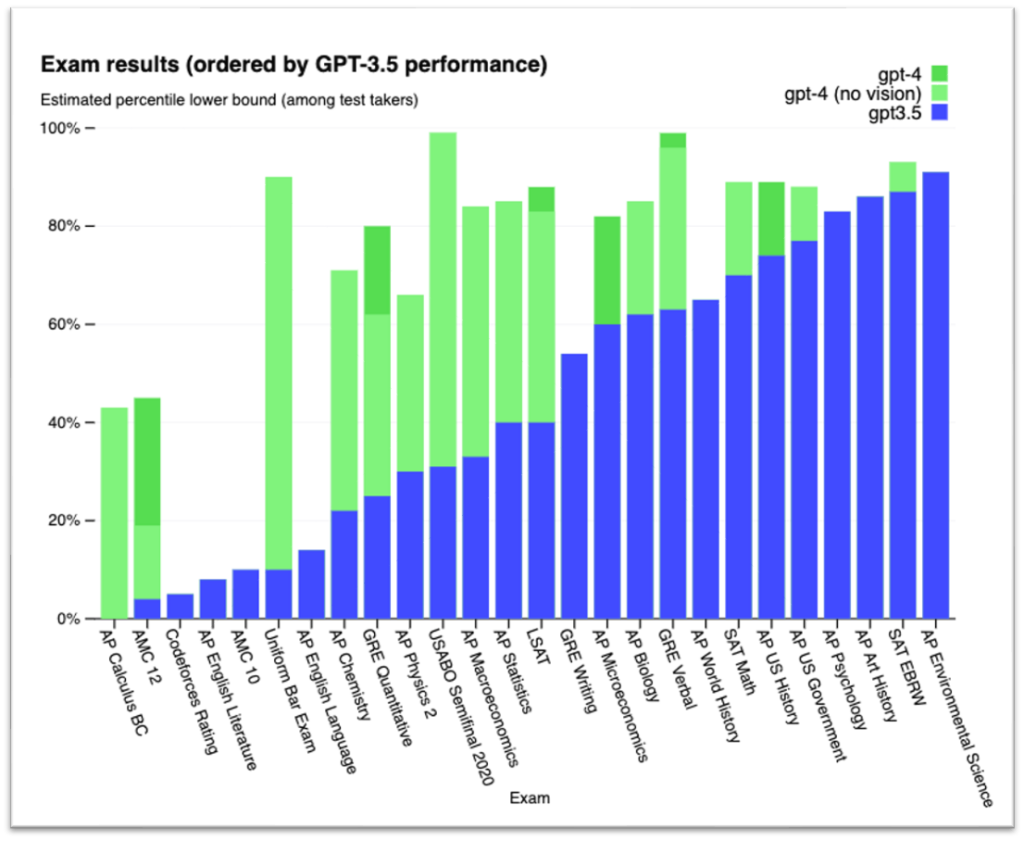
Artificial intelligence is not new. It has been part of our personal and work lives for a long time (autocorrect, facial recognition, satnav, etc.) and large language models like ChatGPT have been a big topic in education since version 3.5 was released in late November, 2022. Large language models (LLMs) are trained on enormous amounts of data in order to recognize the patterns of and connections between words, and then produce text based on the probabilities of which word is most likely to come next. One thing that LLMs don’t do, however, is computation; however, the most recent Open AI release, GPT-4, seems to have made strides in standardized tests in many STEM areas and GPT-4 now has a plug-in for Wolfram Alpha, which does do computation.

Chart from Open AI: exam result improvements from ChatGPT 3.5 to 4

Andrew Roberts (Math Dept) and Susan Bonham (EdTech) did some testing to see how ChatGPT (3.5), GPT-4, and GPT-4 with the Wolfram plugin would handle some questions from Langara’s math courses.

Test Details

Full test results are available. (accessible version of the problems and full details of the “chats” and subsequent discussion for each AI response are available at the link)

The following questions were tested:


Problem 1: (supplied by Langara mathematics instructor Vijay Singh)


Problem 2: (Precalculus)


Problem 3: (Calculus I)


Problem 4: (Calculus II)


Discussion

Responses from current versions of ChatGPT are not reliable enough to be accepted uncritically.

ChatGPT needs to be approached as a tool and careful proof-reading of responses is needed to check for errors in computation or reasoning. Errors may be blatant and readily apparent, or subtle and hard to spot without close reading and a solid understanding of the concepts.

Perhaps the biggest danger for a student learning a subject is in the “plausibility” of many responses even when they are incorrect. ChatGPT will present its responses with full confidence in their correctness, whether this is justified or not.

When errors or lack of clarity is noticed in a response, further prompting needs to be used to correct and refine the initial response. This requires a certain amount of base knowledge on the part of the user in order to guide ChatGPT to the correct solution.

Algebraic computations cannot be trusted as ChatGPT does not “know” the rules of algebra but is simply appending steps based on a probabilistic machine-learning model that references the material on which it was trained. The quality of the answers will depend on the quality of the content on which ChatGPT was trained. There is no way for us to know exactly what training material ChatGPT is referencing when generating its responses. The average quality of solutions sourced online should give us pause.

Below is one especially concerning example of an error encountered during our testing sessions:

In the response to the optimization problem (Problem 3), GPT-3.5 attempts to differentiate the volume function:

However, the derivative is computed as:

We see that it has incorrectly differentiated the first term with respect to R while correctly differentiating the second term with respect to h.

It is the plausibility of the above solution (despite the bad error) that is dangerous for a student who may take the ChatGPT response at face value.

Access to the Wolfram plugin in GPT-4 should mean that algebraic computations that occur within requests sent to Wolfram can be trusted. But the issues of errors in reasoning and interpretation still exist between requests sent to Wolfram.

Concluding Thought

It will be important for us educate our students about the dangers involved in using this tool uncritically while acknowledging the potential benefits if used correctly.

Want to Learn More?

EdTech and TCDC run workshops on various AI topics. You can request a bespoke AI workshop tailored to your department or check out the EdTech and TCDC workshop offerings. For all other questions, please contact edtech@langara.ca

Brightspace Accessibility in Five, Bonus: Accessible Uploads

Brightspace plus accessibility logoBrightspace is an excellent tool to provide equitable, inclusive access to course content, documents, and media. 
As you create content, take advantage of Brightspace’s built-in tools and the Accessibility Checker to ensure what you share is accessible. Accessible content is inclusive, democratic, and maximizes learner independence. 

However, Brightspace is also a good tool to distribute other material such as lecture slides and documents. It is important that that material also be accessible. 

Creating accessible Word and PowerPoint documents is straightforward. Ensuring a PDF is accessible requires additional time and understanding of unique tools and code. 

The best practices (link text, colour contrast, headings, tables, and text equivalents) listed in this series apply to documents of all types. The process to ensure accessibility is slightly different depending on software.  

Microsoft Office Files

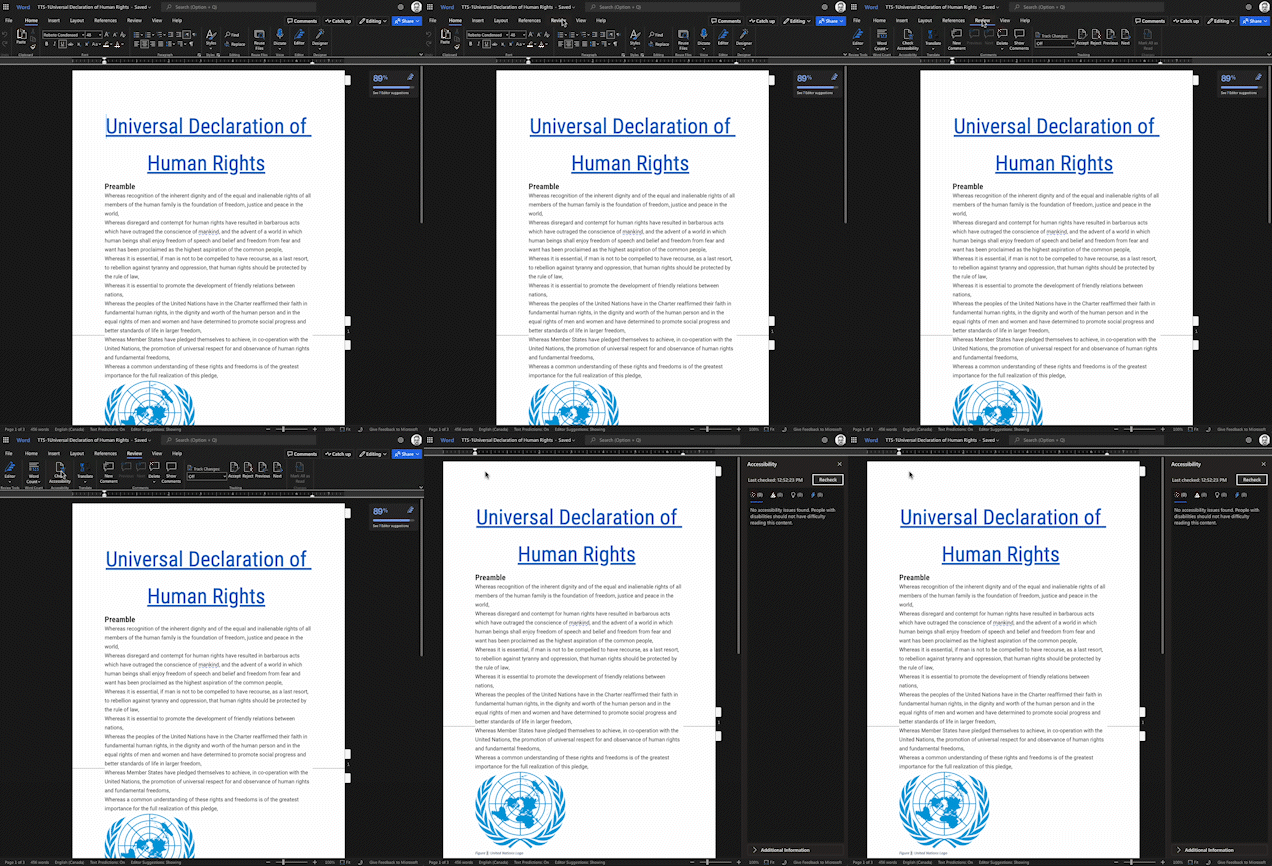
Word and PowerPoint have a built-in accessibility checker. To use this tool: 

  1. Navigate to Review 
  2. Select Check Accessibility 

Read more about making Office documents accessible.

PDF

To make accessible PDFs, it is best practice to make a Word or PowerPoint presentation accessible and then export to PDF. Adobe Acrobat Pro is required to ensure your PDFs are accessible. Try to avoid PDFs for content, except for forms and content to specifically be printed directly. For more information on making PDFs accessible, consult Langara’s Accessibility Handbook for Teaching and Learning. 

docReader

Brightspace now features the docReader tool. When a Word, PowerPoint, or PDF file is uploaded a Brightspace course, students will be able to have them read aloud using the Open with docReader button below the document viewer pane.

This tool does not absolve content creators of generating accessible content. This tool will not be able to read inaccessible documents.


Check out the other posts in the Brightspace Accessibility in Five series:

  1. Link Text
  2. Colour
  3. Headings
  4. Tables
  5. Text Equivalents

Brightspace Accessibility in Five, 5: Text Equivalents

Brightspace plus accessibility logo

Brightspace is an excellent tool to provide equitable, inclusive access to course content, documents, and media.

As you create content, take advantage of Brightspace’s built-in tools and the Accessibility Checker to ensure what you share is accessible. Accessible content is inclusive, democratic, and maximizes learner independence.

In the fifth of this five-part series, we will learn about text equivalents (alternative text and closed captions).

Alternative Text

Alternative text explains the content and context of an image to screen reader users. To write effective alternative text, consider how you would describe the graphic to a friend over the phone. Try to include all relevant information using proper grammar in less than 120 characters. Learn more in the Langara Accessibility Handbook alternative text chapter. 

Images may be marked as decorative if they are only included for visual effect or if the information in the image is also present in text adjacent to the graphic. 

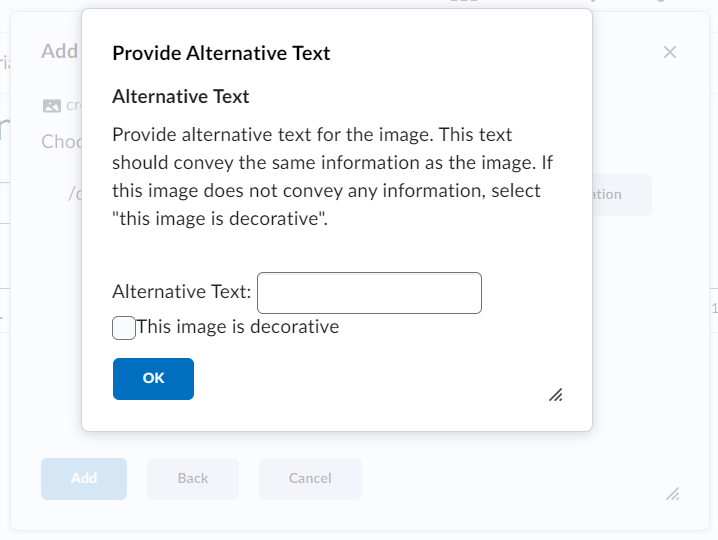
When uploading a new image, Brightspace automatically prompts for alternative text. Enter a description in the Alternative Text field or check This image is decorative. Screenshot of Brightspace provide alternative text prompt

To add alternative text to existing images: 

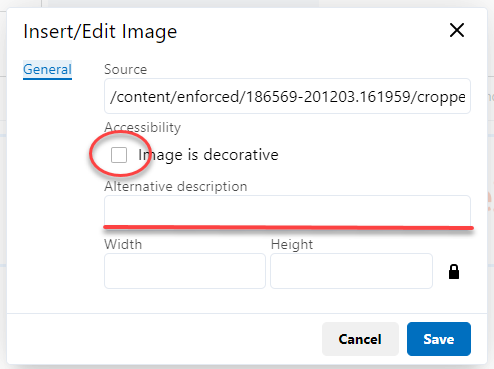
  1. Select an existing image and choose Image options
  2. Check Image is decorative or enter a description in the Alternative description field.

Closed Captions

Captions provide a text equivalent of all audio elements in a video, presented visually in time with the video. Closed captions can be toggled on or off by the viewer. Open captions are ‘burned’ into the video and cannot be turned off.

Traditionally, we think of captions as an accommodation for viewers who cannot hear the audio in a video due to hearing loss. Statistics suggest 4-5% of the general population suffer some form of hearing loss. That number increases to around 20% for people over aged 60. However, 80% of 18 to 25-year-olds regularly use captions when watching video.

Captions are not just an accessibility essential, but also an excellent universal design for learning tool.

All new uploads to Kaltura (either in Brightspace My Media or Mediaspace) will have machine-generated captions automatically ordered. Videos added to OneDrive/SharePoint can have machine-generated captions ordered manually. Machine-generated captions are not accurate enough and must be edited. To learn more about captioning, read the Captions and Transcripts chapter of the Langara Accessibility Handbook.

Accessibility Checker

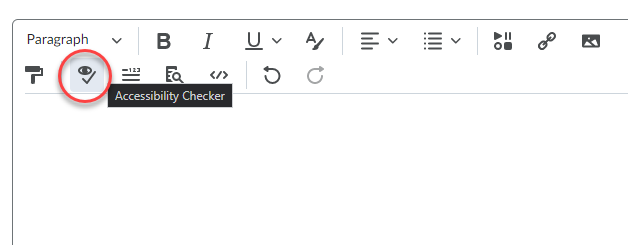
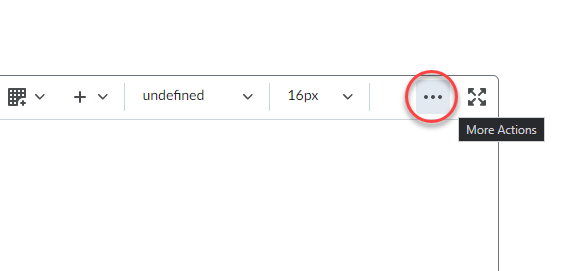
Brightspace includes a built-in accessibility checker. The checker appears on the second row of the editor toolbar.

  1. Select More Actions to reveal the second row of the toolbar
  2. Select Accessibility Checker

The accessibility checker will highlight many accessibility issues and offer solutions to correct them. However, the checker tool will not check videos for captions. This must be verified manually.


Check out the other posts in the Brightspace Accessibility in Five series:

  1. Link Text
  2. Colour
  3. Headings
  4. Tables
  5. Text Equivalents
  6. Bonus: Accessible Uploads

Brightspace Accessibility in Five, 4: Tables

Brightspace plus accessibility logo

Brightspace is an excellent tool to provide equitable, inclusive access to course content, documents, and media.

As you create content, take advantage of Brightspace’s built-in tools and the Accessibility Checker to ensure what you share is accessible. Accessible content is inclusive, democratic, and maximizes learner independence.

In the fourth of this five-part series, we will learn about tables.

Tables

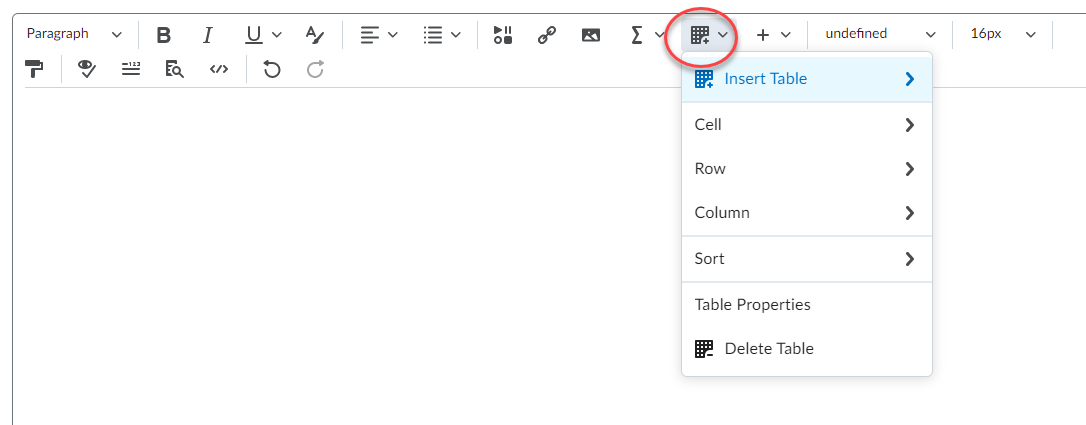
Tables should only be used to present data, not for layout or formatting. Include a header row and/or column and avoid blank, split, and merged cells.

Use the Table tool to insert and modify tables:

Use Table Properties for advanced settings such as style, padding, and formatting.

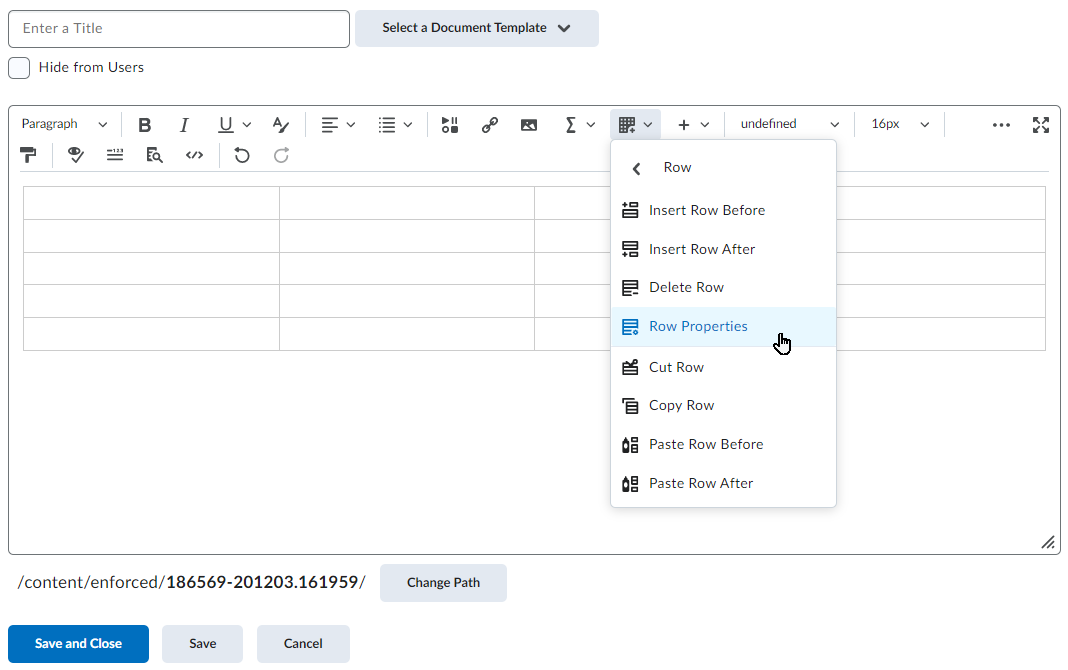
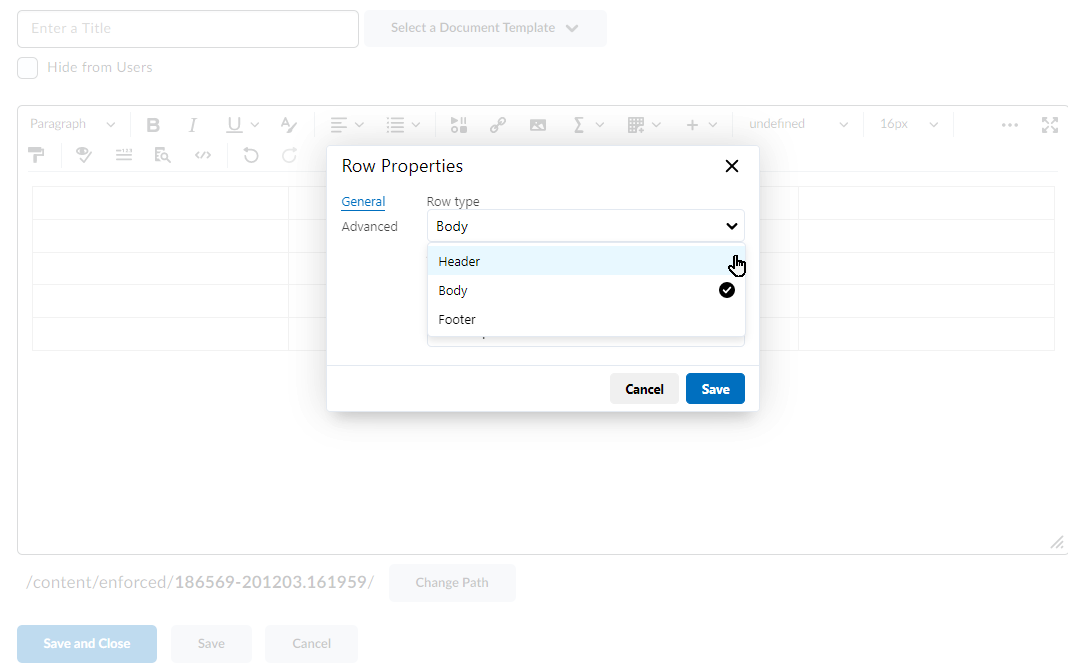
To set header rows:

  1. Select a cell in the row to be made a header
  2. Open the Table menu and choose Cell Properties
  3. Change Row type to Header and click Save

Do not add images of tables. If you must, ensure the image has alternative text that accurately conveys the table data.

Accessibility Checker

Brightspace includes a built-in accessibility checker. The checker appears on the second row of the editor toolbar.

  1. Select More Actions to reveal the second row of the toolbar
  2. Select Accessibility Checker

The accessibility checker will highlight many accessibility issues and offer solutions to correct them. For tables, the accessibility checker will flag tables without header rows or columns. The checker will also note tables without a caption and suggest users add a summary to long or complex tables.


Watch for more posts in the Brightspace Accessibility in Five series coming soon, including:

  1. Link Text
  2. Colour
  3. Headings
  4. Tables
  5. Text Equivalents
  6. Bonus: Accessible Uploads

Brightspace Accessibility in Five, 3: Headings

Brightspace plus accessibility logo
Brightspace is an excellent tool to provide equitable, inclusive access to course content, documents, and media.
As you create content, take advantage of Brightspace’s built-in tools and the Accessibility Checker to ensure what you share is accessible. Accessible content is inclusive, democratic, and maximizes learner independence.

In the third of this five-part series, we will learn about headings.

Headings

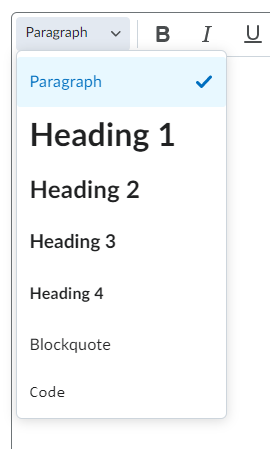
Headings are an important part of documents and web pages. Headings create organizational flow, build connections between key concepts, and break up large blocks of text to increase readability. Screen reader users rely on headings to navigate the web and longer documents. For anything beyond a few paragraphs, headings are essential for screen reader users.

Use headings in a sequential, nested hierarchy. For example, use a Heading 1 for the title or topic. Use Heading 2 for major divisions of content and ideas. Use Heading 3 for subtopics of the major divisions. Brightspace supports 4 heading levels.

You can have multiple headings of the same level, but do not skip a heading level. A Heading 2 can follow a heading 1 or a heading 2. A heading 3 can follow a heading 2 or heading 3 and so on.

Headings benefit all readers. Headings:

• Include all, regardless of access means.
• Provide context and explains relationships between ideas.
• Emphasizes key concepts.
• Provides ‘bookmarks’ for natural breaks.
• Allows for easy review and location of content.

Creating Headings in Brightspace

Select the Format tool in the top left of the editor toolbar and choose the appropriate heading level.

For more information about headings and document structure, consult the Langara Accessibility Handbook.

Accessibility Checker

Brightspace includes a built-in accessibility checker. The checker appears on the second row of the editor toolbar.

  1. Select More Actions to reveal the second row of the toolbar
  2. Select Accessibility Checker

The accessibility checker will highlight many accessibility issues and offer solutions to correct them. For headings, the Brightspace accessibility checker will flag text that could be a heading due to formatting (bolded larger font on a line by itself for example) but is not properly coded as a heading. The accessibility checker also flags headings that are out of sequential order (for example a heading level 3 with no preceding heading level 2).


Watch for more posts in the Brightspace Accessibility in Five series coming soon, including:

  1. Link Text
  2. Colour
  3. Headings
  4. Tables
  5. Text Equivalents
  6. Bonus: Accessible Uploads

Brightspace Accessibility in Five, 2: Colour

Brightspace plus accessibility logo

Brightspace is an excellent tool to provide equitable, inclusive access to course content, documents, and media.
As you create content, take advantage of Brightspace’s built-in tools and the Accessibility Checker to ensure what you share is accessible. Accessible content is inclusive, democratic, and maximizes learner independence.

In the second of this five-part series, we will learn about accessible colour.

Colour

Ensure you choose accessible colours. Text colour needs to have a contrast ratio of at least 4.5:1 against the background. Additionally, colour should not be used alone to emphasize content or convey meaning.

Accessible colour aids all learners. Primarily, accessible colour is required for people with color blindness. However, smart colour choices benefit all learners in numerous ways:

  • Includes all, regardless of access means.
  • Provides similar appearance regardless of device and user settings.
  • Retains all information if printed in black and white.
  • Reduces eye fatigue, glare from the sun, and allows use of dark/night mode or custom contrast settings.
  • Makes content easier to read for everyone.

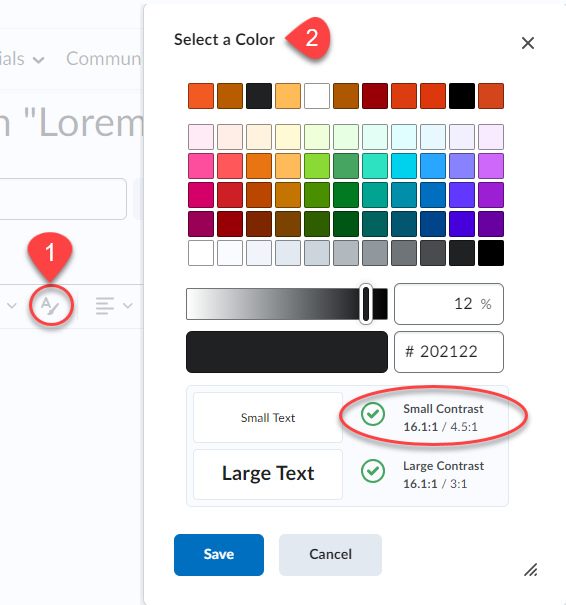
To change font colours in Brightspace

  1. Open the Select Colour tool in the Editor toolbar.
  2. Choose a colour and use the built-in contrast checker to ensure accessible colour choices./li>

A ratio of at least 4.5:1 is required. Remember that regardless of colours used, ensure that colour is not the only method used to highlight or differentiate content.

Learn more about accessible colour in the Langara Accessibility Handbook

Accessibility Checker

Brightspace includes a built-in accessibility checker. The checker appears on the second row of the editor toolbar.

  1. Select More Actions to reveal the second row of the toolbar
  2. Select Accessibility Checker

The accessibility checker will note colour contrast issues and offer solutions to improve the contrast of your content. The Accessibility Checker cannot determine if colour is used to convey meaning.


Watch for more posts in the Brightspace Accessibility in Five series coming soon, including:

  1. Link Text
  2. Colour
  3. Headings
  4. Tables
  5. Text Equivalents
  6. Bonus: Accessible Uploads

Brightspace Accessibility in Five, 1: Link Text

Brightspace plus accessibility logo

Brightspace is an exceptionally accessible platform. Using Brightspace for your course content, documents, and media is an excellent way to provide equitable, inclusive access to learning material.

Take advantage of Brightspace’s built-in tools and the Accessibility Checker to ensure what you share is accessible. Accessible content is inclusive, democratic, and maximizes learner independence.

In the first of this five-part series, we will learn about adding link text to your Brightspace content.

Link Text

Link text should provide a clear description of the destination, independent of the surrounding text.

Students that with a visual impairement may use screen reader software that allows them to navigate by links. Descriptive link text helps orient and guide them to resources. A list of “click here”, “click here”, “Read more”, etc. is not going to provide users with any meaningful information. Pasting raw URLs in Brightspace should also be avoided as, for example, heading “https://iweb.langara.ca/edtech/blog” is jarring and not a useful indicator of what that link would lead to.

Additionally, sighted users can easily spot or relocate a link when it has a clear text description. As well, all users benefit from quality link text to understand why they would want to click on the link.

Effective link text should be:

  • Descriptive
    • Describe the destination
  • Concise
    • Try to limit link text to a few words
  • Unique
    • If two links on a page go to the same destination, they should have the same link text, otherwise ensure all link text is unique
  • Visually distinct
    • Links should be visually distinct from surrounding text. In Brightspace, stick with default formatting (blue underlined text) for links.

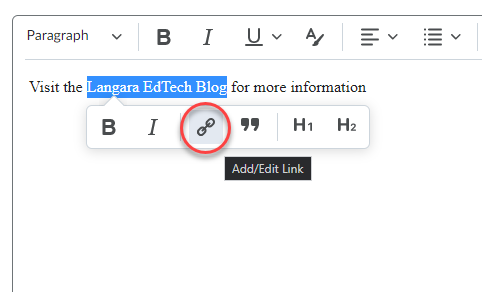
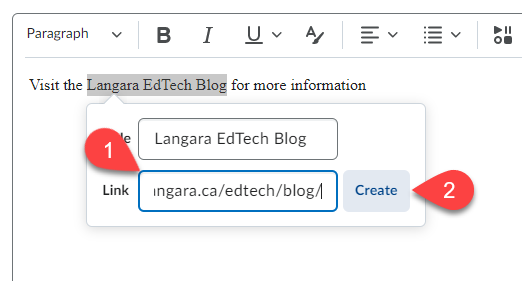
To Link Text in Brightspace

  1. Highlight the text to be linked and select Add/Edit Link
  2. The highlighted text will appear in the Title field. Paste the URL in the Link field and select Create.

Find more information about link text in the Langara Accessibility Handbook and read more about adding hyperlinks in Brightspace.

Accessibility Checker

Brightspace includes a built-in accessibility checker. The checker appears on the second row of the editor toolbar.

  1. Select More Actions to reveal the second row of the toolbar
  2. Select Accessibility Checker

The accessibility checker will highlight many accessibility issues and offer solutions to correct them.


Watch for more posts in the Brightspace Accessibility in Five series coming soon, including:

  1. Link Text
  2. Colour
  3. Headings
  4. Tables
  5. Text Equivalents
  6. Bonus: Accessible Uploads