Podcast Playlist

""Podcast recommendations from your Ed Tech and TCDC team

Looking for inspiration? Podcasts are a convenient and approachable way to pick up some new tools for your teaching toolkit. In this new feature, we’ll share a few of our favorite shows with a teaching and learning focus.

Trends and Issues in Instructional Design, Educational Technology and Learning Science is a bi-monthly podcast presented by Abbie Brown (East Carolina University) and Tim Green (California State University). Episodes are short at around 10-15 minutes and cover news on a wide range of topics connected to technology enhanced learning. Accompanying the podcast is a Flipboard magazine.

Hosted by Thomas Cavanagh and Kelvin Thompson, the monthly The Teaching Online Podcast focuses on issues related to online and blended learning. Episodes clock in at about 30 minutes. Recent topics explored in the show include OER adoption, blended learning course design, community engagement, and the role of synchronous online teaching post-COVID.

ThinkUDL host Lillian Nave interviews guests about their experiences implementing Universal Design for Learning. Recent guests include Kirsten Behling, co-author of Reach Everyone, Teach Everyone: Universal Design for Learning in Higher Education, Flower Darby, co-author of Small Teaching Online: Applying Learning Science in Online Classes, and Kevin Kelly and Todd Zakrajsek, authors of Advancing Online Teaching: Creating Equity-Based Digital Learning Environments.


A Curated List of EdTech Articles

""A recently released study out of Stanford warns that synchronous Zoom lectures and meetings are making us tired. In this short article, Vignesh Ramachandran notes Stanford researchers identify four causes for ‘Zoom fatigue’ and their simple fixes.

Asynchronous videos offer an effective alternative to synchronous Zoom lectures. These articles outline the benefits of synchronous video and offer advice for effectively incorporating them into courses.

Unbounded by Time: Understanding How Asynchronous Video Can Be Critical to Learning Success

Improving Problem-Based Learning with Asynchronous Video

Five Ways to Increase the Effectiveness of Instructional Videos

Engaging Students Through Asynchronous Video-Based Discussions in Online Courses

Thinking beyond Zoom: Using Asynchronous Video to Maintain Connection and Engagement during the COVID-19 Pandemic

Improving Colour Accessibility for Students with Colour Deficiency

Improving Colour Accessibility for Students with Colour Deficiency

Colours as perceived by those with normal vision, deuteranoptia (green-blindness), tritanopia (blue-blindness), and protanopia (red-blindness).

Image CC by Johannes Ahlmann

Did you know that approximately 1 in 12 men is colour blind? Colour blindness — or more accurately, poor or deficient colour vision — can affect a person’s ability to distinguish between certain colors, usually greens and reds, and occasionally blues. Because colour vision deficiency reduces the number of color dimensions, it can be difficult for colour blind individuals to distinguish between certain colors. To improve colour accessibility of course content, it is important to ensure adequate colour contrast and not rely on colour alone as a means of conveying information.

Colour blind friendly alternatives

Use sufficient colour contrast

Effective contrast can make the text easier to read and images easier to see for all students. To ensure text is readable it should pass accessibility guidelines based on the combination of text colour, background colour, and text size. Test contrast using the WebAIM colour contrast checker.

Colours used to convey information on diagrams, maps, and other types of images must also be distinguishable from the background. To ensure adequate contrast use a combination of light and dark background and foreground colours.

Color combinations to avoid for people with color blindness include:

  • Red & green
  • Green & brown
  • Green & blue
  • Blue & gray
  • Blue & purple
  • Green & gray
  • Green & black

If you absolutely must use one of these combinations, adjust the contrast, making adjusting the shades so one is extremely dark, and the other extremely light.

Use colour with another cue to show emphasis or differences

Use elements such as patterns to visually distinguish information

Image source Smashing Magazine

Do not rely on colour alone to communicate meaning. Different patterns and textures can help colour-blind people further distinguish between different elements in charts and infographics.

Use color plus another element to emphasize a point or visually distinguish information differences. Emphasis elements include:

  • Bold
  • Size
  • Patterns or shapes

For more information on improving the accessibility and data visualization, visit Penn State’s Charts & Accessibility web page.

Ed Tech Sandbox Sessions

Ed Tech Sandbox Sessions

""Are you facilitating an online course this semester or next and still feel a bit overwhelmed about using technology? Join the Ed Tech Sandbox Sessions to try out your tools and synchronous teaching in a safe and supportive space.

To give all participants a chance to practice, registration is limited to 10.

Sessions will be held from 11:00 until 12:30 on January 29th, February 26th, March 26th, and April 30th.

The January session will be dedicated to using Zoom. The rest of the sessions will be open to whatever tools and technologies participants want to try out.

Registration is open and space is still available.

Increasing accessibility of course content: How to create closed-captioned videos

Increasing accessibility of course content: How to create closed-captioned videos

What are closed captions?

Closed captions are a transcription of dialogue that is added to a video or digital presentation and, when turned on, appears as text on the bottom of the screen. The primary purpose of captions is to support people who are deaf or hard-of-hearing. However, captions have also been shown to support the learning of students who speak English as an additional language, students with learning disabilities, and students who are new to a discipline and may be unfamiliar with the jargon and unique terminology.

Share closed-captioned videos with students in four easy steps

Step one: Upload your video to Kaltura MediaSpace

Before you can add closed captions to a video you will need to upload it to your MediaSpace library. If you are unfamiliar with uploading videos, click through the steps below. If you have experience with MediaSpace, skip ahead to find out how to add closed captions.

Step two: Add and edit closed captions in Kaltura MediaSpace

The following video will walk you through the steps of ordering and editing machine-generated closed captions in MediaSpace.

Direct video link: Kaltura MediaSpace: Adding closed captions

Step three: Publish your video in Kaltura MediaSpace

Newly uploaded media is set to Private by default so after adding closed captions, you will need to publish your video.

Setting a video to Unlisted allows you to share your video with students but makes it unsearchable. Setting a video to Published allows you to share your video or make it available in a Channel or playlist.

""Save the changes, and then Click Go To Media to view the video, or Go To My Media to see the video in your MyMedia library.

Step four: Share your video with your students in Brightspace

You are now ready to share your closed-captioned video with students.  In Brightspace, you can insert Kaltura videos anywhere you find the HTML Editor.

Increasing Accessibility of Course Content: Tips for using the Brightspace Accessibility Checker

Increasing accessibility of course content: Tips for using the Brightspace Accessibility Checker

Web Accessibility refers to the inclusive practice of making websites and online content usable by people of all abilities and disabilities. Use the Brightspace Accessibility Checker to identify common accessibility issues on your Brightspace course pages.

How to run the Accessibility Checker

The Check Accessibility button is located on the bottom right of the Brightspace HTML Editor
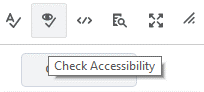
The Accessibility Checker is available within the HTML Editor. When you are in edit HTML mode, the checker is located on the bottom right corner of the Editor, next to the Spellcheck button.

Alternative Text

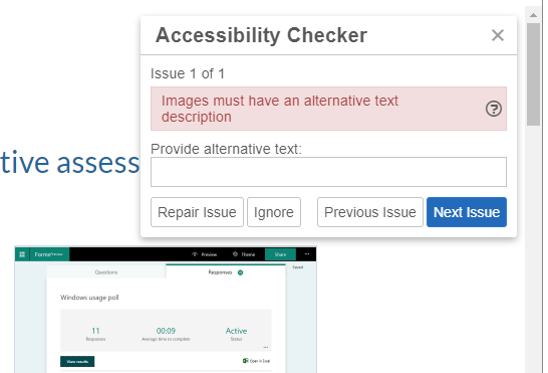
The most common accessibility issue is missing image alternative text (alt text). Alt text is background code added to a digital image that allows a screen reader or other assistive technology to describe the image’s content and meaning to those who cannot see the image or may be unable to process the image due to a cognitive disability. When alt text is missing, the Brightspace Accessibility Checker will flag the issue, noting Images must have an alternative text description.

The Accessibility Checker flags missing alternative text with the message Images must have an alternative text description

How to add alt text

The easiest way to add alt text is to include it when inserting images into a Brightspace page. When you insert an image using the HTML editor, a pop-up appears, prompting you to add alt text. Brightspace add the alt text to the HTML code (e.g., <img src=”filename.jpg” alt=”Example of Microsoft Forms response results.” />).

Treat informative images as decorative by supplying an empty alt attribute or checking the box next to This image is decorative. Brightspace will add alt text of “” to indicate an empty alt attribute.

Brightspace prompts users to add alt text when inserting images

If the Accessibility Checker flags an image as missing alternative text, you can fix the issue by adding alt text inside the report panel or by adding it directly to the HTML code.

Tips for creating alt text

When deciding what to include as alternative text, imagine that you are describing the image aloud over the phone to someone who needs to understand the image.

According to WebAIM, alternative text should:

  • Be accurate and equivalent in presenting the same content and function of the image.
  • Be succinct.
  • Not be redundant or provide the same information as text within the context of the image.
  • Not use the phrases “image of…” or “graphic of…” to describe the image unless the fact that an image is a photograph or illustration, etc. is important content.

WebAIM offers a fantastic guide to creating appropriate alternative text for images.

Note: It is always a good idea to double-check the alt text included in your HTML code. An accessibility checker only indicates whether alt text is included, it cannot check the quality or usability of the alt text.

Contrast

Low colour contrast is another common accessibility issue. Insufficient contrast between the foreground and background reduces readers’ ability to perceive content on the page.

Insufficient colour contrast is flagged by the checher

The W3C Web Content Accessibility Guidelines 2.0 define specific contrast ratios that must be met in order to comply at particular levels. To meet the guidelines, text or images of text must have a contrast ratio of at least 4.5:1 (or 3:1 for large text).

The maximum contrast is black vs. white but other options are available such as navy/white, cream/dark brown, yellow/black, and similar color schemes. A colour scheme is considered legible if it can be read in grayscale/black and white mode.

The Accessibility Checker flags:

  • Large text that does not have a contrast ratio of at least 3:1.
  • Visual presentation that does not have a contrast ratio of at least 4.5:1.

Adjusting contrast

Try using the WebAIM Color Contrast Checker to adjust the contrast by lightening or darkening elements.

Headings

A heading describes the content that follows it, giving uses a sense of the page’s organization and structure. Headings give sighted users a way to quickly find what they want on the page.

If the underlying code for a page’s headings is correct, screen reader users can also benefit from headings. Screen reader and other assistive technology users can also skip from heading to heading.

The checker flags improperly applied heading styles

How to create headings in Brightspace

Select the text then set it to the proper heading using the Format dropdown menu. Do not skip levels. If the heading levels are not in the correct order, the Accessibility Checker will flag the issue.

Tips for creating headings

    • Headings are ranked <h1> through <h6>.
    • Every page should have an H1 heading, representing the most important idea on the page, and sub-sections organized with <h2> level headings. Those sub-sections can themselves be divided with <h3> level headings, and so on.
  • Headings need to be used in the correct order.
  • Do not skip heading levels to be more specific (for example, do not skip from <h2> to <h5>).
  • Do not select heading levels based on their appearance. Select the appropriate heading rank in your hierarchy.

Note: The Brightspace Accessibility Checker will not flag a page without headings; it only flags incorrectly ordered headings. 

Lists

Lists are great from an accessibility standpoint because they provide structured order to content in a linear fashion. Lists are recommended as potential replacements for simple tables, as tables can be more challenging to navigate. Properly code the lists so that they convey the hierarchical content structure to screen reader users. Use unordered lists <ul> when there is no specific order intended for the list you are creating. Use ordered lists <ol> when there is a defined sequence or order for the list.

The checker flags text that appears to be a list but has not been properly styled.

The Brightspace Accessibility Checker will flag items that appear to be a list but do have  unordered or ordered list styles applied.

How to use lists

Select the items, then choose the Unordered List icon if the order does not matter, or select Ordered List from the dropdown menu if it is sequential.

Use bullets for unordered lists and numbers for ordered lists

Descriptive Hyperlink Text

The Accessibility Checker cannot assess whether links are meaningful or accessible; however, making hypertext links accessible is one of the most basic and most important aspects of web accessibility.

How to create a hyperlink

Select Insert Quicklink icon, then select URL in the popup window, enter the URL and a title that describes the link’s destination.

Suggestions for creating meaningful and accessible hyperlinks

  • Link text should be unique within a page, should be meaningful when read out of context, and should help users to know something about their destination if they click on it. Link text such as “Click here” and “More” fail to meet these criteria.
  • Avoid providing two links right next to each other that point to the same location (it can be confusing for screen reader users).

To request help with improving the accessibility of your course content, email edtech@langara.ca

End-of-Semester Sharing Session

On Friday, November 27th from 10:30 until 12:00, Ed Tech is hosting an End-of-Semester Sharing Session and we would love for you to participate. 


How can you participate? 

Share your tool or activity

If you have adopted a tool or educational technology-based activity this semester that is effective for both you and your students and you would like to share it with others, we invite you to share. 

Each Ed Tech tool/activity show & tell can be a few minutes long and up to 5 minutes and requires no formal preparation. If you would like, you can share a screenshot or share your screen to show us your activity, but it’s not absolutely necessary.  

To sign-up as a presenter, email Mirabelle Tinio (mtinio@langara.ca) or Briana Fraser (bfraser@langara) and let us know what tool or activity you plan on sharing. 

Ask questions and help solve issues

If you are looking to solve an issue with a tool or educational technology-based activity, we invite you to attend. 

Through sharing our successes and challenges, we hope to brainstorm solutions we can test next semester. 

To sign-up as an audience member, sign-up on the iWeb event page. 

We hope to see you then. 

New Ed Tech Online Course Assistance Program

Have you heard about Ed Tech’s Online Course Assistants (OCA) pilot program? We have hired and trained three Co-op students who can provide online course support for your department or individual instructors.

Our Co-op students are all hard-working and detail-oriented, with strong technical skills.  They have had specific training on BrightSpace, Kaltura Capture, and Adobe Acrobat, in addition to the technical skills they acquired prior to joining Ed Tech, such as video editing.  They are very keen to take some of the non-teaching and non-marking work off your plate, including helping to get test banks into Brightspace for Fall final exams, and helping you prep your Spring 2021 courses.

Through the OCA pilot program, the OCAs can:

  • help you to organize and populate your courses, making sure there is a consistent look and feel to everything;
  • ensure course links are working, or add in new links;
  • organize your modules and submodules so that students find it easier to navigate the course, with the likelihood that you’ll have less student confusion and fewer inquiries to deal with;
  • turn your printed handouts into interactive PDF fillable files that students can type in and upload to assignment folders – no scanners needed;
  • edit your videos, such as breaking them into chapters and adding titles;
  • assist you with other functions as appropriate.

All we need is content, such as Word or PDF documents or your exam in a Word format and we’ll work with the Online Course Assistants (OCAs) to upload this content to your course. In most situations the OCAs will work in a course that isn’t live, thus protecting your students’ data. If they must work in a live course, they will sign a non-disclosure form.

Taking advantage of the OCA program may help you enjoy your winter break more. Please contact us edtech@langara.ca  to find out more about how we can help.

Who are the OCAs?

Picture of Fredrick Chen

Frederick Chen

Frederick is a 4th year BBA Marketing Management Student. He has worked in technology sales, acquiring advanced knowledge of productivity software and file transfer support, as well as developing excellent customer service skills.  He has advanced Excel skills, as well as experience course building in BrightSpace, and making Adobe fillable files. Frederick is excited about this opportunity to provide support for instructors in their transition to an online teaching environment.

Picture of Michael Cui

Michael Cui

Mike is a 4th year BBA Student. Mike is detail-oriented and highly committed to excellence in project execution.  Well-versed with educational technologies like Brightspace, Kaltura, and Zoom, he also has excellent skills converting handouts into fillable PDF documents. He looks forward to helping relieve some of the pressure instructors are experiencing because of the transition to online course delivery.

Photo of Lily Tran

Lily Tran

Lily is a 4th year accounting student who is proficient in Microsoft Office, BrightSpace, WordPress, and Sage 50, as well as video editing. She has 3 years’ experience as a Langara accounting marker, a position that has honed her attention to detail. She looks forward to helping instructors save time and create a better distant learning experience.

Video Introduction to the OCAs

Video Showcasing OCA Skills

A Curated List of Ed Tech Articles

A Curated List of Ed Tech Articles

""Whether you are on your NID and preparing for the spring semester or you are currently tackling your debut semester teaching remotely online, this list has something useful for you. In this short curated collection of articles, you will find practical tips for the use of educational technology in online classes, lessons learned and opportunities made possible by the pivot to remote teaching and food for thought related to the use of tech for teaching and learning.

Ideas for Remote Online Classes

""“Structuring Synchronous Classes for Engagement” by Bonni Stachowiak suggests how one can structure a 50-minute online synchronous session followed by an after-party office hour.

Zoom to the next level: Active learning in the virtual classroom An openly licensed Pressbook from Indiana University.

From note-taking tools, to online book creation, to 3D modelling tools, you’ll find a plethora of free tech tools in a “Typology of Free Web-based Learning Technologies” by Matt Bower and Jodi Torrington.

“7 High-impact evidence-based tips for remote online teaching” by Youki Terada offers ideas on organizing your virtual learning space and time, and other simple but powerful practices.

Lessons Learned

""The pandemic is forcing many instructors to rethink and sometimes reinvent their teaching practices. Here are one instructor’s reflections:

“What an Ed-Tech Skeptic Learned About Her Own Teaching in the Covid-19 Crisis” by Manya Whitaker

Nine ways online teaching should be different from face-to-face by Jennifer Gonzalez (Cult of Pedagogy podcast).

For certain courses, technology may be a learning outcome, but for most courses, it isn’t, so it’s useful to be reminded that it’s a tool and re-direct our attention to how we can effectively achieve our learning outcomes.

The images gives examples of how technology can be used as a tool, not a learning outcome.